


Want to mix skiing with the smooth glide of ice skating? Skiskating lets you do just that. With compact skates like Snowfeet* Skiskates, you can enjoy the snow without the bulky gear of traditional skis or snowboards. These skates are lightweight, easy to learn, and fit with your regular winter or snowboard boots. Perfect for quick trips to the slopes or snowy trails, making them one of the easiest winter sports for beginners.
Why Snowfeet* Skiskates Work for Beginners:

- Short learning curve: Glide confidently in 15–30 minutes.
- Compact and portable: Weighs just 3.5 lbs per pair and fits in a backpack.
- Affordable: No need for special boots or bulky equipment, ranking among the top snow gear picks for instant fun.
How to Get Started:
- Strap on your Snowfeet* Skiskates and practice balance on flat snow.
- Learn basic gliding by shifting your weight side-to-side.
- Master uphill and downhill techniques with simple V1 and V2 skating moves.
- Use layers, a helmet, and gloves to stay warm and safe.
Snowfeet* Skiskates make it easy to enjoy winter sports without the hassle of traditional skiing. Ready to try? Let’s dive into the details!
Required Gear for Skiskating
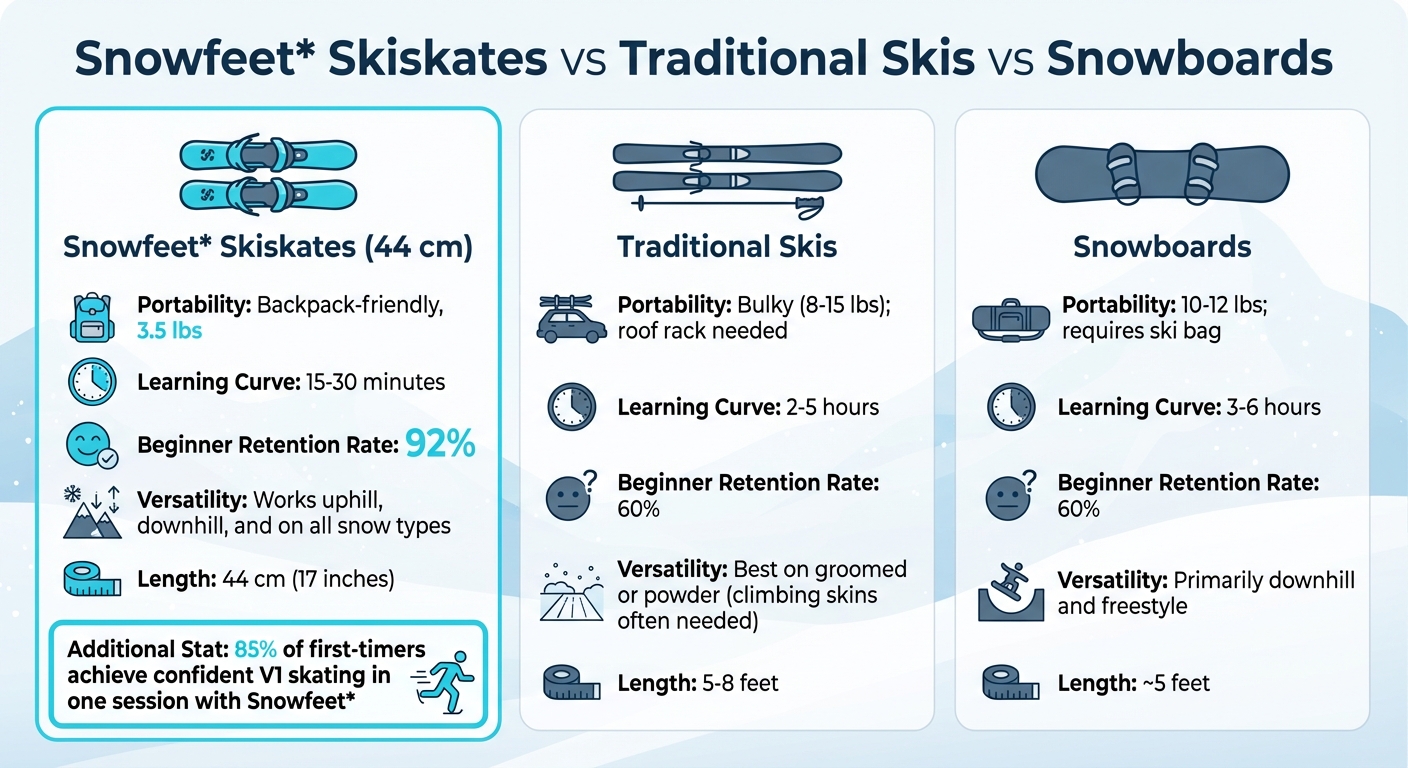
Snowfeet Skiskates vs Traditional Skis and Snowboards Comparison
Getting started with skiskating is refreshingly simple. All you need are Snowfeet* Skiskates (44 cm) and the right clothing layers. Unlike traditional skiing or snowboarding, you can skip the specialized boots, poles, or pricey rental packages. These skiskates weigh just 3.5 pounds per pair and fit into a standard backpack. That means no roof racks, no bulky ski bags - just grab your pack and go. Knowing how to pack for a backcountry day ensures you have all the essentials for safety and performance. This portability makes them perfect for quick trips to the slopes or trails, especially if you're an urban commuter.
Snowfeet* Skiskates vs Traditional Skis and Snowboards
The contrast between Snowfeet* Skiskates and traditional snow gear is huge. Traditional skis are 5 to 8 feet long and weigh between 8 and 15 pounds. Snowboards? Around 5 feet long and 10–12 pounds. In comparison, Snowfeet* Skiskates fit neatly into your backpack.
Learning to use them is also much faster. With Snowfeet*, beginners typically pick up basic gliding in just 15–30 minutes. For skis, it’s 2–5 hours, and for snowboards, it’s 3–6 hours, according to snow sports coaches. A survey found that 85% of first-timers nail confident V1 skating in one session. Snowfeet* also boasts a 92% beginner retention rate after the first try, compared to just 60% for traditional skis and snowboards.
| Feature | Snowfeet* Skiskates (44 cm) | Traditional Skis | Snowboards |
|---|---|---|---|
| Portability | Backpack-friendly, 3.5 lbs | Bulky (8–15 lbs); roof rack needed | 10–12 lbs; requires ski bag |
| Learning Curve | 15–30 min | 2–5 hours | 3–6 hours |
| Versatility | Works uphill, downhill, and on all snow types | Best on groomed or powder (climbing skins often needed) | Primarily downhill and freestyle |
Snowfeet* Skiskates are versatile enough to handle groomed trails, powder, and even icy patches. They let you skate uphill and control your descent without removing bindings. Compare that to traditional skis, which often require climbing skins, or snowboards, which are mainly for downhill rides.
Recommended Accessories and Apparel
To make the most of your skiskating adventures, a few accessories can go a long way:
- Snowfeet* Glide Wax ($15 for a 4 oz jar): Reduces friction and increases speed, with over 20 applications per jar.
- Replacement Straps ($10 per pair): Keep your skiskates secure and comfy.
- Boot Bags ($25): Waterproof and portable (20").
- Edge Guards ($12): Protect your skiskates when not in use.
For clothing, layering is essential to stay comfortable and safe. Start with a moisture-wicking base layer like merino wool ($30–$50), add an insulated mid-layer ($40–$80), and top it off with a waterproof Gore-Tex shell ($100–$200). Don’t forget safety gear like a helmet ($50–$100) and good gloves ($20–$40). These layers will keep you warm and dry in typical U.S. winter temperatures (20–40°F).
With the right gear and apparel, you’ll be fully prepared to enjoy the ease and excitement of skiskating with Snowfeet*.
Step-by-Step Guide to Skiskating for Beginners
Step 1: Getting Fitted and Standing on Snowfeet* Skiskates
First things first - secure your Snowfeet* Skiskates to your winter boots or snowboard boots. Make sure the straps are tight enough to give you solid support, but not so tight that they cut off circulation. Once you're strapped in, find a flat, packed snow surface to stand on. Keep your feet about hip-width apart, and bend your knees and ankles slightly to get into an athletic stance. This position helps you stay balanced by keeping your hips forward. Unlike traditional skis, which can feel a bit stiff, the compact design of skiskates lets you move more naturally. Spend a few minutes shifting your weight from side to side to get a feel for your balance.
Step 2: Basic Gliding and Weight Transfer
Now it’s time to start gliding. Begin on flat terrain by taking small, shuffling steps forward. Focus on shifting your weight from one foot to the other while keeping your torso steady and facing forward. As Charlotte Ogden points out, "The key to skate skiing fast is preserving your forward momentum and letting gravity do all of the work for you, even if you are heading up a hill. To do this, you've got to bend at the ankles and knees to get your hips forward".
Try a simple drill to practice this: place your skiskates in a V-shape, put your hands on your hips, lean forward slightly, and let yourself glide. If you lose momentum, hop lightly to reset and keep going. This drill helps you build muscle memory for smooth weight shifts. Once you’re comfortable, take it up a notch by lifting one foot entirely during each glide before transferring your weight to the other foot. This step lays the groundwork for more advanced techniques.
Step 3: Learning V1 and V2 Skating Techniques
When it’s time to tackle steeper hills, the V1 technique is your best friend. Think of it as your "low gear." In this technique, one skiskate and both poles hit the snow at the same time, giving you the grip you need on inclines. For flatter or gently rolling terrain, switch to the V2 technique, which acts as your "medium gear." With V2, your poles hit the snow just before your skiskate, and each push-off is matched with a pole plant.
To get the hang of these techniques, start without poles. Practice gliding on one skiskate as long as you can before switching to the other. This helps you build balance and control. Once you’re steady, add poles to the mix. Timing is key here - imagine a box between your hips and shoulders to keep your upper body aligned and your power directed forward. The compact design of Snowfeet* makes transitioning between these techniques smoother compared to traditional skis.
Step 4: Turning, Uphill Skating, and Downhill Control
Now that you’ve got the basics down, it’s time to focus on controlling your direction and speed. Turning with Snowfeet* Skiskates is straightforward. To turn left, shift your weight onto your right skiskate and angle your left skiskate in the direction you want to go. Thanks to their compact 44 cm length, quick direction changes are a breeze - something that’s much harder to do with long skis.
For uphill skating, stick with the V1 technique, but pick up the pace with shorter, quicker steps. Keep your posture upright to maintain balance. On downhill slopes, bend your knees more and keep your weight centered over your skiskates. Need to slow down? Widen your V-shape or use a gentle snowplow motion. The sleek design of Snowfeet* gives you excellent control, whether you’re navigating tight spaces or dealing with tricky snow conditions.
sbb-itb-17ade95
Safety Tips and Best Practices
Staying Safe While Learning
First things first: always wear a certified helmet and make sure all your gear fits properly. Safety starts with the right equipment. Stick to terrain that matches your current skill level - this can seriously reduce the chances of falls or collisions. If you're just starting out, flat, groomed areas are your best friend. Gradually move to gentle slopes as you gain confidence. Before you start, take a moment to check for obstacles like rocks or icy spots. Snow conditions can change during the day because of temperature shifts or heavy use, so stay alert.
Dress smartly - layer up with wind- and water-resistant clothing to stay comfortable and protected. Hydration is key, so drink water or sports drinks and skip alcohol or caffeine, which can dehydrate you. When you need a break, find a visible spot off to the side of the slope where you're out of the main flow of traffic. Also, keep your senses sharp - avoid headphones and put your phone away so you can stay aware of your surroundings.
Once you’ve got these basics down, you’ll be ready to focus on building the strength and skills for steady improvement.
Tips for Gradual Progression
Getting stronger and more flexible will make a big difference in your skiskating journey. Low-impact cardio, like brisk walking or biking, is a great way to build stamina. Focus on strengthening your quads, hamstrings, calves, and core muscles - these are the key players when it comes to skiskating. Don’t forget to include stretching in your routine to boost flexibility.
Start each day with a warm-up run on easy terrain to get your muscles ready. Dr. Sandeep Mannava, an orthopedic surgeon, emphasizes:
Fatigue increases the risk of injury by affecting your balance, reaction time, and form.
Listen to your body - rest when you’re tired to keep your balance and reaction time sharp. Set small, manageable goals for every session. For instance, dedicate one day to practicing weight transfer and another to fine-tuning your turns. Snowfeet* Skiskates are compact and easy to use, which can help you make quicker progress compared to traditional snow gear. That said, don’t rush! Taking it slow is crucial for building confidence. If you’re tackling new terrain or exploring an unfamiliar mountain, consider joining a lesson or a guided session to learn safely and efficiently.
Why Snowfeet* Skiskates are the Best Choice for Beginners
If you're new to winter sports, Snowfeet* Skiskates can help you pick up the basics faster than traditional skis or snowboards. Measuring just 44 cm (17 inches), these skiskates are compact enough to fit in a backpack, saving you from lugging around bulky gear. Unlike traditional equipment, which can take time to master, Snowfeet* Skiskates are designed to make learning quick and enjoyable.
Their short length offers incredible control, making it easier to navigate turns and adjust to the snow. Long skis, on the other hand, can feel clunky and overwhelming for beginners. When choosing your gear, it helps to compare skiskates and skiblades to see which compact style fits your needs. With Snowfeet* Skiskates, your movements translate directly, so you can focus on improving your skills instead of battling with your gear. Plus, they work seamlessly with your regular winter boots or snowboard boots - no need to splurge on pricey ski boots right away. These features make Snowfeet* Skiskates a fantastic starting point for anyone eager to try skiskating.
Key Takeaways
Snowfeet* Skiskates are all about making winter sports approachable. Here's why they stand out for beginners:
- Lightweight and portable, with a length of just 44 cm, they’re easy to carry and handle.
- Their forgiving design helps build confidence while keeping the learning curve short.
- You can use them with your existing winter boots or snowboard boots, saving money on extra gear.
To get started, try practicing on flat terrain, focus on shifting your weight smoothly, and gradually tackle steeper slopes as your skills improve.
Where to Purchase Snowfeet* Skiskates
Ready to give them a shot? Snowfeet* Skiskates (44 cm) are available for $575 on the official Snowfeet* store. The store also offers accessories like replacement straps (starting at $6), maintenance wax, and winter apparel to round out your setup. Whether you're ready to dive in or just exploring your options, the site has everything you need to start your skiskating adventure.
FAQs
Can I use Snowfeet* Skiskates on ski resort trails?
Snowfeet* Skiskates are built for skating techniques on snow-covered, flat surfaces. They’re not meant for ski resort trails with packed snow or groomed slopes. The terrain at resorts is better tackled with traditional skis or snowboards. If your goal is to skate on snow, though, Snowfeet* Skiskates shine in that specific setting.
What boot types fit Snowfeet* Skiskates best?
Snowfeet* Skiskates work with a range of boots, from lightweight winter options to dedicated skiskate boots. To get the most out of them, go for boots that fit snugly but still feel comfortable, and make sure they offer solid ankle support. The bindings on Snowfeet* are built to be both easy to use and versatile, making them an excellent choice for beginners or anyone looking for an alternative to traditional ski or snowboard boots.
How do I stop safely on steeper hills?
Stopping on steeper hills with Snowfeet* Skiskates can be done safely with a bit of technique and practice. Start by reducing your speed through controlled, gentle turns or by making side steps. For added control, try shifting your weight slightly backward and applying light pressure to the tails of the skiskates.
Another effective method is using a controlled side slide or the classic snowplow technique. Thanks to their compact design, Snowfeet* Skiskates are easier to maneuver and offer more stability compared to traditional skis, which can make stopping less intimidating for beginners.
Don’t forget to wear protective gear and take time to practice these techniques on flat terrain before tackling steeper slopes.


Leave a comment
This site is protected by hCaptcha and the hCaptcha Privacy Policy and Terms of Service apply.