


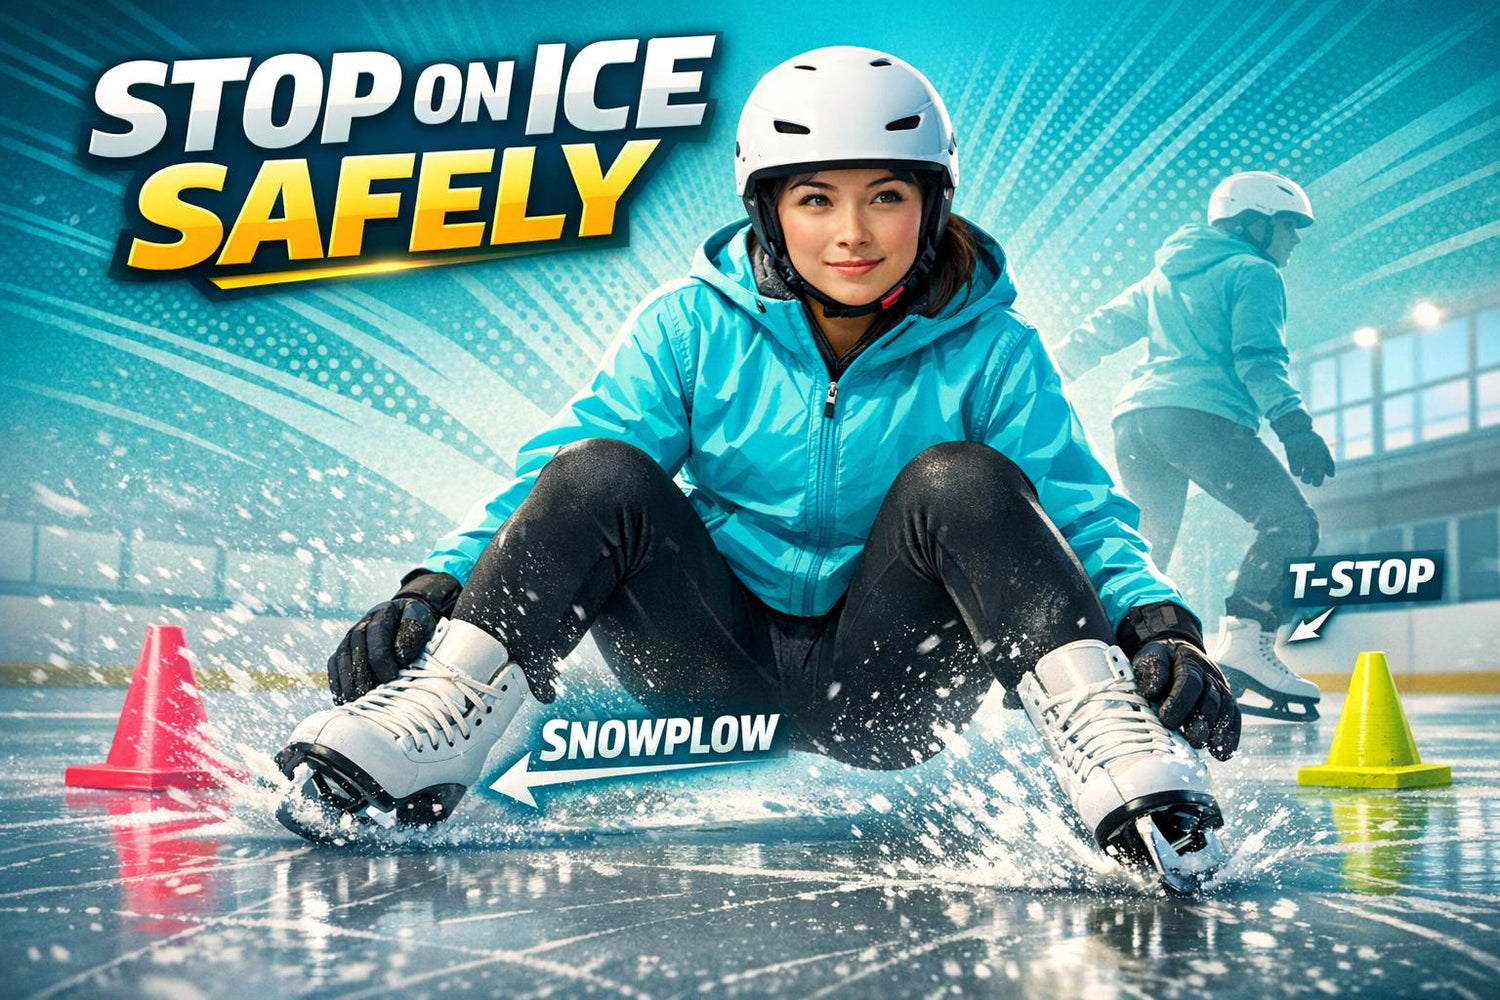
Learning to stop on ice skates is a must for beginners. Skating is fun, but without knowing how to stop, things can go south fast - falls, injuries, or just plain embarrassment. The good news? Stopping safely is simpler than you might think, and it all starts with mastering the Snowplow Stop - the easiest, most stable technique for beginners.
Here’s the gist:
- Snowplow Stop: Glide forward, bend your knees, and angle your skates into a "V" shape to create gentle friction and slow down.
- T-Stop: Once you're confident, try this one-footed stop for better control and balance as you progress.
- Common Mistakes: Avoid leaning back, flailing your arms, or pressing your skates too hard into the ice.
Practice drills like gliding slowly, using the rink boards for support, and gradually increasing pressure on your blades. Gear matters too - securely tied skates with slightly dulled edges can make learning smoother.
Stopping isn’t just about safety - it’s about confidence. Take it slow, stay balanced, and you’ll be skating like a pro in no time. :)
HOW TO STOP ON ICE SKATES - Ice Skating Tips!
The Snowplow Stop
Stopping on ice can be intimidating for beginners, but the snowplow stop is here to save the day. It’s the go-to technique for new skaters because it keeps things simple and stable - no fancy moves or tricky footwork required. All you need is a little practice and a basic understanding of how to angle your skates into an inverted "V" shape. Picture your toes pointing inward and your heels pushing outward. This creates just the right amount of friction to slow you down safely.
"The snowplow stop is the easiest stop to master." - Learn to Skate USA® Blog
What makes this technique beginner-friendly? It’s all about balance. Instead of relying on one foot or sudden weight shifts, you’re stopping from a steady, two-foot glide. The focus is on controlling your blade angles and applying gentle, gradual pressure - no sharp turns or advanced tricks like the hockey stop, which can feel overwhelming at first.
The trick lies in using the inside edges of your blades to "shave" the ice. Think of it like this:
"Imagine you're scraping the icing off a cupcake without damaging the cake itself." - Learn to Skate USA®
This smooth, controlled motion helps you slow down without losing balance or feeling jolted. It’s a gradual process that’s perfect for building confidence.
How to Do a Snowplow Stop
The snowplow stop is easy to break down into three steps: Glide, Bend, Slide.
- Glide: Start by skating forward at a relaxed pace. Keep your feet about shoulder-width apart for stability.
- Bend: Lower into a slight crouch by bending your knees. This helps you stay balanced. Keep your chest upright and your weight centered - don’t lean too far forward or backward.
- Slide: Point your toes inward and push your heels outward to form a "V" shape. Use the inside edges of your blades to create friction. Start with light pressure and gradually increase it. Too much pressure too quickly might make your skates catch, while too little won’t slow you down enough.
"If you press your edges too hard, you'll stop yourself from sliding. If you don't press hard enough, you'll never slow down." - Learn to Skate USA® Blog
Keep your knees soft and slightly bent throughout the process. This helps absorb vibrations and keeps your center of gravity low. As you build friction, you’ll come to a smooth stop while staying balanced.
Why the Snowplow Stop Works for Beginners
For new skaters, balance is everything. Unlike the T-stop, which requires shifting weight onto one leg, the snowplow stop keeps both feet on the ice, providing a wider, more stable base. This makes it a much more approachable technique when you’re still finding your footing.
Another perk? The snowplow stop is all about gradual control. Instead of coming to an abrupt halt like with a hockey stop, you slow down bit by bit. This gives you time to adjust and stay steady, making the whole process feel less intimidating. Plus, the movements - bending your knees, pushing your heels out, and applying steady pressure - are easy for beginners to pick up.
Drills to Practice the Snowplow Stop
If you’re ready to master the snowplow stop, here are a few drills to get you started:
- Board Shave: Stand facing the rink wall and hold onto the boards for support. Bend your knees and practice pushing one blade outward to "shave" the ice. You’ll know you’re doing it right when you see a little pile of snow form.
- One-Hand Progression: Once you’re comfortable, glide slowly along the wall while holding it with one hand. Practice the shaving motion as you move to get a feel for applying the right amount of pressure.
- Open Ice Practice: Find a quiet spot on the ice where you can focus without distractions. Start with slow glides and gradually increase your speed as you gain confidence.
- Stationary Friction Drill: Stand still and alternate pushing each foot sideways against the ice. This helps you find the sweet spot between smooth sliding and creating enough friction.
"Just remember: Glide. Bend. Slide." - Learn to Skate USA®
Before you hit the ice, make sure your skates are properly tied all the way to the top for good ankle support. Also, if your skates are freshly sharpened, consider practicing with slightly dulled edges - they can make it easier to get the hang of the sliding motion.
Once you’ve nailed the snowplow stop, you’ll be ready to move on to more advanced techniques like the T-stop. But for now, enjoy the confidence boost that comes with mastering this beginner-friendly skill!
The T-Stop Method
After you've nailed the snowplow stop, it’s time to step up your game with the T-stop. Unlike the two-footed snowplow, the T-stop pushes your balance skills to the next level, as it relies on one-foot stability. Here’s the gist: one skate glides forward while the other drags behind, creating friction to slow you down. Think of it as a smoother, less abrupt version of a hockey stop - perfect for beginners who aren't quite ready for sharp, high-impact moves.
The name comes from the shape your feet make during the move: your front skate glides straight ahead, while your back skate sits perpendicular behind it, forming an upside-down "T." The trick here is mastering balance and edge control. You’ll need to feel comfortable gliding on one foot while managing how your weight shifts between both skates.
The T-stop follows the familiar rhythm of Glide, Bend, Slide, but with a twist: you shift your weight to drag one skate behind you. Let’s break it down step by step.
How to Do a T-Stop
- Start with a steady glide: Skate forward at a slow to medium pace on a straight path. Make sure you feel stable before attempting the stop. Bend your knees deeply to lower your center of gravity, which helps with balance.
- Position your trailing foot: Shift one foot behind your leading skate. Place the middle of the back skate's blade near the heel of the front skate, forming a "T" shape. If a full 90-degree angle feels tricky, start with 45 degrees to ease into it.
- Drag the back skate: Apply light pressure with your trailing skate’s blade as you drag it along the ice. Gradually increase the pressure to create enough friction to slow down. Be careful not to press too hard too quickly - this can cause your blade to catch - or too lightly, as that won’t slow you down much.
- Keep your upper body steady: Your shoulders should stay square and facing forward to keep you gliding in a straight line. If your trailing skate angles incorrectly or your core isn’t engaged, you might accidentally veer off into a circle.
- Engage the correct edge: Press the pinky toe of your trailing foot into the ice. This activates the outside edge of the blade, which makes the drag smoother and prevents the skate from skipping or chattering across the ice.
Improving Balance for the T-Stop
Once you’ve got the basic motion down, focus on building stability with a few simple drills.
- Practice at the boards: Hold onto the rink boards and work on the "shaving" motion with your back foot. This helps you feel how much pressure is needed to slide the blade smoothly without catching an edge.
- Glide with support: Try skating slowly along the wall with one hand on the boards while dragging your back skate. This gives you extra stability as you refine the motion.
- Focus on posture: When you’re ready to try it on open ice, keep your chin up and look ahead - not down at your feet. Looking down can throw off your balance. Engage your core and keep your torso upright for better control.
- Adjust your edges: If you’re struggling with choppy slides, slightly dulled skate edges can make the motion easier to manage. And don’t forget to practice with both feet trailing - you’ll want to be comfortable stopping on either side.
With time and practice, the T-stop will become a smooth, reliable way to stop at any speed. Plus, it’s a great stepping stone to mastering more advanced techniques!
Common Mistakes and How to Fix Them
Common Ice Skating Stopping Mistakes and How to Fix Them
Learning to stop on ice skates can be tricky, even for those who’ve been skating for a while. Mistakes happen, but the good news is they’re usually easy to correct once you know what’s going wrong. Let’s break down some of the most common errors and how to fix them.
One big issue is overextending your posture because of nervousness. It’s natural to stiffen up when you’re afraid of falling, but staying rigid actually throws off your balance. Instead, try bending your knees into a half-crouch. Picture yourself sitting into an invisible chair - this keeps your weight low and your balance steady.
Another common habit is staring down at your feet. Sure, it feels like watching your skates will help, but it actually disrupts your balance. Instead, keep your head up and focus on a point straight ahead. This aligns your spine and helps you stay upright.
Then there’s the issue of applying too much pressure too quickly. If you push hard into the ice, your blade can catch or bite, which might send you flying. Instead, think of it like gently scraping frosting off a cake - apply light, gradual pressure until you find the right amount of friction to slow down smoothly.
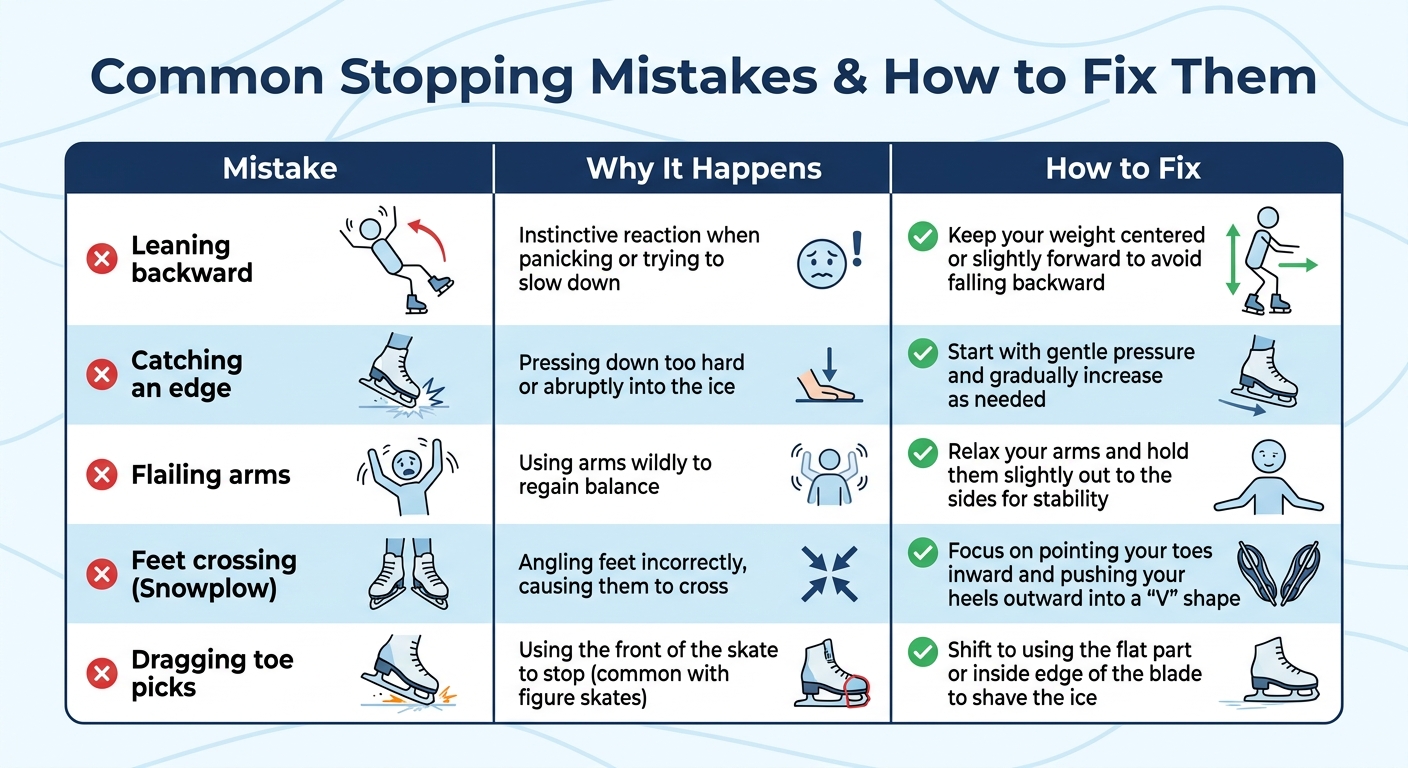
Here’s a quick-reference table to help you troubleshoot and fix these common stopping mistakes:
Mistakes and Solutions
| Mistake | Why It Happens | How to Fix |
|---|---|---|
| Leaning backward | Instinctive reaction when panicking or trying to slow down | Keep your weight centered or slightly forward to avoid falling backward |
| Catching an edge | Pressing down too hard or abruptly into the ice | Start with gentle pressure and gradually increase as needed |
| Flailing arms | Using arms wildly to regain balance | Relax your arms and hold them slightly out to the sides for stability |
| Feet crossing (Snowplow) | Angling feet incorrectly, causing them to cross | Focus on pointing your toes inward and pushing your heels outward into a "V" shape |
| Dragging toe picks | Using the front of the skate to stop (common with figure skates) | Shift to using the flat part or inside edge of the blade to shave the ice |
These tips will help you tweak your technique and build confidence on the ice. Remember, practice makes perfect, so keep at it!
sbb-itb-17ade95
Why Snowfeet* Mini Ski Skates Make Stopping Easier

Getting the hang of safe stopping can feel tricky, but upgrading your gear can make a big difference. If you’ve struggled with traditional ice skates, Snowfeet* Mini Ski Skates might be a better fit. Their compact design and special features give beginners an edge when it comes to controlling speed on ice or snow.
Snowfeet* vs. Traditional Ice Skates
Traditional ice skates require precise control and balance, which can take a while to master. With just a thin blade underfoot, even small mistakes can throw you off. Snowfeet* Mini Ski Skates, on the other hand, offer a wider platform that helps spread out your weight, giving you more stability. Instead of depending entirely on blade angle, you get a more forgiving setup.
Their lightweight design makes it easier to adjust quickly, especially when performing a snowplow stop. Plus, the built-in heel brake - similar to what you’d find on inline skates - adds an extra tool for slowing down.
Snowfeet* vs. Long Skis
Now, let’s talk about skis. Traditional long skis can be a challenge for beginners. They’re bulky, harder to turn, and require more effort to maneuver. Snowfeet* Mini Ski Skates, which range from 15 to 39 inches, are much shorter than the typical 59-inch (or longer) skis.
"Super easy to control, quick to turn, and way more forgiving than traditional skis." - Brad Tolin
This smaller size makes stopping a breeze. Whether you’re trying a snowplow or a T-stop, you won’t have to wrestle with the length of a traditional ski. The shorter design responds faster, so changing direction or slowing down takes less energy.
With over 50,000 riders worldwide and a 4.9 out of 5-star rating from more than 5,500 verified reviews, Snowfeet* users often report feeling comfortable after just a few runs. In fact, many say it takes only about 5 minutes to get the hang of it - much quicker than the time needed to master traditional skis. These features not only make stopping easier but also help build confidence for new riders.
Building Confidence Through Practice
Learning how to stop effectively takes practice, patience, and a step-by-step approach. Start with simple drills and gradually build your skills. Using Snowfeet* gear can help you feel more stable and in control, making the learning process smoother. Here's a breakdown of the steps to help you gain confidence and master reliable stopping techniques.
Practice Plan for Beginners
Begin with Phase 1: Stationary Board Practice. Stand still and practice pushing one blade outward to shave off a thin layer of snow. Once that feels natural, try a one-hand drill to add some movement and get used to the feeling.
Next, move on to Phase 2: Low-Speed Snowplow Stops. Find a clear, obstacle-free area. Start by skating forward slowly, then glide with both feet. Point your toes inward and push your heels outward to create an upside-down "V" shape. Gradually apply pressure until you come to a stop.
When you're comfortable with the snowplow stop, it's time for Phase 3: Developing the T-Stop. This drill builds on your earlier skills and focuses on balance. Start by gliding on one foot to ensure you're steady. Then, position your free foot behind your standing foot at a 90-degree angle to form a "T." Lightly drag the back foot, applying friction with the pinky toe side of the blade. Practice this on both sides to improve balance and control evenly.
Safety Tips for Practice Sessions
- Wear protective gear, including a helmet, knee pads, elbow pads, and wrist guards.
- Make sure your skates are tied securely to support your ankles and reduce the risk of injury.
- Practice in an open, obstacle-free area to prevent collisions.
- Only attempt stops at a pace you're comfortable with. If you feel out of control, focus on regaining balance before trying to stop.
- Apply pressure gradually when practicing stops - pressing too hard too quickly can cause your blade to catch, leading to a fall.
Conclusion
Learning how to stop properly is a game-changer for safe and confident skating. Start with the snowplow stop - it’s a great way to build a solid foundation. This two-foot technique teaches you how angling your blades creates friction to slow you down. Once you’ve got that down, the T-stop is the next step. It helps you work on one-foot balance and gets you ready for more advanced moves.
Pay attention to the pressure you apply. Too much, and your blade might catch; too little, and you won’t stop effectively. Keep things smooth and steady to maintain control.
If you’re still finding your footing, the right gear can make a big difference. For example, Snowfeet* mini ski skates might be easier to handle than traditional ice skates. Their shorter blades make them more maneuverable, which can speed up your progress. Plus, their compact design makes them ideal for practicing edge control and weight distribution - key elements of both the snowplow and T-stop.
Make sure to practice regularly in a safe, open space while wearing your helmet and pads. Start slow, focus on mastering the basics, and gradually build up your speed as you gain confidence. With patience and practice, stopping will feel natural, letting you skate with ease and assurance.
FAQs
How do I stop if I’m going too fast?
To stop safely while skating at high speeds, beginners can try the snowplow stop. This technique helps you slow down in a controlled way. Here's how to do it:
- Start by gliding with both feet.
- Bend your knees to lower your center of gravity - it helps with balance.
- Push into the inside edges of your skates and angle your heels outward. This creates a gentle skid that slows you down until you come to a stop.
Practice this a few times to get comfortable, and soon it’ll feel natural!
Which stop is safer for beginners: snowplow or T-stop?
The snowplow stop is a great choice for beginners because it’s both safer and easier to learn compared to the T-stop. To do it, you turn your toes inward to create a V shape and press down on the inside edges of your blades. This technique lets you slow down gradually and stay in control.
On the other hand, the T-stop is more advanced. It demands better balance and coordination, making it a better fit for experienced skaters. Since it’s trickier to pull off, there’s also a higher chance of losing control if it’s not done right.
Do duller skate edges really make stopping easier?
Yes, having duller skate edges can make stopping easier. The increased friction between the blades and the ice gives beginners more control, making it simpler to come to a smooth stop without sliding around.


Leave a comment
This site is protected by hCaptcha and the hCaptcha Privacy Policy and Terms of Service apply.