


Learning to ski doesn’t have to take weeks. The secret? Shorter, more responsive gear like Snowfeet* Skiblades and Skiskates. Unlike long, heavy skis that demand strength and technique, these compact options are easier to control, helping beginners master skiing basics in just a few days. Here’s why they work:
- Shorter Length: Easier to turn and stop, perfect for beginners.
- Lightweight Design: Less fatigue, more fun.
- Affordable: Prices start at $250, much lower than traditional setups.
- Portability: Fits in a backpack - no bulky ski bags needed.
With Snowfeet*, you’ll focus on enjoying the slopes instead of struggling with your gear. Whether it’s your first time on snow or you’re looking to speed up your learning curve, this gear is designed to make skiing fun and approachable. Let’s dive into how it works and what you need to get started.
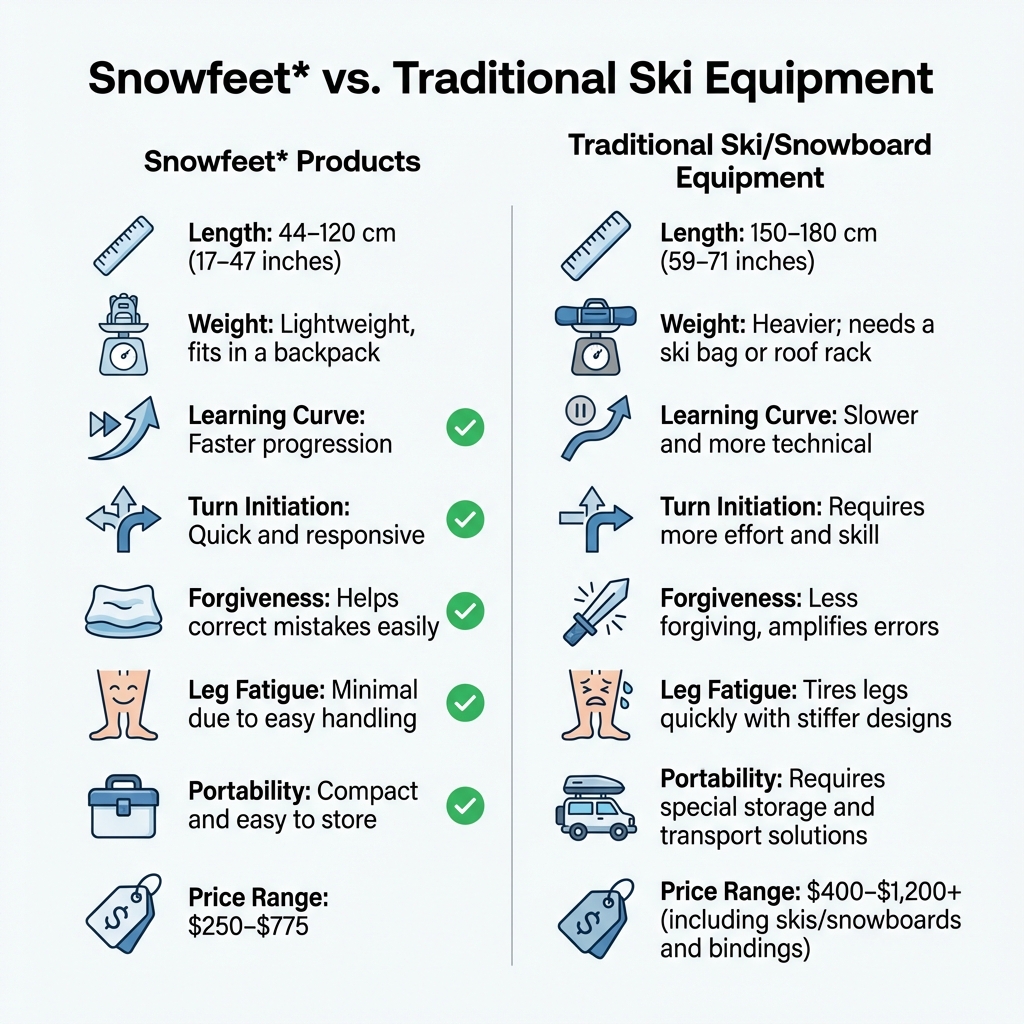
Snowfeet vs Traditional Ski Equipment Comparison Chart
How Snowfeet* Makes Learning Faster Than Traditional Skis

Why Shorter Skis Give You Better Control
Traditional skis, often over 5.5 ft (170 cm) in length, demand more energy and precision, making it easier for mistakes to pile up. On the other hand, shorter skis like Snowfeet* Skiblades (65 cm, 99 cm, 120 cm) and Skiskates (44 cm) respond almost instantly and require much less effort to turn or stop.
Will Chaltas, a PSIA-certified ski instructor, puts it simply:
"Softer skis are easier to bend, making them forgiving and playful."
This same idea applies to ski length. Shorter skis are more flexible and forgiving, helping beginners correct errors and experiment more freely. In contrast, longer, traditional skis can delay your movements, making it tougher to stay in control.
Interestingly, even beginner skis from brands like Rossignol, Salomon, and K2 are often designed with extra stiffness. Chaltas explains:
"A longer ski of the same model will naturally feel stiffer."
This stiffness can lead to faster leg fatigue and slower progress for learners. Snowfeet* products, with their shorter length and responsive design, offer quick turn initiation and less strain, giving beginners a smoother and more enjoyable experience.
Snowfeet* vs. Traditional Ski Equipment
Here’s a side-by-side look at how Snowfeet* stacks up against traditional skis and snowboards:
| Feature | Snowfeet* Products | Traditional Ski/Snowboard Equipment |
|---|---|---|
| Length | 44–120 cm (17–47 inches) | 150–180 cm (59–71 inches) |
| Weight | Lightweight and fits in a backpack | Heavier; needs a ski bag or roof rack |
| Learning Curve | Faster progression | Slower and more technical |
| Turn Initiation | Quick and responsive | Requires more effort and skill |
| Forgiveness | Helps correct mistakes easily | Less forgiving, amplifies errors |
| Leg Fatigue | Minimal due to easy handling | Tires legs quickly with stiffer designs |
| Portability | Compact and easy to store | Requires special storage and transport solutions |
| Price Range | $250–$775 | $400–$1,200+ (including skis/snowboards and bindings) |
One standout feature of Snowfeet* gear is its portability. You can toss a pair of Skiskates into your car trunk or even pack them in your luggage. Compare that to traditional skis, which often need a roof rack or a dedicated storage solution, and the convenience becomes clear.
What You Need Before Your First Day with Snowfeet*
Physical and Mental Preparation
Getting ready for Snowfeet* isn’t just about having the right gear - it’s also about preparing your body and mind. Physical conditioning plays a huge role, and starting about six weeks before your first day can make a big difference.
Start with your legs. Your quads, glutes, and hamstrings work together to control your movements, so keeping them balanced is key. As Jake Hutchinson, an Avalanche Professional and Certified Instructor, points out:
"Many knee injuries are a result of our quads over-powering or being out of balance with the other major muscle groups in our legs."
To strengthen your legs, try exercises like air squats, alternating lunges, wall sits (aim for 2 minutes), and jumping squats. Don’t forget your core - it’s the foundation for all movement. Hutchinson explains:
"A strong, stable core dictates everything else we do. You can have the strongest legs in the world but if they are attached to a bowl of Jell-O you will be unable to utilize all of that strength."
Core exercises such as 1-minute planks, mountain climbers, and sit-ups will help you stay stable and in control. Add three 30-minute cardio sessions each week - running, cycling, or hiking are great options - to build endurance and avoid that late-day fatigue that can lead to injuries. Always start your workouts with a 5–10 minute brisk walk to warm up, and cool down afterward to reduce soreness and flush out toxins.
Once your body is ready, the next step is setting up your Snowfeet* gear to ensure a smooth experience on the slopes.
Setting Up Your Snowfeet* Gear
One of the coolest things about Snowfeet* is that you don’t need to splurge on special boots. They’re designed to work with your regular winter shoes, snowboard boots, or ski boots. Setup is simple, but proper adjustments are key for safety and performance.
Make sure your boots or shoes fit snugly in the bindings. A tight, supportive fit ensures your movements transfer directly to the edges, giving you better control. Adjust the straps and bindings until everything feels secure.
Avoid common mistakes like leaving too much wiggle room, which can reduce control, or overtightening, which can tire you out faster. Dialing in the right fit is all about balance. Snowfeet* products range from $250 to $775 and come ready to use - no complicated setup required. Just strap in and you’re good to go!
How to Learn Skiing Basics with Snowfeet*
Days 1-2: Stopping and Balance with Skiskates
Start your skiing journey with Snowfeet* Skiskates (44 cm), priced at $199. Their compact size gives you a lower center of gravity and easier edge control compared to traditional skis. For the first two days, focus on mastering balance and stopping techniques. Stick to flat terrain or gentle slopes (under 10°) to build confidence.
Day 1 is all about balance. Stand with your feet shoulder-width apart, keep your knees bent, and shift your weight slightly forward over your toes. Spend 30–60 minutes practicing balance drills and controlled glides on flat ground. Next, learn the snowplow stop by pushing your heels outward into a V-shape while leaning back just enough to engage the edges. Aim to stop completely within 10 feet. The short length of skiskates makes it easier to recover from mistakes without the momentum of longer skis.
On Day 2, reinforce what you learned. Practice gliding and stopping until you can stop from a speed of 5 mph within 5 feet. By the end of the day, you should be able to glide steadily for up to five minutes. With these basics down, you'll progress much faster than you would with full-length skis - two to three times faster, in fact.
Once you’ve nailed stopping and balance, you’re ready to take on turning techniques using Skiblades.
Days 3-5: Making Turns with Skiblades
After building control with Skiskates, it’s time to step up to Snowfeet* Skiblades. These come in two sizes: the 65 cm model ($249) for maximum control or the 99 cm model ($289) for those who want a bit more speed. Over the next three days, you’ll focus on turning techniques, progressing steadily.
Day 3 introduces the uphill christie. On a gentle slope (10–15°), practice five uphill christie turns on each side. This will help you get comfortable with initiating turns. On Day 4, move to downhill garlands. Glide straight and then arc across the slope without crossing over, practicing weight transfers. Aim for 10 repetitions. By Day 5, you’ll be ready for continuous S-turns. Work on completing 20 in a row, focusing on shifting your weight over your hips to carve smoothly instead of skidding.
The learning curve with Snowfeet* is noticeably faster. As a PSIA-certified instructor from Vail Resorts puts it:
"Short blades teach balance intuitively, like inline skates on snow - turns in days, not weeks."
sbb-itb-17ade95
Beyond the Basics: Using Snowfeet* on Different Terrain
Using Snowfeet* on Slopes, Powder, and Parks
Once you've nailed the basics, it's time to see what Snowfeet* can do across different terrains. These compact skis are designed to adapt, taking you from beginner slopes to more challenging runs with ease. On groomed slopes, the 120 cm Short Skis (priced from $775) offer precise carving and steady control, even at higher speeds. To handle steeper inclines, shift your weight forward - riders often report mastering slopes with 20–30° pitches in just 2–3 runs.
For powder enthusiasts, the 99 cm Snowfeet* POWDER ($675) is the go-to choice. Its wider design keeps you floating on top of the snow rather than sinking in. To make the most of these, keep your knees bent, your weight slightly back, and focus on quick edge adjustments for smooth, controlled turns. This centered stance reduces fatigue by 30–40% compared to longer skis, thanks to their shorter length and ability to pivot quickly. When transitioning from groomed trails to powder, retract your poles and use your ankles to smoothly engage the edges while maintaining speed.
If park riding is your thing, Snowfeet* really shines here. The 120 cm Short Skis, weighing under 5 lbs per pair, make spins, 180s, and 360s feel more manageable. Start small with ollies to get a feel for the air, then move on to low-speed rail slides while keeping a crouched stance for better balance. Park riders have noted they can land twice as many tricks in a session, thanks to the gear's agility and quick recovery after falls. For icy park conditions or gentle slopes, the Skiskates (44 cm, starting at $575) perform exceptionally well, offering skate-like control for sharp stops and quick pushes.
No matter the terrain, keeping your Snowfeet* gear in top shape is essential for peak performance.
Caring for Your Snowfeet* Equipment
With the right care, your Snowfeet* gear can last for three or more seasons, outlasting many traditional skis. After a powder day, rinse your gear with lukewarm water to remove snow and debris, then dry it completely. To keep the bases in good condition, apply Snowfeet* universal wax (a hydrocarbon wax suitable for all temperatures, starting at $6) every 3–5 uses. This simple step can boost glide performance by 15% in powder conditions. For even better results, consider a hot wax treatment every four rides.
If you're hitting the park, check your edges daily and sharpen them as needed. Replace the nylon straps ($6) at least once per season or after 50 uses to ensure they stay secure, even after frequent falls. A quick weekly inspection can help you catch small problems early, potentially extending your gear's life by 25–50% compared to equipment that's left unchecked. Unlike traditional skis, which often need professional tuning, Snowfeet* products are easy to maintain at home with minimal tools.
How to Ski in a Day | 20 Tips
Why Snowfeet* is the Best Option for Learning to Ski
Snowfeet* is a game-changer for anyone starting out with skiing. Traditional skis, with their large size and stiffness, can feel overwhelming for beginners. Snowfeet*, on the other hand, is designed to make learning fast and fun. With lengths ranging from 44 cm to 120 cm, this gear offers incredible maneuverability and flexibility, making it easier to correct mistakes and pick up skills quickly.
Another big win for Snowfeet* is its portability. Forget about lugging around heavy, awkward equipment. This lightweight, compact gear is easy to pack, store, and transport. No more struggling with bulky ski bags - just grab your Snowfeet* and hit the slopes. Plus, it’s budget-friendly. Prices start at $250 for the Snowfeet Mini Ski Skates (38 cm, or about 15 inches) and go up to $775 for the 120 cm Short Skis. It’s an affordable way to dive into skiing without breaking the bank.
What really sets Snowfeet* apart is how beginner-friendly it is. The narrower design requires less effort to control, which means you can focus on improving your technique rather than fighting with your gear. While traditional ski schools often suggest shorter skis for beginners, Snowfeet* takes it a step further by creating equipment tailored for quick learning and instant fun.
Curious about which model suits you best? Head over to the official Snowfeet* site to explore your options!
FAQs
Which Snowfeet* size should I start with?
When choosing the right Snowfeet* size, it’s all about finding what matches your height and skill level. If you’re just starting out, shorter options like the 65 cm or 99 cm Skiblades are great - they offer a good balance of control and stability. For those who want something compact and easy to handle, the 44 cm Skiskates are an excellent pick. On the other hand, taller individuals or those with more experience might lean towards the 99 cm or even the 120 cm Skiblades for greater versatility.
Can I use Snowfeet* with my regular winter boots?
Snowfeet* products are made to pair with most standard winter boots. The key is to choose boots that offer solid ankle support and fit snugly. To get the most out of your Snowfeet*, make sure your boots are not only comfortable but also work well with the Snowfeet* bindings. Always double-check the product details to ensure everything is compatible before hitting the snow.
Are Snowfeet* safe on steeper or icy slopes?
There’s no detailed information about how safe Snowfeet* are on steeper or icy slopes. Like with any skiing gear, it’s crucial to stay cautious and adapt your technique depending on the terrain and weather conditions.


Leave a comment
This site is protected by hCaptcha and the hCaptcha Privacy Policy and Terms of Service apply.