


Backcountry ski camping with a tent is totally doable - and it’s an amazing way to escape crowded slopes and enjoy untouched winter landscapes. But here’s the deal: it’s not as simple as a day trip. You’ll need the right gear, solid planning, and a few clever tricks to keep warm, dry, and safe.
Key Takeaways:
- Lightweight gear is your best friend. Compact options like Snowfeet WALKSKI Backcountry Touring Skis (100 cm) make uphill climbs and tight trails easier, weighing only 6.9 lbs per pair (wood-core version). Bonus: they work with your regular winter boots.
- Winter camping requires smart prep. A four-season tent, insulated sleeping bag, and layered clothing are non-negotiable for staying warm. Pro tip: pack two sleeping pads for extra insulation and use a Nalgene bottle filled with hot water as a mini heater.
- Safety first. Always carry avalanche gear (beacon, probe, shovel) and know how to use it. A satellite communicator like a Garmin inReach can be a lifesaver in remote areas.
Ready to learn how to set up camp, pack efficiently, and handle winter’s challenges? Let’s dive in.
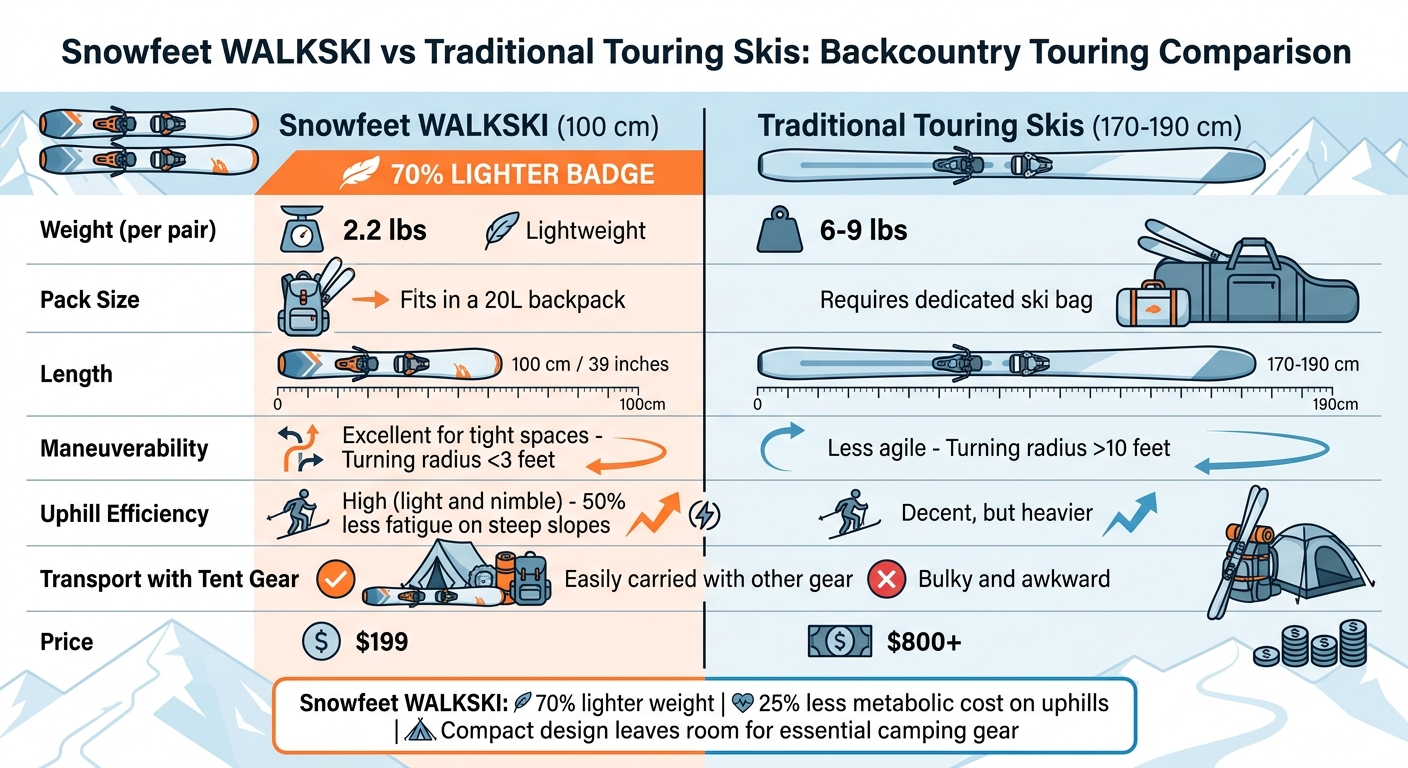
Snowfeet WALKSKI vs Traditional Touring Skis Comparison
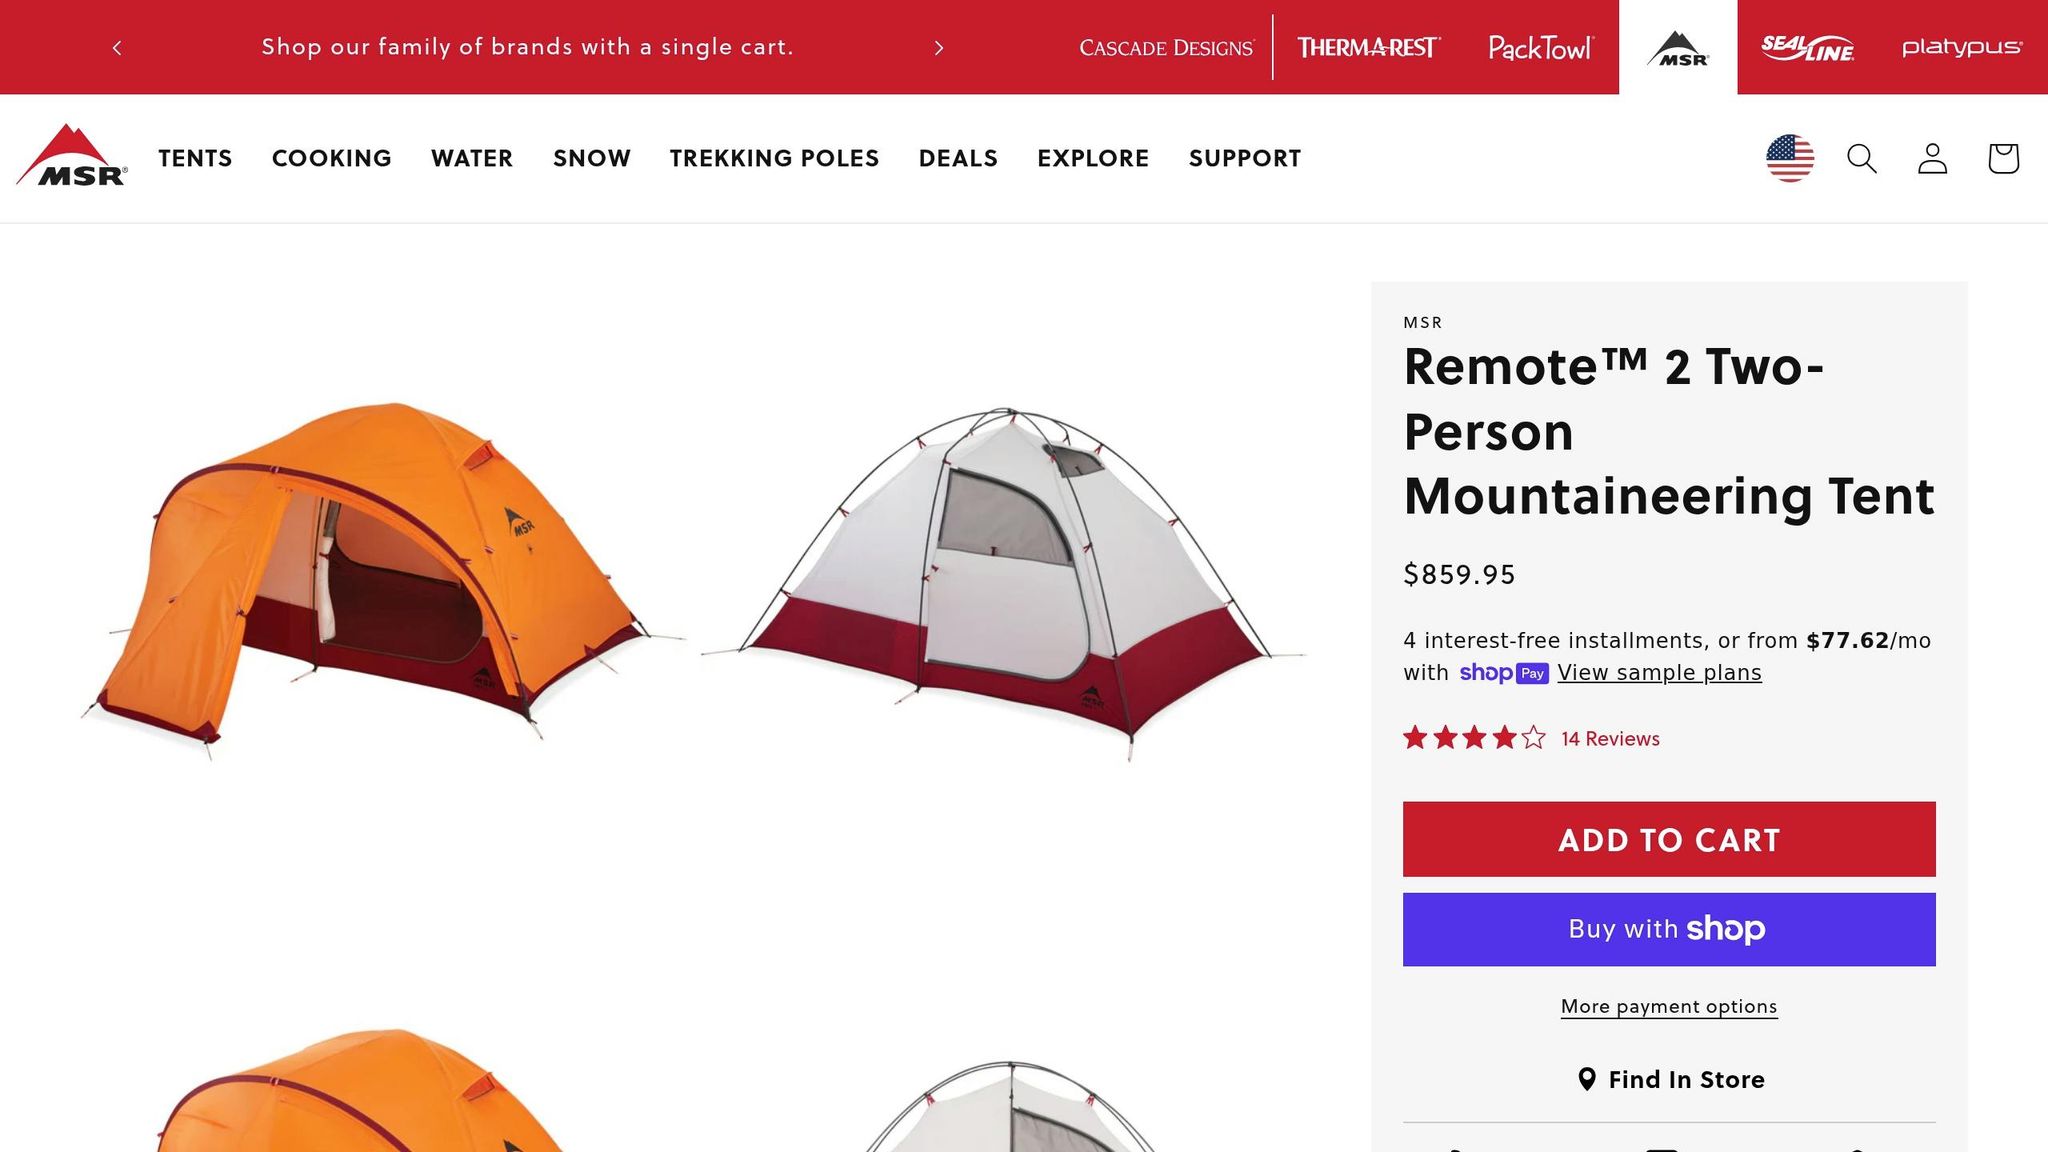
MSR Remote 2 Tent Field Test, Backcountry Ski Touring and Winter Camping Tips
Gear Selection for Winter Camping
Picking the right gear can make or break your winter camping experience. When you're dealing with freezing temperatures, heavy snow, and the extra load you're carrying, having the right equipment is a game-changer.
Shelters and Sleeping Systems
For winter camping, go for a four-season tent that balances protection and weight. A solid option is the MSR Access 2, which weighs just 3 lbs 10 oz but can handle heavy snow loads with ease. Look for tents with advanced composite poles and spacious vestibules. These features make it easier to store gear and keep snow out of your living space. As MSR tent designer Terry Breaux puts it:
Not everyone who camps in the winter backcountry is a mountaineer... We realized there was a tent missing from the market.
For your sleeping setup, choose a sleeping bag rated at least 10°F lower than the coldest temperatures you expect to face. Pair it with two sleeping pads: a closed-cell foam pad against the snow and an insulated air pad on top, ensuring a combined R-value of 4.0 or higher. Down insulation is lightweight and warm, but it needs to stay dry. Adding a liner can increase warmth by 5°F to 25°F.
Once you've nailed your shelter and sleeping system, you'll need the right stove and lighting to keep things running smoothly.
Cooking and Lighting Equipment
In winter, your stove has to do more than just cook - it also needs to melt snow for water. That makes fuel efficiency a top priority. Multi-fuel stoves like the Primus OmniLight are great for extreme cold, outperforming standard canister stoves when temperatures drop. To keep fuel canisters functional, store them in your sleeping bag overnight.
For lighting, go with headlamps that use lithium batteries since alkaline ones tend to fail in freezing conditions. Some headlamps, like the Silva Trail Runner Free H ($90), come with extension cables so you can keep the battery pack inside your jacket where your body heat keeps it warm. A small rechargeable lantern, like the Snow Peak Mini Hozuki ($70), is also handy for those long winter nights, whether you're cooking or relaxing in the tent.
With cooking and lighting sorted, you'll want to focus on staying warm and dry with the right clothing setup.
Clothing and Layering
Stick to a three-layer system: a moisture-wicking base layer, an insulated mid-layer, and a waterproof shell. Skip cotton and adjust layers during activity to avoid sweating. When you reach camp, change into dry long underwear and socks to stay warm and comfortable. If your gloves or socks are damp, store them close to your body to help them dry out.
Keep electronics in your sleeping bag to prevent the cold from draining the batteries. Instead of a hydration bladder, use a hard plastic bottle like a 32-ounce Nalgene ($17). Fill it with boiling water, and it doubles as a heat source for your sleeping bag.
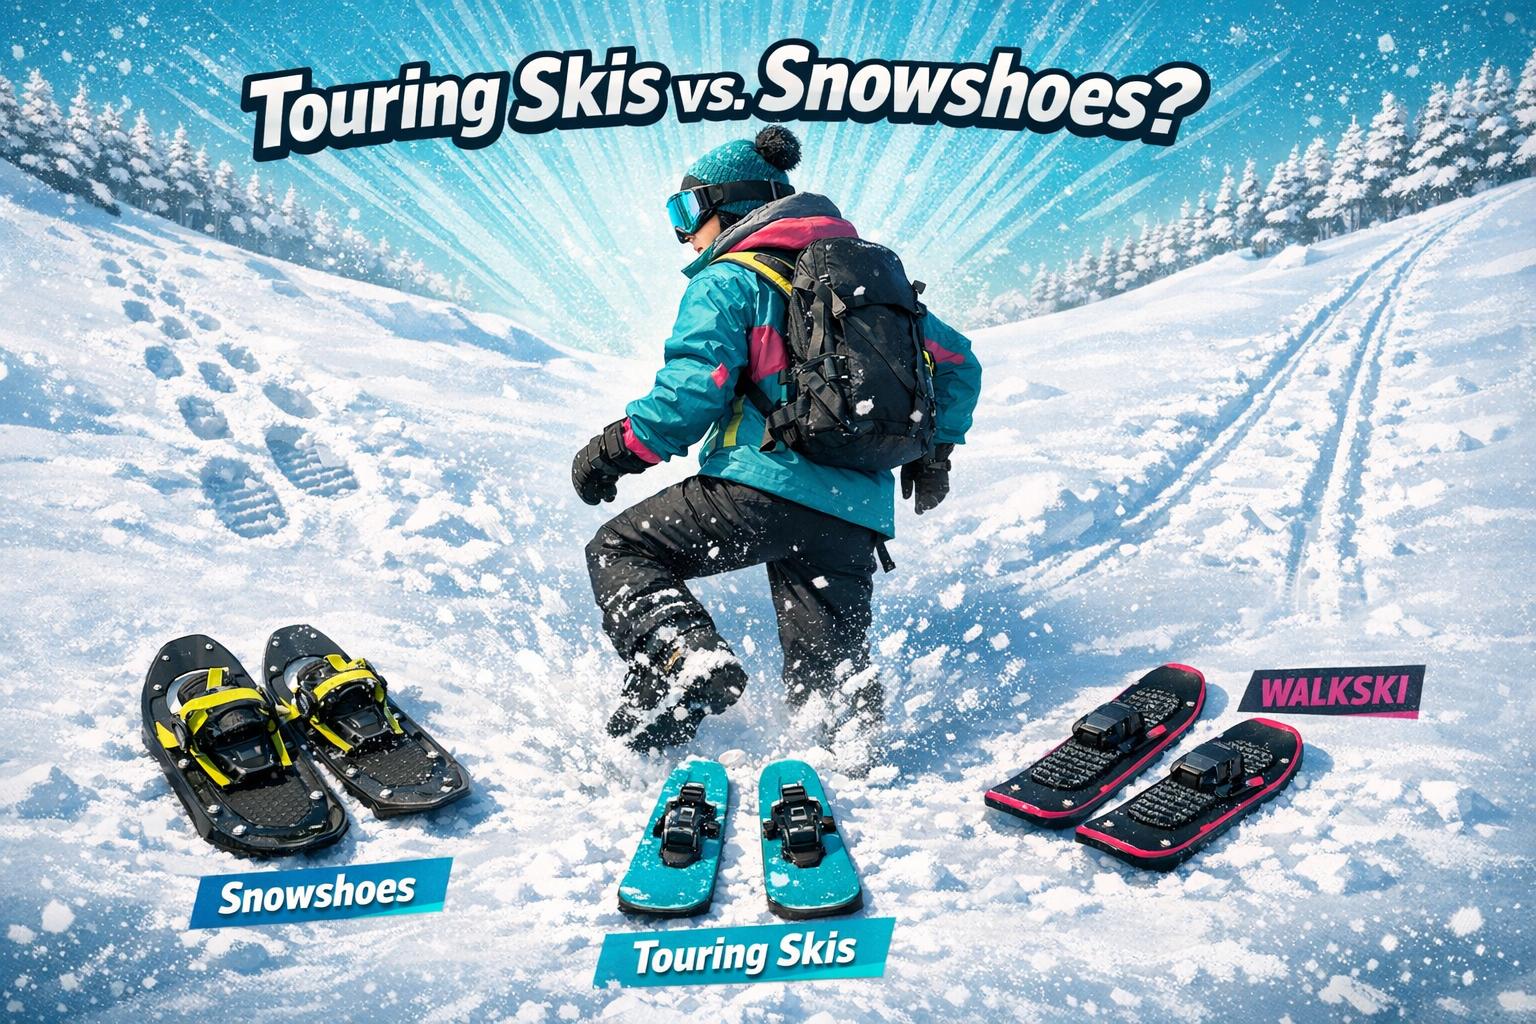
Why Snowfeet* Skis Work Better for Backcountry Touring
When you're heading into the backcountry, every ounce of backcountry gear matters. Snowfeet* WALKSKI Backcountry Touring Skis stand out as a smart alternative to traditional touring skis and snowboards, offering lightweight convenience without sacrificing performance.
Portability and Pack Size
Snowfeet* skis are a game-changer when it comes to portability. At just 100 cm (39 inches) long and weighing around 2.2 lbs per pair, they pack down to about 1 cubic foot. This compact size lets you easily attach them to a standard 55-liter backpack. Compare that to traditional backcountry skis, which are typically 170–190 cm long, weigh between 6–10 lbs per pair, and often require bulky external mounts or separate ski bags.
Take Sarah L.'s 2026 Sierra Nevada trip, for example. She packed her Snowfeet* skis, a lightweight 3 lb tent, and 48 hours of rations into a 50-liter backpack. She hiked 12 miles uphill without the exhaustion that usually comes with heavier gear. That’s the kind of efficiency and ease Snowfeet* bring to the table.
Their compact design not only lightens your load but also ensures you're ready to tackle whatever terrain lies ahead.
Movement in Different Terrain
Navigating backcountry terrain can be tricky, but that's where short skis like Snowfeet* shine. With a turning radius of under 3 feet, these skis let you maneuver quickly through tight tree lines, narrow gullies, and steep pitches. In contrast, traditional skis - often with turning radii exceeding 10 feet - can feel clunky and harder to control in confined spaces.
On steep slopes (30 degrees or more), Snowfeet* reduce uphill fatigue by up to 50%, as shown in a Colorado case study. Skiers using Snowfeet* reached their campsite in half the time compared to those with longer skis. And in powder conditions ranging from 2 to 4 feet deep, their compact design helps avoid the tipping issues that often plague traditional setups.
Mike R., an avalanche trainer, summed it up perfectly:
"Short skis like Snowfeet* turned a grueling 8-mile tour into a fun adventure, with room for safety gear." Knowing how to pack for a tour is just as important as the gear itself.
Snowfeet* WALKSKI vs. Traditional Skis
When you stack Snowfeet* up against traditional touring skis, the advantages in weight, packability, and agility are clear. Here’s a side-by-side comparison:
| Feature | Snowfeet* WALKSKI (100 cm) | Traditional Touring Skis (170–190 cm) |
|---|---|---|
| Weight (per pair) | 2.2 lbs | 6–9 lbs |
| Pack Size | Fits in a 20L backpack | Requires a dedicated ski bag |
| Maneuverability | Excellent for tight spaces | Less agile |
| Uphill Efficiency | High (light and nimble) | Decent, but heavier |
| Transport with Tent Gear | Easily carried with other gear | Bulky and awkward |
| Price | $199 | $800+ |
The numbers tell it all: Snowfeet* weigh about 70% less than traditional skis, cutting the metabolic cost of uphill travel by roughly 25%. Plus, their flat-pack design leaves plenty of room in your backpack for essential items like a 20°F sleeping bag or a bear canister - things you definitely don't want to leave behind.
Setting Up Your Campsite
Site Selection and Avalanche Safety
Picking the right spot for your winter campsite can make or break your trip. Rule number one? Stay far away from avalanche-prone areas. Bergen Tjossem from GearJunkie emphasizes this perfectly:
"The most critical 'need to have' component is to not camp in avalanche terrain or an avalanche runout."
Before heading out, check the local avalanche forecast and consider taking an avalanche safety course for detailed conditions in the area. Once you're on-site, aim for flat ground with natural windbreaks like tree clusters or small hills. An eastern-facing spot can be a bonus, as the morning sun will warm your camp and help dry out your gear. Watch out for hazard trees with unstable branches and make note of nearby landmarks - they’ll be lifesavers if you need to find your camp in a snowstorm or when it’s dark. And don’t forget: set up a designated area for gathering snow to melt for water. Keep this area at least 200 feet away from trails and water sources to minimize environmental impact.
Once you've found a safe, stable site, it's time to prep the area for your tent by compacting the snow properly.
Building Your Snow Camp
After securing your campsite, start by compacting the snow to create a solid, stable base for your tent. You can use skis, snowshoes, or even your boots to pack it down. Let it sit for 15–30 minutes to harden before moving on to the next step.
Use a shovel to level the surface. If it’s still uneven, add more snow and re-pack it. For extra comfort, dig out a small trench under your tent's vestibule to create a bench - this makes putting on boots easier and adds extra storage space for your gear. If it’s windy, build a wind barrier or dig your site slightly into the snow, but don’t forget to maintain proper ventilation for your tent.
Regular tent stakes won’t cut it in snow. Instead, go for snow-specific stakes or make deadman anchors. To do this, bury items like stuff sacks filled with snow, ice axes, or stakes horizontally under the surface. Once the snow hardens, these anchors will hold securely. And here’s a critical tip from REI:
"Ripping your tent on a stormy winter day can be disastrous."
Keep sharp tools like ski edges, crampons, and ice axes well away from your tent fabric to avoid any mishaps. By following these steps, you’ll have a safe and sturdy setup, ready to handle the challenges of winter camping.
sbb-itb-17ade95
Staying Warm and Dry Overnight
Clothing and Sleeping Tips
Keeping cozy in the backcountry starts well before you climb into your sleeping bag. One critical tip? Always reserve a set of dry wool base layers and socks specifically for sleeping. As Bergen Tjossem from GearJunkie puts it, this "sacred socks" rule is non-negotiable - wearing damp clothes from your day out can significantly reduce your sleeping system's ability to keep you warm.
And let’s clear up a common myth: sleeping nearly naked isn’t the secret to staying warm. Backcountry skier Cody Townsend sets the record straight:
"I'm also here to dispel the old tale that sleeping nearly naked is the best way to stay warm in your bag... the more down that you have on, as long as it's still lofted, the warmer you'll be."
So, go ahead - wear your down jacket and pants inside your sleeping bag for an extra layer of insulation. Before settling in, get your blood pumping with 50 jumping jacks or a quick jog in place to generate some heat. For an added boost, fill a hard-plastic water bottle with boiling water, wrap it in a sock, and tuck it near your core or between your legs. Tjossem describes this trick as "a hand warmer for your whole body". And don’t forget to remove your ski boot liners and place them inside your sleeping bag - they’ll stay warm and won’t freeze overnight.
Once you’re warm, focus on drying out any damp items to keep your insulation effective.
Drying Wet Gear
Believe it or not, your body can act as a natural dryer in the backcountry. Damp socks or gloves? Tuck them close to your body - try your shoulders, armpits, or waistband - to help evaporate moisture overnight. For boot liners, insoles, or extra wet socks, stash them at the bottom of your sleeping bag. They’ll stay warm and dry instead of turning into frozen bricks by morning.
Inside your tent, string up some paracord to create a makeshift clothesline for hanging damp layers. The warmer air near the top of your tent can help with drying, though the best strategy is to avoid soaking your gear in the first place by pacing yourself during the day. Lastly, keep your tent vents open - even in freezing weather. Ventilation reduces condensation on the walls, which can make everything damp and chilly.
Safety and Packing Tips
With your campsite prepared and your warm gear ready, it's time to focus on safety essentials and smart packing strategies.
Required Safety Equipment
Safety gear isn't just a suggestion - it's a must. The "Big Three" for avalanche safety include a transceiver (beacon), a collapsible probe (240–320 cm), and a metal shovel. These are absolutely essential for any backcountry travel. As TSP Research emphasizes:
"Avalanche safety gear is not optional. If you're skiing in uncontrolled terrain, you need a beacon, probe, and shovel - plus the training to use them."
When it comes to avalanche transceivers, always buy new to ensure they’re reliable and up-to-date. Expect to spend around $250–$400 for a beacon, $40–$80 for a probe, and $40–$80 for a metal shovel. (And skip the plastic shovels - they won’t hold up against avalanche debris.)
Beyond avalanche gear, a satellite communicator like a Garmin inReach is a smart addition for SOS capabilities in areas without cell service. Don't forget other navigation tools like a topographic map, compass, and offline GPS. Your packing list should also include:
- A first-aid kit
- Fire-starting tools (waterproof matches or a lighter)
- A whistle
- A repair kit with a multi-tool, duct tape, and ski straps
Finally, practice using your beacon, probe, and shovel before heading out. Knowing how to use them can help prevent common backcountry accidents and make all the difference in an emergency.
Packing for Multi-Day Trips
For overnight backcountry trips, a 50–80 L backpack is ideal for carrying the extra cold-weather gear you'll need. To keep your balance while skiing or hiking, pack the heaviest items close to your back. And here’s a pro tip: line your pack with a trash bag to keep everything dry if you're caught in heavy snowfall.
Stick to a three- to four-layer clothing system to save space while staying warm. Use wide-mouth water bottles instead of hydration bladders - they’re less likely to freeze. When choosing a backpack, look for one with a dedicated pocket for avalanche tools so they’re easy to grab in an emergency. Also, store electronics and spare batteries in internal pockets to protect them from the cold.
This efficient packing approach pairs perfectly with lightweight gear like Snowfeet* skis, helping you stay safe and agile during your backcountry adventure. By sticking to these strategies, you'll be ready for the challenges of the backcountry without being weighed down.
Conclusion
Backcountry ski camping with a tent isn’t just possible - it’s an adventure that offers a whole new way to experience winter. The key? Lightweight gear. When you’re hauling shelter, sleeping systems, and safety equipment through deep snow, every ounce matters.
That’s where Snowfeet* WALKSKI Backcountry Touring Skis come in. These skis, just 100 cm long and weighing only 6.9 lb per pair (wood-core model), are a game-changer. Unlike touring skis vs. backcountry skis, they’re compact and easy to carry, strapping neatly to your backpack. Their design makes navigating tight trails a breeze, and the ability to switch between Walk, Ski, and Climb modes means you’re ready for any terrain. Plus, the universal binding system means you can use your regular winter boots - no need to shell out for heavy, specialized touring boots. For context, a traditional touring setup can run you about $2,200 and requires bulky, rigid boots. By comparison, Snowfeet* WALKSKI costs between $499 and $750, offering a flexible and efficient alternative.
This lightweight, no-fuss approach captures the essence of modern backcountry touring. With proven gear like this, your next step is planning a short trip to test your setup and refine your skills. Start small, ensure you have essentials like beacons, probes, and shovels, and practice your techniques. It’s worth it - nearly one-third of campers now embrace winter adventures. With the right preparation and gear that works with you, not against you, you’ll discover a winter experience like no other.
FAQs
How do I plan a safe overnight tour route?
To plan a safe overnight backcountry ski trip, start by packing lightweight gear like the Snowfeet WALKSKI Backcountry Touring Skis, which are easy to carry. Pick a route that matches your experience level, and always check the weather and snow conditions before heading out. Steer clear of areas with avalanche risks.
Make sure to bring essentials like navigation tools, a first-aid kit, and a way to communicate, such as a satellite phone or personal locator beacon. Let someone know your plan, including your route and estimated return time. Don’t forget to identify emergency exit points along the way - just in case. Safety first!
What’s the lightest tent-and-sleep setup that’s still warm?
For backcountry ski camping, ultralight tents like the Durston X-Mid 1P are a smart choice. They offer solid weather protection while keeping your pack weight manageable. To stay warm without adding unnecessary bulk, pair the tent with lightweight down quilts or compact sleeping bags. For mobility, Snowfeet lightweight touring skis* are a game-changer. Their portability and ease of transport make them perfect for anyone aiming to keep their winter camping gear simple and efficient.
Are Snowfeet* WALKSKI stable enough for deep powder and steep climbs?
Snowfeet* WALKSKI skis are compact, lightweight, and built for backcountry adventures. At just 100 cm long, they’re much easier to handle than traditional skis, which can feel bulky in tight spots. Made with fiberglass-reinforced polyamide, they strike a balance between durability and flexibility, giving you solid stability and control whether you're tackling deep powder or steep ascents. For anyone looking to explore challenging terrain with confidence, these skis are a game-changer.
Related Blog Posts
- Intro to Light Backcountry: Essential Gear for Exploring Beyond the Groomed Trails (Without the Pro Setup)
- First Backcountry Ski Tour: What to Expect (Step-by-Step Walkthrough)
- Best Touring Ski Destinations in the Alps and Rockies (2026 Edition)
- Multi-Day Touring Trips: How to Pack Light Without Sacrificing Safety


Leave a comment
This site is protected by hCaptcha and the hCaptcha Privacy Policy and Terms of Service apply.