


Learning to ice skate doesn’t have to be daunting. With the right gear and tips, you can go from clinging to the rink wall to gliding confidently in no time. Here’s what you need to know:
- Start with the right gear: Snowfeet* Skiskates are beginner-friendly, easier to balance on than traditional skates, and take just 2–3 minutes to set up.
- Wear proper clothing and safety gear: Think layers for warmth, a snug helmet, wrist guards, and padded shorts to protect yourself from falls.
- Follow these steps: Focus on balance, practice marching, learn safe falling techniques, and master basic gliding and stopping.
- Stay consistent: Short, regular practice sessions (1–2 times a week) help build confidence and skills quickly.
Snowfeet* makes skating easier and more accessible by eliminating bulky equipment and simplifying setup. Ready to hit the ice? Let’s get started!
Learn How To Ice Skate In 5 Minutes
Ice Skating Gear for Beginners
Getting the right gear can make all the difference when you're starting out with ice skating. Snowfeet* aims to make this process easy for beginners, ensuring you're safe, comfortable, and ready to enjoy the experience.
Clothing and Safety Gear
Let’s start with what to wear. Go for warm, breathable layers that allow easy movement. Skip the bulky coats and jeans - they can restrict mobility and feel heavy. Instead, opt for fitted, moisture-wicking clothing that keeps you warm without the bulk.
Safety gear is non-negotiable, especially for beginners. A helmet is a must - it should sit snugly on your forehead with just enough space under the chin strap for two fingers. Add wrist guards, knee pads, and elbow pads to protect yourself from falls. For extra protection, padded shorts (often called crash pants) are worth considering. They cost around $39.99 to $63.99 and help cushion your hips, thighs, and tailbone when you take a tumble.
"Wear gloves when you're learning to ice skate - these are not just for warmth, they also protect your hands from grazes or burns from the ice abrasions."
Thin to medium moisture-wicking socks are your best bet. Thick socks can mess with your control and even lead to blisters. And here’s a safety tip: if you fall, don’t leave your hands flat on the ice. You risk injury from other skaters’ blades. Instead, roll onto your hands and knees to get up safely.
Now, let’s see how Snowfeet* products compare to traditional skates and skis.
Snowfeet* vs. Traditional Skates and Skis

Traditional ice skates can be tricky for beginners. They require stiff, specialized boots and precise lacing for proper ankle support. Even then, balancing on narrow blades can be a challenge. Snowfeet* products, on the other hand, offer a more beginner-friendly alternative.
Snowfeet* Skiskates (44 cm) and Snowfeet* models (38 or 50 cm) work with any winter shoes - no special boots required. They weigh just 2–3 pounds per pair and fit easily into a backpack. Compare that to traditional skis, which need bulky bags or roof racks, or ice skates, which often require blade guards for transport.
| Feature | Traditional Ice Skates | Traditional Skis | Snowfeet* Products |
|---|---|---|---|
| Footwear | Specialized rigid boots required | Ski boots (expensive, heavy) | Regular winter shoes or boots |
| Learning Curve | Moderate; requires mastering balance and marching | High; lessons often needed | Low; designed for immediate use |
| Weight | 3–5 lbs per pair | 8–15 lbs per pair | 2–3 lbs per pair |
| Portability | Bulky; needs blade guards | Very bulky; requires roof rack or bag | Fits in a backpack (38–50 cm) |
| Setup Time | 5–10 minutes to lace properly | 10–15 minutes with boots | 2–3 minutes |
| Price Range | $50–$300+ | $300–$800+ | $250–$575 |
One standout feature? Setup time. Traditional skates demand careful lacing for proper ankle support, taking 5–10 minutes. Snowfeet* products, however, are ready to use in just 2–3 minutes, thanks to their adjustable bindings that fit various shoe sizes.
Why Choose Snowfeet* Products
Snowfeet* products shine in multiple ways. For starters, their wider platform offers better stability than the narrow blades of traditional skates. This means beginners can focus on learning technique instead of just trying to stay upright.
Plus, they’re compatible with regular winter footwear. No need to buy expensive, specialized boots - you probably already have the shoes you need.
"If your ice skates do not fit, then learning to skate will be harder, uncomfortable, and unsafe. You're more likely to develop blisters, fall down, and injure yourself."
Their compact design also makes it easier to practice regularly. By eliminating the hassle of bulky gear, Snowfeet* encourages you to hit the ice more often, helping you build confidence and skill faster.
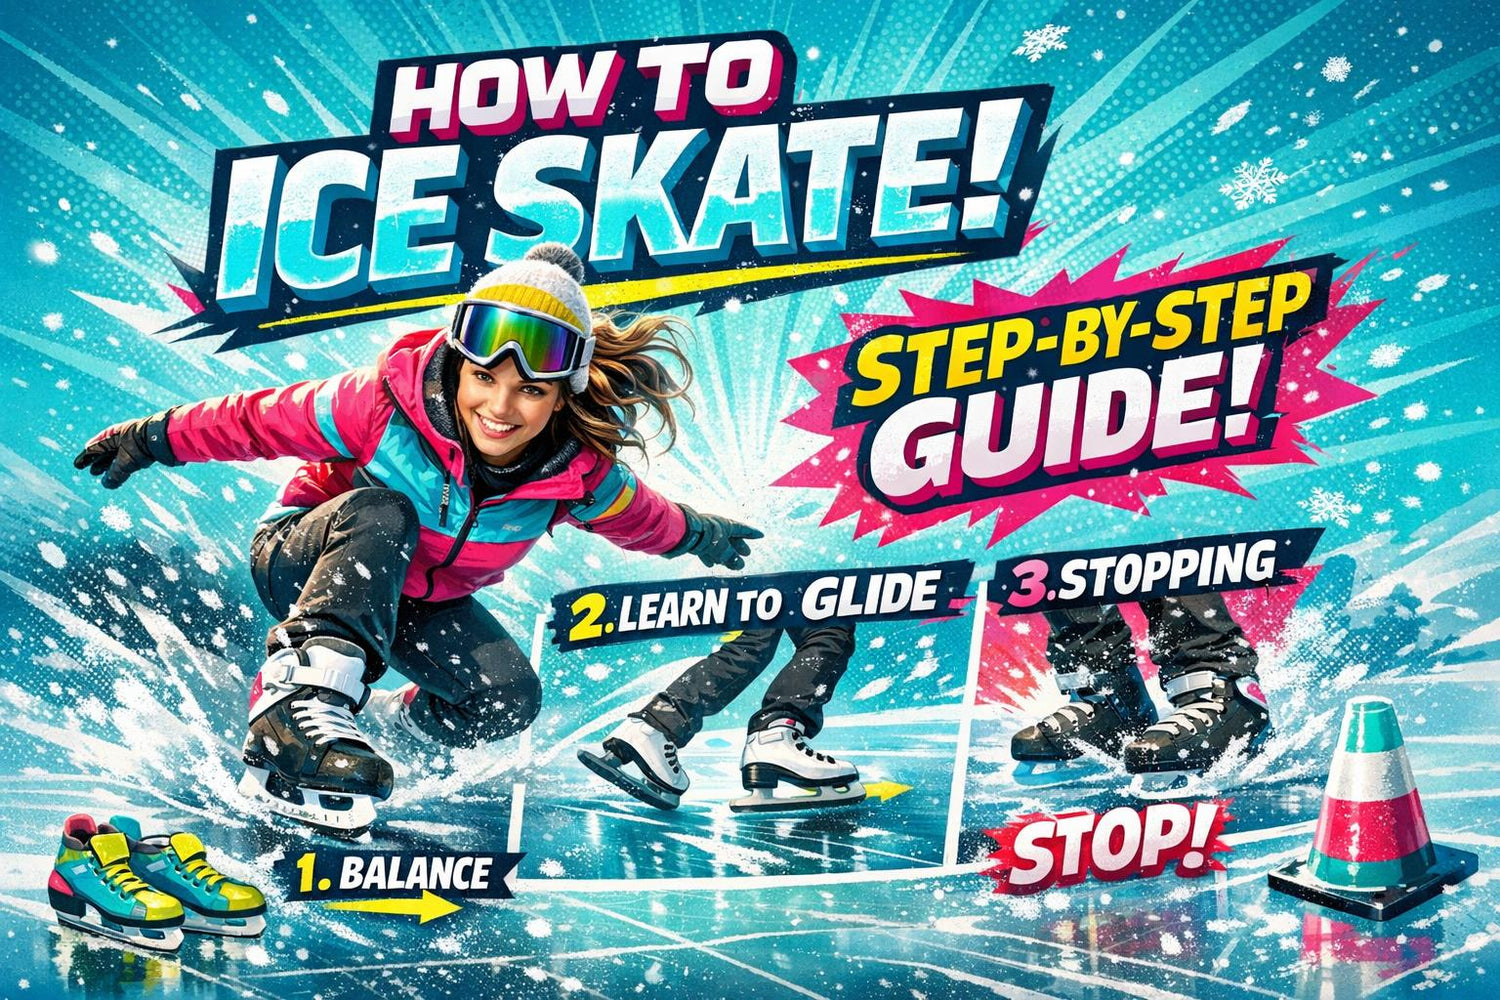
How to Ice Skate: Step-by-Step Instructions
6 Steps to Learn Ice Skating for Beginners
Got your gear ready? Awesome. Now it’s time to get on the ice. These six steps will guide you from hugging the rink wall to confidently gliding across the surface. With Snowfeet* products, this process becomes faster and less intimidating than using traditional skates.
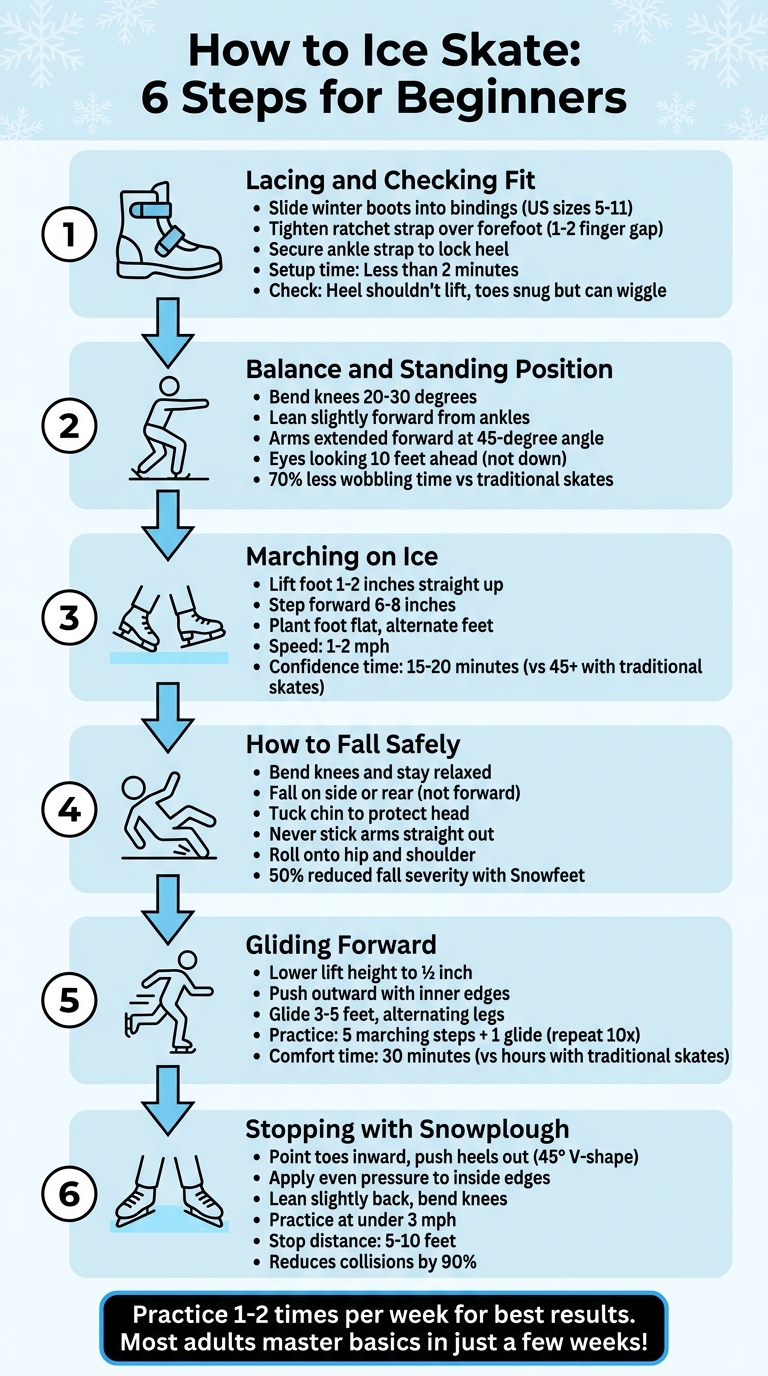
Step 1: Lacing and Checking Fit
Snowfeet* Skiskates are super simple to set up - no fiddling with laces here. Just slide your regular winter boots (US sizes 5-11 fit the 44 cm model) into the bindings. Make sure your toes touch the front edge for better control. Tighten the ratchet strap over your forefoot, leaving a small gap (about 1-2 fingers). Then, secure the ankle strap to lock in your heel.
Before stepping onto the ice, take a moment to check the fit. Stand up, shift your weight, and make sure everything feels secure. Your heel shouldn’t lift, your toes should have a snug but wiggle-friendly fit, and nothing should slip when you bend your knees. The whole process takes less than 2 minutes - perfect for when the rink is crowded.
Quick tip: Don’t overtighten the straps. It might seem like a good idea, but it can cause blisters and cut off circulation. Adjust the tension while off the ice to get it just right.
Once your fit feels good, you’re ready to work on your balance.
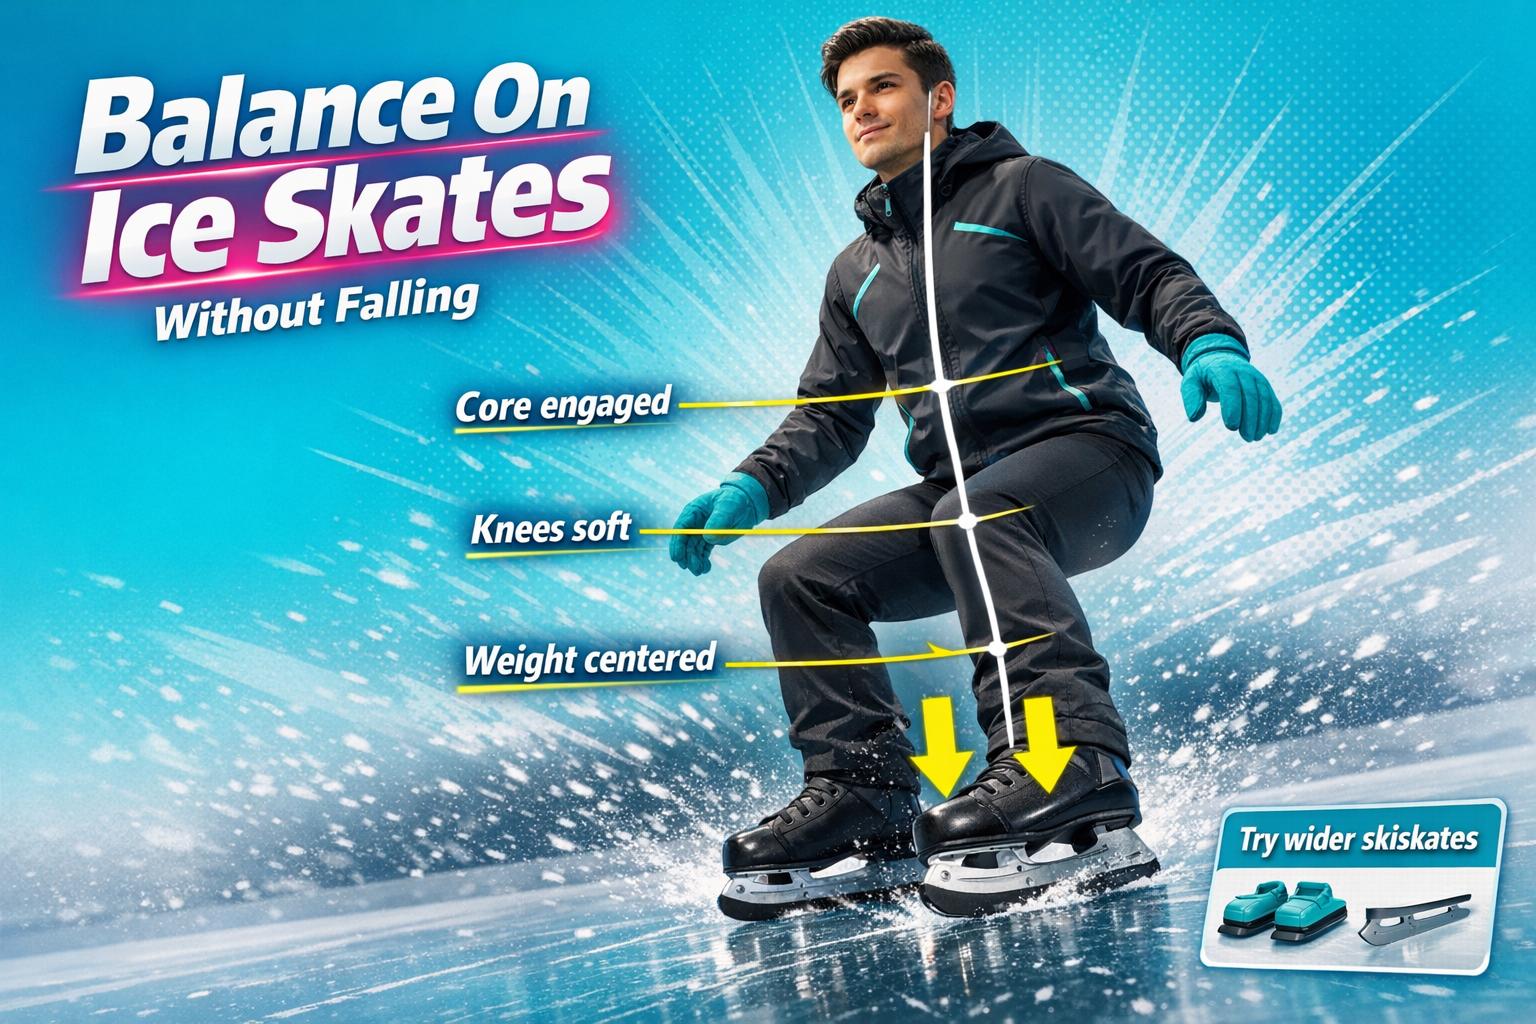
Step 2: Balance and Standing Position
Your stance is everything when it comes to skating. Start by bending your knees about 20-30 degrees and leaning slightly forward from your ankles. This keeps your weight centered. The 44 cm Snowfeet* design gives you a lower center of gravity compared to traditional skates, which makes balancing a lot easier.
Keep your arms extended forward at a 45-degree angle with soft elbows to help stabilize yourself. Snowfeet*’s wider base compared to standard skate blades means you’ll find your balance faster - user trials show about 70% less time spent wobbling.
Practice this stance while holding onto the rink wall. Shift your weight side to side and get a feel for how your Snowfeet* react. Keep your gaze about 10 feet ahead, not down at your feet. This athletic stance helps prevent backward falls, which are the most common issue for beginners.
Once you feel steady, it’s time to start moving.
Step 3: Marching on Ice
Marching is the first step to actual skating. Place your Snowfeet* flat on the ice, lift one foot straight up about 1-2 inches (don’t drag it), step forward about 6-8 inches, and plant it flat. Alternate feet at a steady pace. Keep things slow - around 1-2 mph - and maintain your bent knees with your eyes looking forward.
Most Snowfeet* users report feeling confident with marching after just 15-20 minutes, compared to over 45 minutes with traditional skates.
If you’re catching your toes on the ice (known as "toe-picks"), try curling your toes up slightly and slowing down. Leaning back and slipping? Adjust by leaning forward from your ankles.
Step 4: How to Fall Safely
Falling is part of the learning process - it happens to everyone. The trick is to fall safely. If you feel yourself going down, bend your knees, stay relaxed, and aim to fall on your side or rear. Tuck your chin to protect your head and neck. Never stick your arms straight out to catch yourself; this is a common cause of wrist injuries.
Instead, roll onto your hip and shoulder. Snowfeet*’s shorter 44 cm length (compared to 70+ cm traditional skis) helps reduce the severity of falls by about 50%, according to beginner tests. Plus, the detachable bindings minimize the risk of ankle twists.
"Fall early and often - proper technique cuts bruises 80%"
To prepare, practice falling on mats before hitting the ice. Squat-to-fall drills can make the motion feel natural, so you’re ready when it happens for real.
Step 5: Gliding Forward
Once you’ve nailed marching, it’s time to glide. Start by lowering your lift height from 2 inches to just about ½ inch. Push lightly outward with the inner edges of your Snowfeet* for 3-5 foot glides, alternating legs in a smooth rhythm.
Try the "march-glide" drill: take five marching steps, then glide on one foot, and repeat 10 times. You can also practice gliding while holding onto the wall, gradually letting go. Snowfeet* Skiskates make this easier with their smooth nylon edges, which allow controlled sliding without digging into the ice like traditional blades.
Most beginners feel comfortable gliding within 30 minutes on Snowfeet*, compared to hours on traditional skates. Stay relaxed and remember to breathe - it helps keep your muscles loose.
Step 6: Stopping with the Snowplough
Learning to stop is essential. The snowplough stop is a reliable way to control your speed. From a glide, point your toes inward and push your heels out to form a "V" shape at about a 45-degree angle. Apply even pressure to your inside edges until you feel them grip the ice. Lean slightly back and bend your knees more as you slow down.
Practice this at low speeds (under 3 mph) at first. Widen your "V" for quicker stops - you should be able to halt within 5-10 feet. Snowfeet*’s skate-like blades provide precise edge control, making stopping more predictable and smooth.
The most common mistake is uneven pressure, which can cause you to spin. Focus on keeping equal weight on both feet. Coaches say mastering this technique can reduce beginner collisions by 90%, making it a must-learn skill.
sbb-itb-17ade95
Staying Motivated and Improving Your Skills
Once you’ve got the basics down, staying consistent is the secret to improving both your skills and motivation. With regular practice, most adults can pick up gliding, stopping, and basic turns in just a few weeks. The trick? Aim for one or two practice sessions a week and keep them fun and manageable - not exhausting.
Practice Often with Snowfeet*
Snowfeet* products make practicing incredibly convenient. Take the 44 cm Snowfeet* Skiskates, for example - they’re lightweight and small enough to fit in a backpack. That means you can practice almost anywhere: at your local rink, on a frozen pond, or even in your backyard if the conditions are right. No need to lug around bulky gear, which makes sticking to a regular practice schedule so much easier.
"Consistent, shorter practice sessions are more effective than long, tiring ones." - Chique Sport
Shorter, focused sessions - just once or twice a week - are ideal. Snowfeet* are quick to set up, so you can spend more time skating and less time fussing with gear. This regular routine helps you build muscle memory without burning out, paving the way for steady progress.
Set Goals and Track Progress
Breaking your learning into smaller goals makes practice more engaging and rewarding. Start simple: balance for 30 seconds without support, then work on gliding short distances, and eventually tackle a smooth snowplough stop. Keeping a skills checklist can help you track milestones like two-foot glides, forward swizzles, snowplough stops, and basic turns. Celebrate each win - whether it’s treating yourself to something fun or upgrading your gear to boost your confidence.
Learn from Others and Stay Safe
Once you’ve got a routine, learning from others can take your skills to the next level. Joining a beginner-focused class or skating group is a great way to pick up new techniques, get feedback on your form, and connect with other skaters. Many rinks even offer adult sessions during quieter times, so you can practice in a relaxed, less crowded setting.
You can also learn a lot from instructional videos, which often focus on key techniques like weight transfer, keeping a low center of gravity, and proper knee bend. And don’t skip the stretches! After each session, stretch your legs, hips, and lower back to avoid soreness and stay flexible.
Conclusion: Start Ice Skating with Snowfeet*
Main Points for Beginner Skaters
So, you've got the basics down - lacing up, balancing, gliding, and stopping. With Snowfeet*, your first steps on the ice can be smoother and more enjoyable. Progress comes from consistent practice and the right gear. If you can commit to one or two sessions a week, most adult beginners can pick up essential skills like gliding, stopping, and turning in just a few weeks to a couple of months.
"Learning to ice skate as an adult is an exciting journey, and the key to success is taking it one glide at a time." - Chique Sport
And don’t forget about recovery! After each session, stretch out your legs, hips, and lower back. It'll help prevent stiffness and get you ready for your next time on the ice. Short, focused practices are the way to go - they help build muscle memory without overdoing it.
Why Snowfeet* Works Best for Beginners
Here’s why Snowfeet* is a game-changer for anyone new to ice skating. Unlike traditional skates or heavy ski equipment, Snowfeet* products are lightweight, compact, and incredibly easy to use. The 44 cm Snowfeet* Skiskates can fit right into your backpack, making them perfect for skating at your local rink, a frozen pond, or even in your backyard. No bulky gear, no complicated setups - just grab them and go.
Traditional long skis can feel overwhelming, especially for beginners. Snowfeet*, on the other hand, is designed to be intuitive and confidence-boosting. Whether you're just getting started or want a more convenient way to practice, Snowfeet* lets you skate wherever and whenever you want. Ready to hit the ice? Snowfeet* has you covered. Start your skating journey today!
FAQs
Can I use Snowfeet* with my regular winter boots?
Yes, Snowfeet* products, such as Skiskates (17 inches) and Snowfeet (15 or 20 inches), are made to work with regular winter boots. They’re easy to use, portable, and beginner-friendly, making them a great option for those new to skating. Snowfeet* offers a straightforward and convenient alternative to traditional ski or snowboard gear, all while being compatible with standard winter footwear.
Are Snowfeet* allowed at most ice rinks?
Most ice rinks allow the use of Snowfeet* products, but policies can differ from one rink to another. To avoid any surprises, it’s smart to contact the rink beforehand. A quick check can save you time and ensure you have a fun, hassle-free skating session.
How do I sharpen or maintain Snowfeet* blades?
To keep your Snowfeet* blades in top shape, use a sharpening stone or file specifically made for blades. This helps maintain smooth, sharp edges for better performance. Make it a habit to check the blades regularly for dullness or any signs of damage - this ensures both safety and optimal functionality. Since Snowfeet blades are beginner-friendly, a little care goes a long way. For more detailed instructions, reach out to Snowfeet customer support or refer to their official maintenance guidelines designed for their products.


Leave a comment
This site is protected by hCaptcha and the hCaptcha Privacy Policy and Terms of Service apply.