


Teaching your child to ice skate doesn’t have to be stressful. Strap-on double-blade skates make it easier by providing extra stability, helping kids focus on balancing and gliding without constant falls. These skates attach directly to regular winter boots, saving you money and keeping your child comfortable. Plus, many models adjust across multiple sizes, so they grow with your child.
Here’s the quick version:
- Why double-blade skates? They’re like training wheels for skating, offering a stable base for beginners.
- How do they work? Strap them onto winter boots with a simple buckle system - no need for stiff, expensive skate boots.
- Best options? Snowfeet* Mini Ski Skates (lightweight, dual-use for ice and snow) and Bob Skates (budget-friendly, ice-only).
- Teaching tips: Start with off-ice practice, move to standing and gliding on ice, and progress at your child’s pace.
How To Teach My NERVOUS Child To Skate
What Are Strap-On Double-Blade Ice Skates?
Strap-on double-blade ice skates, often called bob or twin blade skates, are designed for young beginners. Unlike traditional skates that balance on a single, thin blade - requiring strong ankles and good balance - these skates feature two parallel blades. This wider base provides much-needed stability for kids learning to skate. Essentially, they work like training wheels on a bike, reducing ankle strain and making it easier for children to stay upright.
These skates strap onto regular winter boots or sturdy shoes using adjustable buckles, eliminating the need for dedicated skate boots. That means no extra expense or discomfort from quickly outgrown specialized boots. Modern versions, like Snowfeet* Mini Ski Skates, have taken this idea further, offering lightweight designs that make it easy for kids to hit the ice. This simple setup encourages faster learning and a smoother introduction to skating.
Why Double-Blades Help Kids Learn Faster
The key advantage of double-blade skates is the extra stability they provide. Single-blade skates force kids to constantly adjust and balance on one blade, which can be a tough challenge for beginners. In contrast, double-blade skates offer steady support, so kids can stand, walk, and glide confidently. This stability means fewer falls, less frustration, and more time spent actually enjoying the ice. It also helps kids focus on mastering the basics - standing, marching, and gliding - without being discouraged by constant tumbles. That said, these skates are strictly for beginners; they aren’t designed for advanced moves like hockey turns or figure skating spins.
How to Attach Strap-On Skates to Regular Shoes
Using strap-on skates is quick and simple. Start by having your child wear their winter boots. Place the boot onto the skate’s platform, ensuring the heel is pushed all the way back. Then, fasten the adjustable buckles securely. Tighten each strap so the skate fits snugly and doesn’t shift or wobble when your child moves their foot. Many models are adjustable to accommodate different shoe sizes, so you won’t need to replace them every time your child’s feet grow.
Best Strap-On Double-Blade Products for Kids
Looking to make ice skating easier and more fun for your child? Strap-on double-blade skates are a great way to help them build confidence on the ice. Let’s dive into two popular options: Snowfeet* Mini Ski Skates and Bob Skates (like the Powerslide Ice Glider). Both are built with a double-blade design for added stability, but they differ in features like weight, versatility, and overall convenience.
Snowfeet* Mini Ski Skates

The Snowfeet* Mini Ski Skates are a standout choice because they’re designed for use on both ice and snow. At just 15 inches (38 cm) long, they’re lightweight and compact enough to fit in a backpack - perfect for family outings. These skates attach securely over regular winter boots using adjustable bindings, so there’s no need to buy special footwear. Starting at $250, they combine ice skating and mini skiing into one product, making them a fun and versatile option for active kids. Plus, their portability and dual-purpose design make them a great investment for families who enjoy a mix of winter activities.
Product Comparison: Snowfeet* vs. Bob Skates
Here’s a quick side-by-side look at how Snowfeet* Mini Ski Skates compare to Bob Skates (like the Powerslide Ice Glider):
| Feature | Snowfeet* Mini Ski Skates | Bob Skates (Powerslide Ice Glider) |
|---|---|---|
| Price | From $250 | Budget-friendly option |
| Weight | Lightweight and easy to carry | Heavier plastic construction |
| Versatility | Works on both ice and snow | Ice-only |
| Strap System | Adjustable bindings for a snug fit | Two-buckle system |
| Size Range | Fits most winter boots | Adjustable across 7 sizes (EU 24–31) |
| Portability | Compact, fits in a backpack | Bulkier design |
| Durability | High-quality materials | Standard plastic |
Why Snowfeet* Stands Out
Snowfeet* Mini Ski Skates shine because they’re not just for ice - they give kids the chance to try mini skiing too. Their lightweight design makes them easier for kids to use and for parents to carry. On the other hand, while Bob Skates are more affordable and work well with thick winter boots, they’re limited to ice use and are bulkier to transport.
If you’re looking for a product that grows with your child and supports multiple winter activities, Snowfeet* is a fantastic choice. Their dual-function design and portability make them a favorite for families who want to get the most out of their time on the ice and in the snow.
Safety Checklist Before Your First Ice Session
Taking a few moments to run through a safety checklist can help prevent injuries and make your first ice session more enjoyable.
How to Fit and Adjust the Skates Correctly
Getting the right skate fit is key for both safety and comfort. Start by having your child stand with their heel against a wall, then trace their foot on paper while they wear skating socks. Measure from the heel to the longest toe. Add 2–3 mm for a snug fit, or 4–6 mm if you want a bit more room. It’s a good idea to measure at the end of the day or after some activity since feet tend to swell slightly.
When using strap-on double-blades like Snowfeet* Mini Ski Skates or Bob Skates, make sure they’re secured over wide, thick winter boots. Tighten the buckle system so it fits snugly but doesn’t pinch. Once the skates are properly adjusted, your child will be ready to put on the necessary protective gear.
Required Protective Gear and Clothing
Since strap-on double-blade skates fit over regular winter boots, ensure the boots are wide enough to accommodate skating socks comfortably. Look for beginner skates that comply with safety standards like EN 15638:2009 for added peace of mind. Snowfeet* skates are designed with safety in mind and work well with high-quality protective gear. Once your child is geared up, pick an ice rink that’s beginner-friendly to complete the setup.
How to Pick a Beginner-Friendly Ice Rink
Not every ice rink is ideal for beginners. Look for rinks that offer designated beginner or family skating hours, as the ice is usually less crowded during these times. A smooth, well-maintained surface makes learning easier, so indoor rinks are often a better choice - they provide consistent conditions, especially during warmer months. To avoid crowds, try going during off-peak times like weekday mornings. These steps not only help keep your child safe but also make the most of the stability features offered by strap-on double-blades, such as those from Snowfeet*.
sbb-itb-17ade95
How to Teach Your Child to Ice Skate: 5 Steps
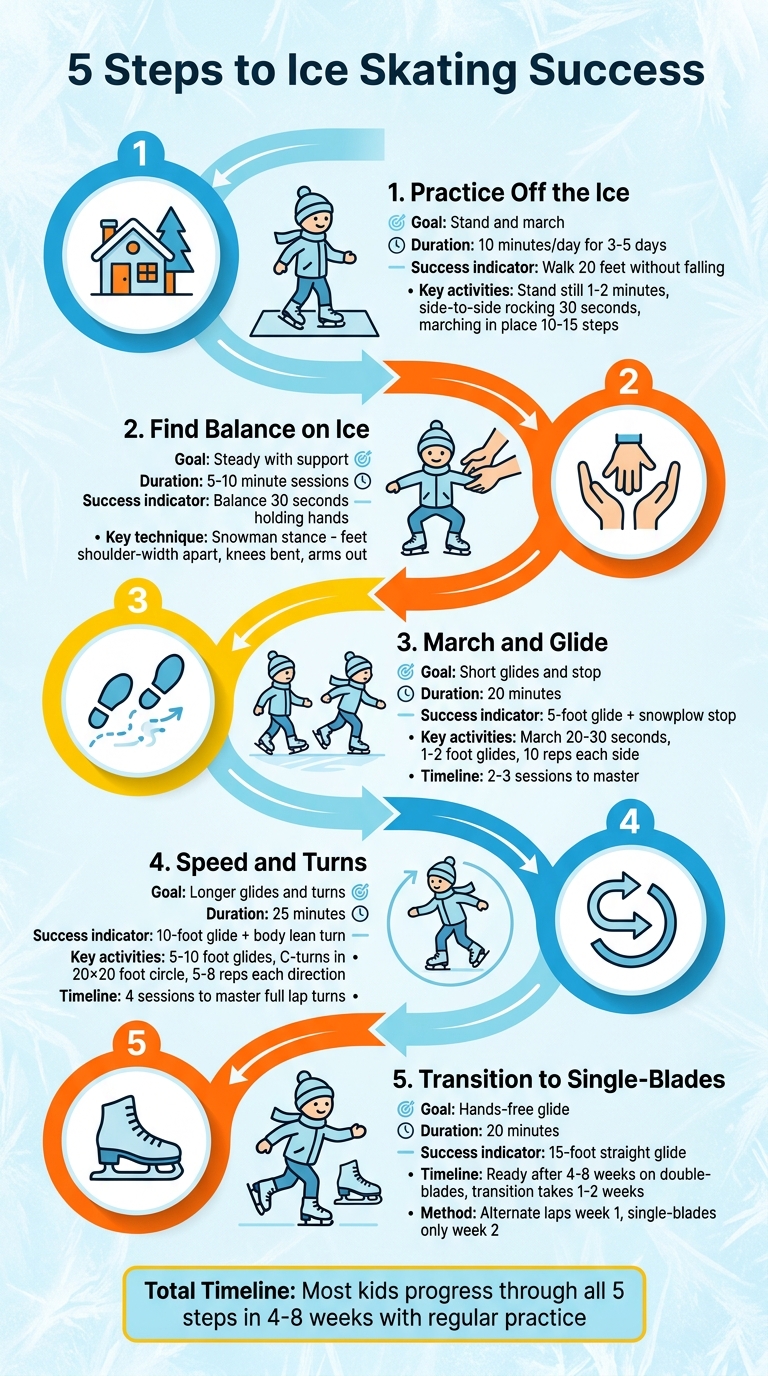
5-Step Guide to Teaching Kids Ice Skating with Double-Blade Skates
Once you’ve got the safety gear sorted, it’s time to hit the ice - well, almost. These five steps are designed to build skills gradually, so take your time. With regular practice, most kids using strap-on double-blades like Snowfeet* Mini Ski Skates can move through these steps in about 4–8 weeks.
Step 1: Practice Standing and Balancing Off the Ice
Start at home. Have your child wear the double-blades over their winter boots and practice standing still for a minute or two. Make sure their weight is evenly distributed. Then, try gentle side-to-side rocking for 30 seconds each way, followed by marching in place for 10–15 steps. Offer support if needed.
Stick to 10–15 minutes a day for 3–5 days before heading to the rink. This helps build ankle strength and confidence without the slippery ice. Track progress by timing how long your child can stand on their own - aim for a full 60 seconds before moving to the next step.
Step 2: Help Your Child Find Balance on Ice
When you’re ready to get on the ice, stand behind your child, holding both their hands at shoulder height. Keep your knees bent to match their height. Encourage the "snowman stance" - feet shoulder-width apart, knees slightly bent, and arms stretched out for balance.
Start with short sessions - just 5–10 minutes. Focus on small weight shifts while holding their hands. You can also try the "hula hoop hold", where your child stands inside a hula hoop while you hold it from the outside. This gives them a sense of independence while you stay in control. Double-blades like Snowfeet* skates are great for this stage, as they provide extra stability.
Step 3: Teach Marching and Basic Gliding
Now it’s time to get moving. Start with marching in place for 20–30 seconds, then progress to short glides - just 1–2 feet forward for a couple of seconds. Aim for 10 repetitions on each side in a small area, like 10×10 feet.
For stopping, teach the "snowplow" technique. Have your child point their toes inward to form a pizza slice. Practice this off the ice first so they can get the hang of it. According to USA Hockey youth programs, most kids can develop solid propulsion skills in 2–3 sessions of about 20 minutes each. To keep things fun, try games like "follow the leader", which helps kids stay engaged while practicing. Most kids are gliding independently after just a few sessions.
Step 4: Practice Gaining Speed and Making Turns
Once your child is comfortable gliding, work on speed and turning. Start with 5–10-foot glides using a push-and-glide method. Then, introduce gentle C-turns by having them lean into the curves. Practice in a 20×20-foot circle, doing 5–8 repetitions in each direction.
Before working on speed, make sure they’re confident with 10-foot glides. Most kids can master full lap turns after about four practice sessions. Double-blades, like those on Snowfeet* skates, provide extra stability during this phase, making it easier to pick up speed. Don’t forget to teach fall recovery: tuck the chin, keep arms close, and roll to the side.
Step 5: When and How to Switch to Single-Blade Skates
Once your child can confidently glide 20+ feet and make basic turns without frequent falls, it’s time to think about transitioning to single-blade skates. For most kids aged 5–9, this happens after 4–8 weeks of practice on double-blades.
Make the switch gradual. Start by alternating laps between double-blades and single-blades during the first week. By the second week, have them use single-blades exclusively, with hand support if needed. According to Learn to Skate USA, 85% of kids transition successfully within two weeks using this method. To keep motivation high, consider a reward system or even a "graduation skate" party. Parents often find that tracking progress through videos helps boost their child’s confidence.
| Step | Goal | Session Length | Success Indicator |
|---|---|---|---|
| 1: Off-Ice | Stand/march | 10 min | Walk 20 feet without falling |
| 2: On-Ice Balance | Steady with support | 15 min | Balance 30 seconds holding hands |
| 3: March/Glide | Short glides/stop | 20 min | 5-foot glide + snowplow stop |
| 4: Speed/Turns | Longer glides/turns | 25 min | 10-foot glide + body lean turn |
| 5: Transition | Hands-free glide | 20 min | 15-foot straight glide |
3 Common Mistakes Parents Make (And How to Fix Them)
Before jumping into advanced skating techniques, it's important to address some common mistakes parents make when teaching their kids to skate. Even with the best intentions, these missteps can slow progress or even discourage your child. Let’s break down three frequent challenges and how to tackle them.
Mistake 1: Moving Too Fast Through the Learning Stages
It’s tempting to rush through the basics, especially when everyone’s excited to see progress. But skipping essential steps - like off-ice practice or focusing on balance - can lead to falls and a loss of confidence. For beginners, trying to glide too soon is a recipe for frustration. Reports show that rushing increases injury risk by 40% in new skaters. Plus, kids need time to build muscle memory, which usually takes 20–30 minutes of focused practice per session.
The fix: Take it slow and follow a structured timeline. Start with off-ice balancing exercises for 5–10 minutes daily during the first week. In Week 2, introduce short on-ice sessions (15 minutes, 2–3 times a week), focusing on standing and basic movements. Use clear goals like “stand unsupported for 30 seconds” before advancing. Tracking progress not only builds confidence but also lowers dropout rates by 25%, according to youth sports studies. Snowfeet* Mini Ski Skates are perfect for this step-by-step approach, offering stability at each learning stage.
Mistake 2: Ignoring Safety Equipment and Proper Fit
Some parents skip safety gear, assuming double-blades or beginner skates are enough protection. Others don’t check if the skates fit snugly, which can lead to ankle twists, blisters, or even more serious injuries. Statistics from the U.S. Consumer Product Safety Commission reveal that 15,000 kids under 12 are injured annually while skating, often due to poor equipment fit.
The fix: Always measure your child’s shoe size before strapping on skates, and make sure there’s no more than 0.25 inches of heel slip. Tighten straps properly and ensure your child wears a CSA-approved helmet, along with pads and gloves for added protection . Re-check the fit every 10 minutes on the ice to avoid discomfort or slipping. This simple habit can prevent up to 70% of common injuries like blisters and falls. Snowfeet* skates are designed with adjustable straps, making it easy to get a secure fit every time.
Mistake 3: Skating in Crowded or Poor Ice Conditions
Crowded rinks or poorly maintained ice can be overwhelming for beginners. Public sessions with more than 50 skaters per hour triple the risk of collisions. Add in ruts, chips, or slushy ice (caused by temperatures above 28°F), and it’s hard for kids to stay steady - especially when they’re still learning basic balance.
The fix: Opt for sessions with fewer than 20 skaters. Morning slots, like 9–11 AM, are usually less busy and have better ice conditions. Avoid weekends or holidays when rinks are packed. Calling ahead to check ice quality can also save you a trip. According to coaches from the Ice Skating Institute of America, this strategy improves learning speed by 50%. One parent on Reddit’s r/iceskating shared that switching from a crowded weekend session to a quiet morning helped their child master turns in just two weeks. While Snowfeet* skates offer excellent stability, smoother and less crowded ice always makes learning easier.
Conclusion
Teaching ice skating with strap-on double-blades can be a smooth and rewarding experience. By taking a step-by-step approach - starting with off-ice practice, emphasizing safety gear, and picking the right skating conditions - you can set your child up for a fun and successful start.
Take Snowfeet* Mini Ski Skates, for example. These skates are a great choice because they attach to regular winter boots and adjust to growing feet, making them a smart, long-term option compared to traditional skates.
Progress at a steady pace. Focus on each learning stage, ensure the skates fit properly, pick less crowded times to practice, and celebrate small wins like standing unsupported for 30 seconds or completing that first glide. Remember, rushing through the process can lead to injuries, while patience helps build both confidence and skill.
Most importantly, keep it enjoyable. The goal isn’t perfect technique right away - it’s about helping your child find the joy in gliding across the ice. With the right equipment and a safe setting, those first wobbly steps will soon turn into confident strides.
FAQs
What age should kids start using strap-on double-blade skates?
Kids can usually start using strap-on double-blade skates between the ages of 3 and 5. At this stage, most children have developed enough balance and coordination to stand and move steadily on the ice. For tips on building their confidence, improving balance, and ensuring their safety, check out the full article for helpful guidance.
Will strap-on double-blades fit any winter boot?
Strap-on double-blades are built to be adjustable, making them suitable for various winter boots, particularly those with standard sizes and shapes. That said, it’s a good idea to review the product details to confirm they’ll work with your child’s boots. A proper fit ensures both safety and stability on the ice.
How do I know my child is ready for single-blade skates?
A child is likely ready for single-blade skates once they can confidently balance, walk, and glide on strap-on double-blades with little to no assistance. They should also have a grasp of basic safety rules, like how to fall without getting hurt. Building these foundational skills on double-blades helps ensure they have the stability and confidence to make the switch to single-blade skates smoothly.


Leave a comment
This site is protected by hCaptcha and the hCaptcha Privacy Policy and Terms of Service apply.