


Maintaining your cross-country skis is simple if you follow a few key steps. Regular cleaning, waxing, and proper storage can keep your skis gliding smoothly and lasting for years. Here’s the gist:
- Clean after every use: Remove dirt, old wax, and moisture to prevent damage.
- Wax regularly: Glide wax every 100 km or as needed. Use storage wax during the off-season.
- Inspect for damage: Look for scratches, rust, or loose bindings and fix them early.
- Store properly: Keep skis dry, flat, and in a cool, controlled space.
If you’re short on time, consider Snowfeet* NORDIC skis. Their compact size (just 35 inches) means less cleaning, waxing, and storage hassle compared to longer skis. They’re lightweight, easy to maintain, and perfect for skiers who want more time on the trails and less time on upkeep. Whether you’re new to skiing or a seasoned pro, following these tips will keep your gear in great shape and ready for action.
Snowfeet NORDIC vs Traditional Cross-Country Skis Maintenance Comparison
How to Clean Cross-Country Skis
Removing Old Wax
Start by scraping off as much old wax as possible using a plastic scraper. Hold the scraper at a slight angle and work from tip to tail in smooth, even strokes. While you won’t get all the wax off in this step, the bulk of it should come away, leaving only the residue for chemical removal.
For tougher kick waxes and klisters, grab a citrus-based wax remover or base cleaner. These waxes are built to resist water, so regular cleaning methods won’t cut it. Always use nitrile gloves (EN374 standard) to protect your skin while handling solvents. Apply the remover to fiberlene paper, then wipe down all surfaces of the ski - the base, sides, and top sheet. Follow up with clean fiberlene to remove any leftover residue and let the skis dry for about 5–10 minutes.
If you’re using Snowfeet* NORDIC skis, this step is much quicker. At just 35 inches long, these skis have less than half the surface area of traditional 71–79 inch skis, cutting your cleaning time significantly. Once the surface is clean, you’re ready to move on to restoring the glide structure.
Cleaning the Glide and Kick Zones
With the old wax gone, it’s time to deep-clean the ski’s base. Start with the glide zone. Use a fine steel brush to clean from tip to tail, opening up the pores and removing dirt . Spray glide wax cleaner onto fiberlene paper, then brush it evenly into the glide zone while it’s still wet. Wipe away the residue with clean fiberlene and let the base dry for 5–10 minutes before giving it a final, firm brushing.
"A clean ski performed noticeably better, appropriate wax and structure were just icing on the cake." - Coach Karl and Kelly, Teacup Lake Nordic Club
Stick to brushing in a single direction (tip to tail) to avoid damaging the base. For the kick zone, use the same fiberlene and base cleaner method, but skip the aggressive brushing since this area doesn’t need the same level of fine structure as the glide zone.
Checking Bases and Edges for Damage
Once the cleaning is done, inspect the base for any damage. A clean base makes it easier to spot potential problems early. Look for dry spots that appear white or gray - these indicate the skis have gone without protective wax and need attention. Check for deep scratches or gouges that could allow moisture to seep into the core. Also, examine the steel edges for rust, especially if the skis were stored in a damp environment.
Don’t forget to inspect the binding plates and make sure all screws are tight. Loose bindings can affect your balance and create safety risks on the trail. If you notice serious base damage or heavy oxidation, professional stone grinding might be necessary. However, in most cases, regular cleaning can catch these issues early, allowing for simple fixes like epoxy repairs or re-waxing.
Snowfeet* NORDIC skis, with their ultra-high-molecular-weight polyethylene (UHMWPE) bases, require less maintenance than traditional skis. Research shows this material can resist oxidation for up to three decades, making it far more durable than the softer, low-density polyethylene bases found on many touring skis.
Waxing Your Cross-Country Skis
Applying Storage and Performance Wax
Waxing is essential for keeping your ski bases in top shape, preventing oxidation, and ensuring a smooth glide on the snow. To get started, secure your skis in a vise or on a waxing bench. Heat your waxing iron to the temperature specified on the wax packaging. Then, drip wax along the ski base, spacing drops about every ½ inch from tip to tail for an even coat.
When ironing, move the iron steadily down the ski at a pace of 1–2 inches per second. As Daryl McNutt from Fast Wax puts it, "Keep the iron moving at all times; keep the iron from sitting in one spot too long; doing so may burn your ski base." While the wax is still warm, use a groove scraper to clean out the center and sidewalls. Let the skis cool for about 30 minutes at room temperature - avoid sudden temperature changes, as rapid cooling can stress the materials in your skis.
Once the wax has cooled, grab a plastic scraper, hold it at a 90° angle, and remove the excess wax with steady, firm strokes. Follow this up with a horsehair brush for several passes, then finish with a nylon brush to polish the base to a smooth, shiny finish.
If you're using Snowfeet* NORDIC skis, you'll find this process even quicker. Their shorter length compared to traditional skis means less wax, less ironing, and less scraping, making maintenance a breeze.
For off-season storage, apply a thick layer of hydrocarbon storage wax (usually red or yellow) and leave it unscraped. When the new season rolls around, scrape off the storage wax and apply fresh performance wax. This simple routine, especially with the streamlined maintenance of Snowfeet* skis, keeps your gear in excellent condition and ready for action.
If your skis feel sluggish or dull, consider giving them a deeper clean with the hot scraping method.
Hot Scraping Method
For a deeper clean, hot scraping is a great option. This method is especially useful if your skis seem to have lost their glide. Apply wax as usual, but while it’s still slightly warm, scrape it off immediately. The warm wax helps lift dirt and grime embedded in the base more effectively. Thanks to the compact design of Snowfeet* skis, this deep-cleaning process is faster and easier to manage.
Storing Skis During the Off-Season
Preparing Skis Before Storage
Before tucking your skis away for the off-season, make sure they’re completely dry. Any leftover moisture can lead to rust and other damage. Once dry, leave the final layer of storage wax on the skis. As Jan Olav Bjørn Gjermundshaug, Product Developer at Swix, explains:
"We recommend that you heat a layer of storage wax when you put away your skis in spring. This saves you a lot of time when the first snow arrives, as you only need to remove the wax before skiing."
Next, clean off any kick wax or klister from the grip zone using a scraper and base cleaner. This prevents sticky residue from becoming a permanent problem. After that, brush the base about 20 times with Fibertex to refresh the surface. Gjermundshaug adds:
"By using Fibertex you get a fresher base material that more easily absorbs wax. This will result in better skis."
If you’re using Snowfeet* NORDIC skis, storage becomes even easier. Their compact size - around 35 inches - takes up far less room than traditional cross-country skis, which typically range from 67 to 83 inches. You can stash them in a closet, gear room, or even under a bed. This smaller size not only saves space but also helps protect the skis’ performance by avoiding awkward storage setups. While these prep steps work for all skis, Snowfeet* NORDIC skis make off-season storage much simpler.
Once your skis are prepped, focus on creating the right storage environment to keep them in top shape.
Best Storage Conditions
To keep your skis in great condition, store them flat in a cool, dry, and temperature-controlled spot. Roger Knight from Boulder Nordic & Cycle Sport offers this advice:
"Store lying down in an environment that doesn't get too warm. Do not store skis upright standing on their tails. Do not store skis in attics or crawl spaces where temperatures can be very hot in the summer."
Extreme heat can warp skis and damage materials, while dampness can lead to rust. Avoid standing skis upright on their tails, as this can cause unnecessary stress on the structure.
Use ski straps to keep your skis together, but don’t overtighten them - compressing the camber over time can affect performance. If your storage area tends to gather dust, like many garages or basements, that un-scraped layer of storage wax will act as a shield. Swix highlights this benefit:
"Storage rooms, garages and basements are typical places where skis are stored over the summer. They also typically contain a lot of dust that will end up on the base of your skis. This will in turn produce a dry base, which will be harder to glide on next season."
For added protection, consider using a ski bag, especially if your skis might be moved around or have other items stacked nearby. When winter rolls back around, all you need to do is scrape off the storage wax, apply fresh performance wax, and you’re ready to hit the trails again.
sbb-itb-17ade95
Maintenance Tips for Snowfeet* NORDIC Skis

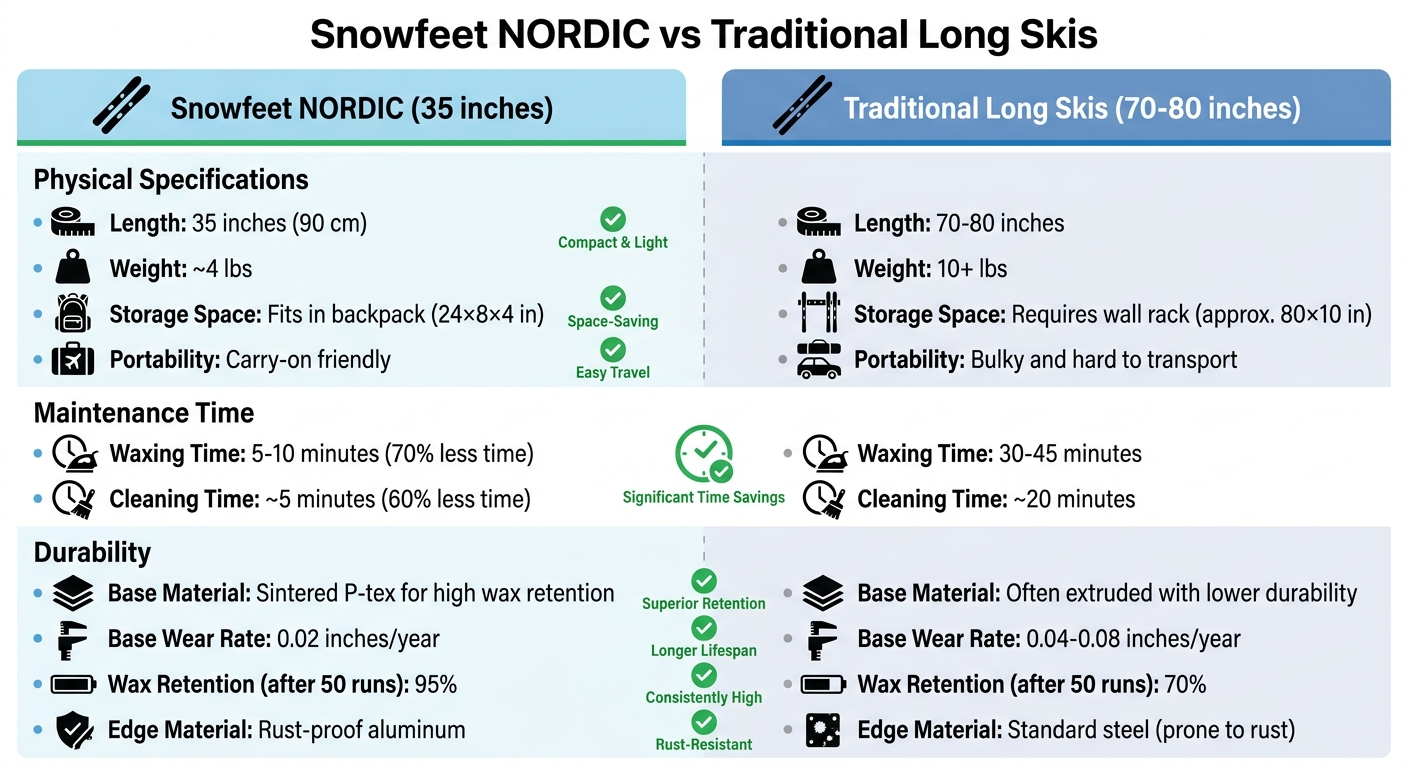
Snowfeet* NORDIC vs. Traditional Long Skis
Snowfeet* NORDIC skis are a breeze to maintain compared to traditional long skis. At just 35 inches long (about 90 cm) and weighing only 4 lbs per pair, they’re lightweight and compact. Traditional skis, on the other hand, can be 70–80 inches long and weigh over 10 lbs per pair. This difference means less hassle for you - cleaning, waxing, and storing these skis is much faster and easier.
Here’s a quick comparison:
| Feature | Snowfeet* NORDIC (35 inches) | Traditional Long Skis (70–80 inches) |
|---|---|---|
| Weight | ~4 lbs | 10+ lbs |
| Waxing time | 5–10 minutes | 30–45 minutes |
| Cleaning time | ~5 minutes | ~20 minutes |
| Storage space | Fits in a backpack (24×8×4 in) | Requires a wall rack (approx. 80×10 in) |
| Base material | Sintered P‑tex for high wax retention | Often extruded with lower durability |
| Portability | Carry-on friendly | Bulky and hard to transport |
With Snowfeet* NORDIC skis, you’ll spend about 70% less time waxing and 60% less time cleaning. That’s more time on the slopes and less time worrying about upkeep. Plus, their compact size makes storing them as simple as tucking them into a closet or sliding them under your bed.
Regular Maintenance Schedule
Keeping your Snowfeet* NORDIC skis in top shape doesn’t take much. During the ski season, here’s what to do:
- Weekly: Check for sidewall nicks or base scratches. If you find damage smaller than 1/16 inch, smooth it out with fine-grit sandpaper.
- Monthly: Test your bindings to ensure they’re secure. Use the Snowfeet* Binding Adjustment Tool (available for $14.99 at snowfeetstore.com) to tighten screws to 5–7 Nm torque.
- Every 5–10 uses: Clean and wax the base to keep it smooth and fast.
For deeper maintenance, inspect the base every month for signs of delamination or small cracks. If you notice damage up to 1–2 mm deep, grab the Snowfeet* Base Repair Kit ($19.99 at snowfeetstore.com). Apply the epoxy and let it cure for 24 hours.
Before storing your skis for the off-season in September, give them a full clean and wax. When November rolls around, inspect and prep them for the new season. Following this routine can prevent up to 80% of common ski issues and help your skis last for over 300 hours of use each season.
Why Snowfeet* Skis Are Easier to Maintain
Thanks to their 35-inch length, maintaining Snowfeet* skis is quick and simple. You can wipe down the base in under five minutes using a microfiber cloth - no fancy tools or extra space required. Waxing? It’s so easy you can do it on your kitchen table with a hairdryer for heat. This makes them ideal for anyone living in tight spaces, like apartments.
The skis are built to last, too. Their sintered bases are abrasion-resistant, wearing down only about 0.02 inches per year. Compare that to traditional extruded bases, which wear down at 0.04–0.08 inches annually. The rust-proof aluminum edges also handle salty snowmelt without corroding, making these skis a great choice for all conditions. Even after 50 runs in wet snow, the bases retain about 95% of their wax absorption, unlike traditional wood-core skis, which can drop to around 70% and might even need re-glueing.
When it’s time to store them, their compact size makes it easy. You can stash them vertically in a closet using ski straps (available for $9.99 at snowfeetstore.com) without worrying about warping. Simple, right? Snowfeet* NORDIC skis are built for convenience, so you can spend less time on maintenance and more time enjoying the ride.
Wax Your Waxless XC Skis: Applying Storage Wax to Your XC Skis
Conclusion
Taking care of your cross-country skis doesn’t have to be a hassle. Just wipe off dirt and leftover wax after every use, apply glide wax every 100 km, and store them in a cool, dry spot during the off-season. Also, give the bases and bindings a quick check now and then to spot any problems early.
With Snowfeet* NORDIC skis, maintenance gets even easier. Their compact design means less time spent cleaning and waxing compared to traditional long skis, so you can spend more time on the trails. Plus, their small size makes storage a breeze - no bulky racks needed. Built with a durable base and corrosion-resistant edges, these skis are made to handle tough conditions without breaking a sweat.
Stick to these easy tips, and your skis will stay in top shape, ready for smooth and carefree adventures on the trails.
FAQs
How do I know my skis need waxing?
If your skis aren’t "waxless" and they’re slipping or losing grip, it’s probably time to wax them. For classic cross-country skis, the center third needs waxing to ensure proper grip. The type of wax you’ll need depends on snow and temperature conditions. Cold, dry snow works best with hard wax, while warmer or refrozen snow calls for klister wax. Slipping or struggling to get a good grip? That’s your cue to grab the wax.
What’s the safest way to remove kick wax or klister?
To get rid of kick wax or klister safely, start by scraping off as much as you can with a scraper like the T87 or T88. Next, take a cleaning paper (fiberlene works great), apply a wax remover such as Swix Base Cleaner or Citrus Solvent, and gently clean off any leftover residue. Don’t forget to clean the sides and tops of the skis too. Once that's done, use fresh fiberlene to wipe everything down and let the skis dry for about 5–10 minutes before moving on to the next step.
Where should I store skis to avoid warping or rust?
To keep your skis in great shape, store them in a stable, climate-controlled spot. Avoid areas with big temperature swings or high humidity, as these can lead to warping or rust. When storing, place your skis base to base and secure them with straps or sleeves, but don’t overtighten - this could compress the camber. If you want to get fancy, ceiling racks are a great way to keep things organized and protected. Snowfeet skis are super easy to store, but these tips work for any type of skis to keep them in peak condition.


Leave a comment
This site is protected by hCaptcha and the hCaptcha Privacy Policy and Terms of Service apply.