


Jízda v terénu je vzrušující, ale nese s sebou rizika. Znalost jak vybírat trasy, číst terén a používat navigační nástroje vás může ochránit. Tento průvodce se věnuje všemu, co potřebujete: jak číst mapy, používat GPS a dělat bezpečnější rozhodnutí. Navíc vám představíme Snowfeet* - kompaktní lyže dlouhé 39 palců, které usnadňují pohyb v úzkých místech a smíšeném terénu jako nikdy předtím. Na rozdíl od dlouhých lyží jsou Snowfeet* lehké, přenosné a fungují s běžnou zimní obuví, což je ideální pro rychlé přechody mezi lyžováním a turistikou.
Hlavní poznatky:
- Naučte se číst topografické mapy pro úhly svahů, terénní pasti a sněhové podmínky.
- Používejte aplikace jako Gaia GPS, onX Backcountry a CalTopo pro plánování v reálném čase a lavinová data.
- Vždy mějte u sebe lavinové vybavení (vysílač, sonda, lopata) a umějte ho používat..
- Snowfeet* vynikají svou kompaktní velikostí, ovladatelností a snadným použitím v náročném terénu.
Pojďme si rozebrat, jak plánovat chytřeji, zůstat v bezpečí a co nejlépe využít své backcountry dobrodružství. :)
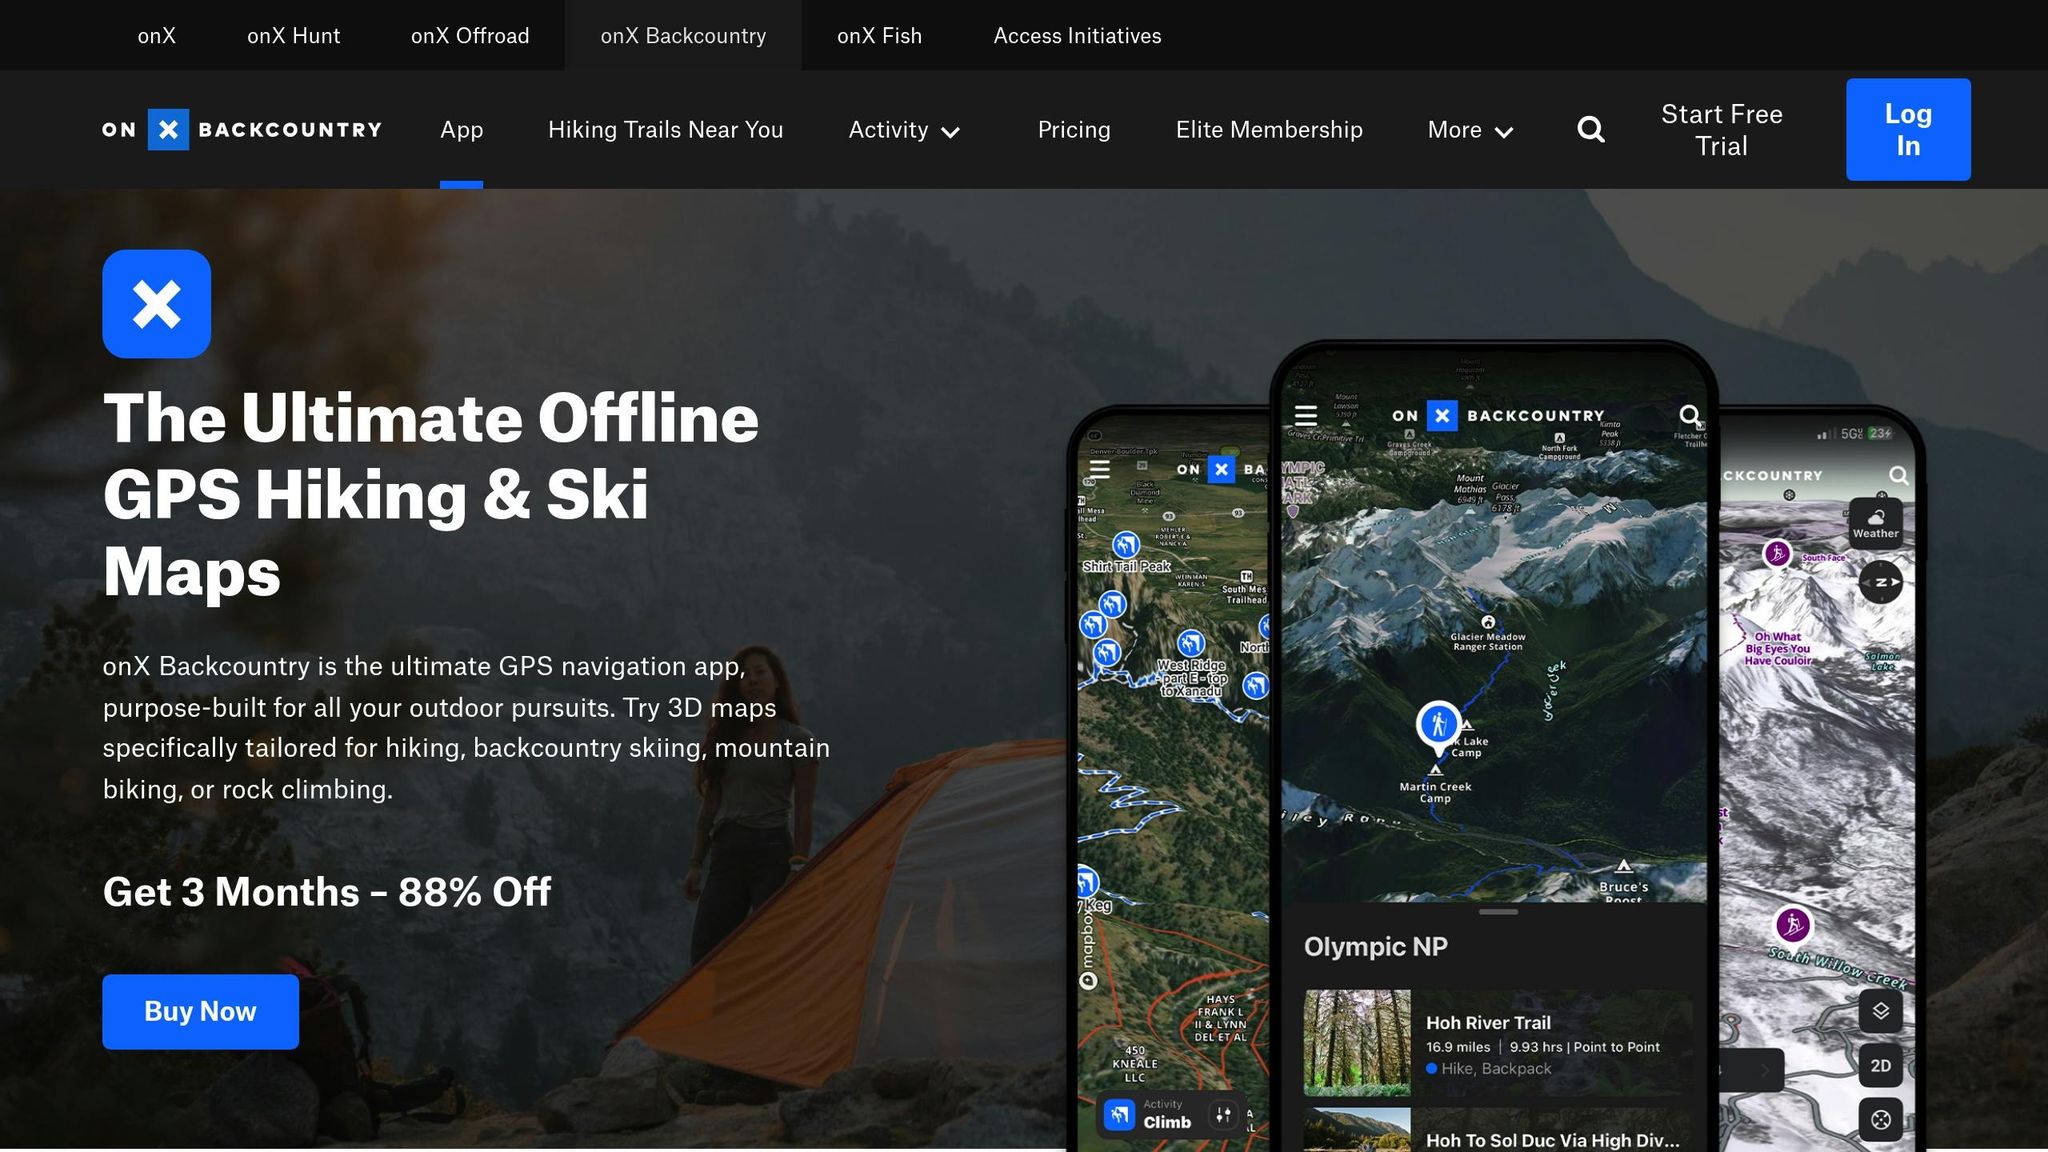
onX Backcountry Masterclass: Mapování v backcountry s ATES
Jak číst terén a plánovat svou trasu
Pochopení terénu není jen užitečná dovednost v backcountry – je to nutnost. Tam venku nemáte lyžařskou hlídku, která by označovala nebezpečí, ani záchranný tým připravený zasáhnout. Jste tam jen vy, vaše skupina a krajina. Proto je znalost „čtení“ terénu klíčem k bezpečí.
Čtení terénu není jen o tom, jak se dostat z bodu A do bodu B. Jde o rozpoznání stop, které vám řeknou o stabilitě sněhu, vlivu počasí a dokonce i únikových cestách. Každý hřeben, svah a rokle má svůj příběh – vaším úkolem je naslouchat, než se pustíte do jízdy.
Jak číst topografické mapy pro backcountry lyžování
Topografické mapy jsou jako taháky pro hory. Ty vrstevnice? Ukazují změny nadmořské výšky. Čím jsou blíže u sebe, tím je svah strmější – a strmé svahy (zejména mezi 30 a 45 stupni) jsou místem, kde laviny rády řádí.
Na co se zaměřit:
- Úhly svahů: Těsné vrstevnice znamenají strmý terén, což může znamenat riziko laviny. Naučte se tyto nebezpečné zóny rozpoznat před výstupem.
- Terénní prvky: Rokle a couloiry se často objevují jako vzory ve tvaru V, zatímco hřebeny vypadají jako obrácená V. Tyto tvary také naznačují expozici větru a hromadění sněhu.
- Orientace svahu (směr svahu): Na severní polokouli severně orientované svahy zůstávají chladnější, drží prašan, ale také nestabilní sněhové vrstvy. Jižně orientované svahy se rychleji oteplují, což může sníh zpevnit – nebo destabilizovat, jak se den otepluje. Východní a západní svahy? Často jsou střední cestou, nabízejí vyváženější sněhové podmínky.
- Terénní pasti: Jsou to místa jako rokle, koryta potoků nebo roviny pod strmými svahy, kde se může hromadit lavinový materiál. I malý sesuv může být v těchto zónách smrtelný.
- Stromy: Mapy také mohou ukazovat, kde stromy řídnou, což značí oblasti s větší expozicí větru a proměnlivými sněhovými podmínkami.
Ovládnutí těchto dovedností čtení map může znamenat rozdíl mezi bezpečnou, efektivní trasou a riskantní.
Používání digitálních nástrojů pro plánování tras
Zatímco papírové mapy jsou skvělé pro základy, digitální nástroje oživují hory díky datům v reálném čase a přesným plánovacím funkcím. Aplikace jako Gaia GPS, onX Backcountry a CalTopo jsou průlomové.
- Gaia GPS: Tato aplikace usnadňuje plánování tras. Můžete si nakreslit svou cestu, označit rozhodovací body a vypočítat převýšení. Její překryv úhlu svahu (červeně pro svahy strmější než 30 stupňů) vám pomůže rychle odhalit oblasti náchylné k lavinám. Navíc si můžete stáhnout mapy pro offline použití – super praktické, když jste mimo dosah signálu.
- onX Backcountry: Tento nástroj jde ještě dál tím, že integruje lavinová a meteorologická data přímo do vaší mapy. Uvidíte nedávné lavinové zprávy a předpovědi, což vám pomůže dělat chytřejší rozhodnutí za pochodu.
- CalTopo: Pro pokročilé uživatele nabízí CalTopo funkce jako vlastní vrstvy map a analýzu výhledu. Můžete vrstvit satelitní snímky, lavinové cesty a meteorologická data pro detailní pohled na terén.
Tyto nástroje vám dávají dynamičtější pohled na terén, což činí plánování bezpečnějším a efektivnějším.
Proč Snowfeet* fungují lépe v různých typech terénu
Tradiční lyže a snowboardy mohou být v terénu těžkopádné. Jejich délka (obvykle 170–190 cm) může ztížit ostré zatáčky nebo rychlé úpravy, zvláště v komplikovaném terénu. Právě zde přicházejí na řadu Snowfeet*.
S délkou pouhých 100 cm (39 palců) jsou Snowfeet* touring lyže kompaktní a obratné, otevírají možnosti, které delší lyže mohou zablokovat. Tady je důvod, proč vynikají:
- Úzké prostory: V hustých lesních porostech tradiční lyže potřebují široké oblouky, aby se vyhnuly překážkám. Snowfeet* vám umožní dělat rychlé, přesné pohyby, což vám dává lepší kontrolu v omezených prostorách.
- Skalnaté nebo smíšené podmínky: Kratší lyže usnadňují upravit stopu nebo vyskočit z vázání, když narazíte na proměnlivý sníh nebo odkryté kameny. Jejich kompatibilní boty umožňují hladký přechod mezi lyžováním a chůzí – žádné nepohodlné chození v lyžařských botách.
- Výhoda nízké hmotnosti: Nošení tradičních lyží vás může unavit při dlouhých přístupech nebo při průzkumu nových tras. Snowfeet* jsou mnohem lehčí, šetří vaši energii na sjezd.
Se Snowfeet* nejenže zvládáte terén – ovládáte ho. Ať už je to prašan, větrná krusta nebo ledové plotny, tyto lyže zvládnou přechody s lehkostí. Kombinace chytrých dovedností čtení terénu s univerzálním vybavením jako Snowfeet* vám dává jistotu čelit terénu přímo.
Navigační nástroje, které potřebujete: mapy, GPS a aplikace
Ztratit se v terénu není jen frustrující – může to být přímo nebezpečné. Proto je mít správné navigační nástroje, včetně záloh, nezbytné. Kombinace spolehlivosti tradičních metod s pohodlím moderní technologie zajišťuje, že najdete cestu i když se počasí nebo viditelnost zhorší. Tato směs staré školy a high-tech nástrojů je klíčem k bezpečným a přizpůsobivým dobrodružstvím v terénu.
Jak vybrat správnou mapu pro cestování v terénu
Papírové mapy jsou ultimátní záloha. Nezávisí na bateriích, nezamrzají v chladu a poskytují vám široký přehled o terénu, který digitální obrazovky prostě nemohou nabídnout. Pro skialpinismus jsou USGS 7,5minutové topografické mapy (měřítko 1:24 000) solidní volbou, nabízející detailní informace o terénu ideální pro plánování tras.
Je důležité vybírat mapy, které se pravidelně aktualizují. Trasy se mění, cesty se uzavírají a objevují se nová nebezpečí. Například Green Trails mapy jsou populární na západě USA a často zahrnují turistické trasy a značené startovní body, což je skvělá volba pro objevitele divočiny.
Digitální mapy naopak nabízejí data v reálném čase a časté aktualizace. Mohou zobrazovat zprávy o počasí, lavinové předpovědi a živé GPS sledování – to vše je nesmírně užitečné, ale mají i nevýhody. Výdrž baterie, odlesky na obrazovce na přímém slunci a ovládání v rukavicích jsou běžné výzvy.
Nejlepší strategie? Plánujte trasu doma pomocí digitálních map a v terénu noste jak digitální, tak voděodolné papírové verze. Papírovou mapu vložte do uzavíratelného sáčku nebo zalaminujte klíčové části, aby byly chráněné před živly.
Jak používat GPS zařízení a mobilní aplikace
Specializovaná GPS zařízení jako Garmin GPSMAP 66i jsou navržena pro náročné podmínky. Jsou vodotěsná, zvládají mrazivé teploty a mají baterie, které vydrží dny. Navíc GPSMAP 66i nabízí obousměrné satelitní zprávy – záchrana, když jste daleko od mobilního signálu.
Aplikace pro chytré telefony jsou všestrannější, ale méně spolehlivé v extrémním počasí. Aplikace jako Gaia GPS umožňují stáhnout podrobné topografické mapy pro offline použití a automaticky sledovat vaši trasu. Další skvělou volbou je onX Backcountry, který integruje lavinové bulletiny a aktualizace počasí přímo do svých map.
Před odchodem si stáhněte mapy celé trasy a přidejte kolem ní bezpečnostní zónu. Označte klíčové body – jako rozhodovací místa, únikové cesty nebo známá nebezpečí – abyste měli plán, pokud se podmínky náhle změní. Chladné počasí rychle vybíjí baterie, proto mějte zařízení v teple v kapse u těla a přibalte si náhradní powerbanky. S spolehlivými nástroji po ruce jste připraveni vyrazit do divočiny s jistotou.
Proč Snowfeet* usnadňují orientaci
Mít správné vybavení je zásadní, ale vaše výbava může také výrazně ovlivnit, jak snadno se dokážete orientovat. Právě zde vyniká kompaktní design Snowfeet*. Tradiční dlouhé lyže mohou ztížit rychlé zastavení a kontrolu mapy, zvlášť na úzkých místech jako hřebeny nebo husté lesy.
Snowfeet* mění pravidla hry. S délkou přibližně 39 palců (zhruba 100 cm) jsou dostatečně kompaktní, abyste mohli zastavit, vytáhnout mapu a zorientovat se bez potíží s těžkými lyžemi. Díky tomu jsou ideální pro rychlé přechody – třeba když narazíte na složitý rozcestník a potřebujete si zkontrolovat trasu.
Jejich lehká konstrukce také uvolňuje místo ve vašem batohu pro další navigační nezbytnosti, jako jsou náhradní baterie do GPS nebo nouzový přístřešek. A když se proplétáte úzkými lesními průseky nebo navigujete složitý terén, obratnost Snowfeet* vám umožní dělat přesné úpravy a udržet vás na správné cestě.
I ve skupině Snowfeet* usnadňují navigaci. Umožňují všem se shromáždit a prohlédnout mapy bez problémů s rozestupy, které přinášejí delší lyže. Je to malá, ale silná výhoda, která může znamenat velký rozdíl, když tam venku každé rozhodnutí počítá.
Jak dělat bezpečnější rozhodnutí v divočině
Dělat chytrá rozhodnutí v divočině není jen o správném vybavení - jde o čtení podmínek a připravenost upravit plány, jak se situace mění. Hory se nestarají o váš rozvrh a to, co odděluje bezpečný den od nebezpečného, často závisí na správném rozhodnutí ve správný čas.
Jak hodnotit riziko: povědomí o lavinách a analýza terénu
Začněte s lavinovými předpověďmi. Zdroje jako Utah Avalanche Center poskytují podrobné hodnocení nebezpečí od 1 (nízké) do 5 (extrémní). Ale pamatujte, tyto předpovědi pokrývají rozsáhlé oblasti a svah, který máte na mysli, může mít své vlastní jedinečné podmínky.
Úhel svahu je velmi důležitý. Strmější svahy jsou náchylnější k lavinám. Můžete použít aplikaci s inklinometrem v telefonu pro přesné měření. S praxí se zkušení lyžaři naučí odhadovat úhly pouhým okem. Pokud svah vypadá příliš strmý na pohodlné turistické boty, pravděpodobně je rizikový.
Dávejte pozor na terénní pasti. Prvky jako údolíčka, koryta potoků a oblasti pod skalními stěnami mohou i z malé laviny udělat smrtelnou situaci. Sníh se v těchto místech může nahromadit hlouběji nebo vás může zatlačit do stromů či skal. Vždy si prohlédněte únikové cesty a vyhněte se lyžování o samotě v těchto oblastech.
Věnujte pozornost větru a počasí. Svahy chráněné před větrem - ty, které jsou ve větrném stínu - mohou hromadit nestabilní, větrem naložený sníh, který se může uvolnit až po několika dnech. Hledejte známky jako vítr tvarovaný sníh, praskliny vystřelující ze sněhu nebo dutý zvuk pod nohama. Teplotní výkyvy jsou dalším vodítkem: rychlé oteplení oslabuje sněhovou pokrývku, zatímco dlouhodobý mráz může vytvořit křehké vrstvy. Včasné rozpoznání těchto rizik vám pomůže dělat lepší rozhodnutí jako skupina.
Nejlepší postupy pro skupinovou cestu a komunikaci
Dobrá komunikace je klíčem k prevenci nehod. Než vyrazíte, rozhodněte, kdo bude volit trasu a jak budete řešit neshody. Někdy by měl vést nejopatrnější hlas ve skupině, i když není nejzkušenější.
Cestujte jednotlivě přes lavinové území. Zbytek skupiny by měl zůstat v bezpečných zónách, odkud mají lyžaře jasně na dohled. Vyhněte se stání v zónách výjezdu laviny nebo místech, kde byste mohli být zachyceni, pokud se něco pokazí. Každý by měl znát únikovou cestu, než lyžař začne sjezd.
Často se hlaste. Naplánujte si konkrétní místa pro shromáždění a přehodnocení podmínek. To je obzvlášť důležité, pokud se počasí změní nebo narazíte na nečekaný terén. Pokud se někdo cítí nejistě nebo má problémy s podmínkami, řešte to hned, místo abyste tlačili dál.
Vědět, kdy se vrátit. Dohodněte se předem na podmínkách, které vyvolají návrat, ať už jde o zhoršující se počasí, známky nestability nebo jen pocit. Hory nikam neutečou a není ostuda ukončit den kvůli bezpečí.
Jak vám Snowfeet* dávají více možností
Když se podmínky změní, obratnost může znamenat vše. Tradiční dlouhé lyže vás drží v režimu lyžování, ale Snowfeet* vám umožňují rychle se přizpůsobit. Pokud úsek vypadá příliš riskantně, můžete snadno přejít na chůzi nebo je úplně sundat a jít pěšky.
Tato všestrannost usnadňuje bezpečnější rozhodování. Místo toho, abyste se zavázali k plnému sjezdu na pochybném sněhu, můžete lyžovat bezpečnější části a po problematických úsecích jít pěšky. Dlouhé lyže dělají přechody nepohodlnými, což může ohrozit bezpečnost.
Snowfeet* také pomáhají v úzkých místech. Pokud se podmínky změní nebo někdo ve skupině zápasí, můžete zastavit, znovu se seskupit a upravit plán, aniž byste se rozptylovali po nebezpečném terénu. Jejich kompaktní design umožňuje shromáždit se a dělat rozhodnutí v reálném čase.
Lehká konstrukce snižuje únavu, což je v terénu velmi důležité. Unavené nohy vedou k špatnému úsudku a přehlédnutí jemných změn ve sněhu nebo počasí může znamenat problém. Se Snowfeet* zůstáváte svěžejší a bdělejší, což zlepšuje vaši schopnost reagovat na potenciální nebezpečí.
I v nouzových situacích Snowfeet* usnadňují život. Pokud někdo utrpí zranění nebo se počasí zhorší, jejich malá velikost a nízká hmotnost je mnohem snazší nést než tradiční lyže. To může být zásadní v náročné evakuační situaci.
sbb-itb-17ade95
Snowfeet* vs dlouhé lyže a snowboardy: Kompletní srovnání
Při přípravě na dobrodružství v terénu často tradiční dlouhé lyže a snowboardy nestačí zvládnout obratné výzvy smíšeného terénu. Přicházejí Snowfeet*: lehká, přenosná a všestranná alternativa, která září tam, kde tradiční vybavení selhává. Pojďme se podívat na porovnání vedle sebe, jak si Snowfeet* vedou proti dlouhým lyžím a snowboardům.
Porovnání vedle sebe: Snowfeet* vs tradiční dlouhé lyže & snowboardy
Přehled klíčových vlastností a výkonu Snowfeet* ve srovnání s tradičními dlouhými lyžemi a snowboardy:
| Vlastnost | Snowfeet* | Tradiční dlouhé lyže & snowboardy |
|---|---|---|
| Hmotnost | Ultra lehké, snižující únavu při dlouhých túrách | Těžší, což ztěžuje výstupy |
| Přenosnost | Dostatečně kompaktní, aby se vešel do batohu | Vyžaduje další nosné vybavení jako popruhy nebo střešní nosiče |
| Rychlost přechodu | Rychlé přepínání mezi lyžováním a chůzí | Pomalejší kvůli složitému vázání |
| Schopnost chůze | Umožňuje přirozenou chůzi mimo sjezdovku | Nepohodlné a těžkopádné při chůzi |
| Uložení v autě | Snadno se vejde do auta | Často vyžaduje externí úložný prostor, jako jsou střešní nosiče |
| Nouzové sundání | Rychlé a snadné sundání | Tradiční vázání zabere více času |
Lehký design, který vás udrží v pohybu.
Snowfeet* jsou vyrobeny s ultra lehkým designem, což znamená menší zátěž pro vaše tělo během dlouhých výstupů a lepší kontrolu při navigaci v náročném terénu. To z nich dělá průlom pro ty, kteří chtějí šetřit energii, aniž by obětovali výkon.
Přenosnost, která zjednodušuje vaše dobrodružství.
Díky své kompaktní velikosti se Snowfeet* pohodlně vejdou do vašeho batohu, osvobozují vás od potíží s objemným vybavením. Zapomeňte na střešní nosiče nebo složitá úložná řešení – tyto se snadno vejdou do vašeho auta a jsou připraveny vyrazit kamkoli vás vaše dobrodružství zavede. Navíc jsou cenově dostupnou volbou, která vám nechá více peněz na důležité bezpečnostní vybavení a lavinový výcvik.
Přizpůsobivost pro smíšený terén.
Jednou z výrazných vlastností Snowfeet* je jejich schopnost rychle přepínat režimy. Ať už lyžujete nebo jdete pěšky, můžete se snadno přizpůsobit měnícímu se terénu, aniž byste byli omezeni svým vybavením. Tato flexibilita vám umožní soustředit se na dobrodružství místo boje s výbavou.
Rychlé sundání pro nouzové situace.
V kritických situacích záleží na čase. Snowfeet* lze rychle sundat, což vám dává výhodu, když potřebujete evakuovat nebo reagovat na nouzovou situaci. Tato snadnost použití může znamenat rozdíl, když každá sekunda hraje roli.
Snowfeet* nejsou jen alternativou k tradičnímu lyžařskému vybavení – jsou chytřejším, efektivnějším způsobem, jak zvládnout výzvy v terénu. Ať už jde o jejich lehkou konstrukci, bezkonkurenční přenosnost nebo schopnost přizpůsobit se měnícím se podmínkám, jsou navrženy tak, aby vaše dobrodružství bylo plynulejší a zábavnější.
Krok za krokem průvodce plánováním vaší túry na lyžích v terénu
Plánování túry na lyžích v terénu není jen o výběru trasy a vyrazit. Je to o přípravě, povědomí a správných nástrojích pro zajištění bezpečnosti a zábavy. Pevný plán začíná důkladným výzkumem, správným vybavením a flexibilitou přizpůsobit se. Snowfeet* to usnadňují svým kompaktním designem, který snižuje potíže s objemným vybavením a zjednodušuje logistiku.
Jak zkoumat trasy a podmínky
Začněte s denními lavinovými zprávami. Před odchodem zkontrolujte zprávy z důvěryhodných zdrojů, jako je Colorado Avalanche Information Center, Northwest Avalanche Center nebo Utah Avalanche Center. Tyto zprávy rozebírají aktuální stav sněhové pokrývky a lavinová rizika, pomáhají vám pochopit nejen to, co se děje nyní, ale i jak se sníh choval v průběhu času.
Ponořte se do více zdrojů pro podrobnosti o trasách. Průvodce jsou skvělým výchozím bodem pro pochopení místního terénu, ale nezastavujte se jen u nich. Online fóra, Facebookové skupiny zaměřené na konkrétní horská pásma a cestovní zprávy na platformách jako Mountain Project vám mohou poskytnout aktuální informace od těch, kteří tam nedávno byli. Aplikace jako OnX Backcountry jsou také neuvěřitelně užitečné, nabízejí podrobné mapy s úhly svahů, které zvýrazňují potenciální lavinová nebezpečí.
Používejte nástroje k vizualizaci terénu. Google Earth Pro je skvělý zdroj pro získání 3D pohledu na vaši trasu. Pomáhá vám odhalit hřebeny, údolí a potenciální nebezpečí jako jsou rokle nebo rovné oblasti, kde by se mohl hromadit lavinový sníh.
Proberte se svou skupinou úroveň zkušeností a toleranci k riziku. Trasa, která je zvládnutelná pro zkušené lyžaře, může být pro začátečníky příliš riskantní. Snowfeet* pomáhají vyrovnat podmínky díky svému snadno naučitelnému designu, což méně zkušeným členům umožňuje soustředit se na bezpečnost a navigaci.
Dodržování těchto kroků vám usnadní balení i rozhodování na cestách.
Co sbalit na bezpečný výlet
Výbava pro bezpečnost při lavinách je nezbytná. Vždy noste lavinový vyhledávač, sondu a lopatu – a naučte se je používat. Pokud jste tak ještě neučinili, absolvujte kurz Avalanche Level 1, kde se naučíte základní záchranné techniky. Programy jako "Know Before You Go" jsou také skvělé pro získání pevného základu v bezpečnosti při lavinách.
Přineste spolehlivé navigační nástroje. Aplikace jako GAIA GPS vám umožní stáhnout mapy pro offline použití, takže se můžete orientovat i bez signálu. Ale nespoléhejte se jen na technologie – přibalte si také fyzickou mapu a kompas jako zálohu. Díky lehkému designu Snowfeet* budete mít v batohu místo i na tyto nezbytnosti.
Buďte připraveni na nepředvídatelné počasí. Horské počasí se může změnit během mrknutí oka, proto se oblékejte do vrstev a přibalte si extra izolaci. Zahrňte nouzové předměty jako bivakovací pytel nebo nouzovou deku pro zvýšení bezpečnosti.
Nezapomeňte na opravné a nouzové potřeby. Opravná sada s izolační páskou, stahovacími pásky a multifunkčním nářadím může zachránit den, pokud se něco pokazí. Lékárnička přizpůsobená velikosti vaší skupiny a délce výletu je nutností. Také zvažte nošení satelitního vysílače nebo lokalizačního majáku pro nouzové situace.
Mít správné vybavení znamená, že budete připraveni přizpůsobit se čemukoli, co vám hory přichystají.
Jak upravit své plány v reálném čase
Zůstaňte flexibilní. Podmínky v terénu se mohou rychle měnit, takže buďte připraveni měnit plány za pochodu. To, co se zdálo bezpečné při vašem průzkumu, může na místě vypadat riskantně. Snowfeet* v těchto situacích vynikají, umožňují vám bez námahy přepínat mezi lyžováním a chůzí, když potřebujete změnit směr nebo ustoupit.
Mějte oči na terénu. Sledujte známky nebezpečí jako praskliny nebo dutě znějící sníh. Tyto varovné signály znamenají, že je čas přehodnotit trasu. Snowfeet* usnadňují přechod do režimu pěší turistiky, když potřebujete projít rizikovými oblastmi.
Komunikace je klíčová. Ujistěte se, že každý ve vaší skupině se cítí pohodlně vyjádřit své obavy. Pokud někdo zaznamená něco nebezpečného nebo se cítí nejistě, naslouchejte. Ignorování těchto varování může vést k špatným rozhodnutím.
Pokud je to možné, kontrolujte aktualizace. Pokud máte signál, podívejte se na aktualizované předpovědi počasí a lavinové bulletiny. Podmínky se mohou měnit rychleji, než očekáváte, a nové zprávy mohou odhalit nebezpečí ve vaší plánované oblasti. Lehký výbava jako Snowfeet* usnadňuje rychlou změnu směru bez zatížení těžkým vybavením.
Vědět, kdy to vzdát. Někdy je nejchytřejší rozhodnutí se otočit zpět. Pokud se podmínky stanou příliš nebezpečnými, nepokračujte dál. Snowfeet* usnadňují proces ústupu díky rychlým přechodům a kompaktní velikosti, což usnadňuje manipulaci s vybavením v stresových situacích.
Závěr: Ovládněte hledání trasy se Snowfeet*
Hledání trasy je o přípravě, správném vybavení a flexibilitě. Správné vybavení může znamenat rozdíl mezi náročnou túrou a hladkou, příjemnou cestou.
Snowfeet* jsou průlomem v navigaci v terénu. Umožňují plynule přecházet mezi lyžováním a pěší turistikou, i když terén nebo podmínky hodí nečekanou výzvu. Na rozdíl od tradičního vybavení, které může být objemné a omezující, Snowfeet* vám dávají svobodu přizpůsobit se za pochodu. Potřebujete rychle ustoupit? Žádný problém - nebudete se trápit s nadměrným vybavením, které se zachytává o každou větev nebo kámen.
Další velká výhoda? Přenosnost. Snowfeet* jsou dostatečně kompaktní, aby se vešly do standardního batohu, přičemž zůstává dostatek místa pro vaše nezbytné bezpečnostní nástroje jako vysílač, sondu, lopatu nebo dokonce staromódní záložní mapu. Navíc jejich lehký design znamená, že si udržíte tempo, ať už zvládáte dlouhý přístup nebo rychlé úpravy trasy.
A pojďme mluvit o bezpečnosti. Když vaše vybavení pracuje s vámi - ne proti vám - je snazší dělat chytrá rozhodnutí v daný okamžik. Snowfeet* zjednodušují přechody mezi vybavením, což znamená, že můžete rychle reagovat na měnící se podmínky. Pokud lavinové zprávy nebo aplikace pro analýzu svahů signalizují nebezpečí, budete připraveni jednat bez váhání.
Často kladené otázky
Jak se Snowfeet* srovnávají s tradičními dlouhými lyžemi z hlediska bezpečnosti a ovladatelnosti při backcountry lyžování?
Snowfeet* backcountry lyže, měřící pouhých 39 palců (100 cm), jsou navrženy pro maximální obratnost a kontrolu v náročných nebo úzkých prostorech. Jejich kompaktní velikost usnadňuje průchod úzkými stezkami nebo hustými stromy, snižuje riziko zranění a umožňuje rychlé, přesné zatáčky - i když jsou sněhové podmínky nepředvídatelné.
Na druhou stranu tradiční dlouhé lyže, obvykle přes 60 palců (152 cm), vynikají stabilitou a plynulým klouzáním na širokých, otevřených svazích. Ale v omezených prostorách mohou působit neohrabaně a být těžší na ovládání, což může komplikovat bezpečnost v prudkém nebo technickém terénu. Snowfeet* lyže nabízejí ideální kombinaci přenosnosti a ovladatelnosti, což je skvělá volba pro lyžaře, kteří chtějí s lehkostí a jistotou zvládat backcountry dobrodružství.
Jaké jsou nejlepší digitální nástroje pro plánování tras backcountry lyžování a jak zlepšují bezpečnost?
Při plánování tras pro backcountry lyžování vyniká několik digitálních nástrojů: Gaia GPS, CalTopo a onX Backcountry. Tyto aplikace jsou nabité funkcemi jako podrobné topografické mapy, analýza terénu a nástroje pro kontrolu úhlů svahů a předpovědí lavin. Navíc umožňují stahovat mapy pro offline použití, takže jste krytí i na místech bez signálu.
Co dělá tyto nástroje tak cennými, je jejich schopnost zvýšit bezpečnost. Poskytují aktuální informace o počasí, úrovně rizika lavin a popisy tras navržené speciálně pro podmínky v backcountry. Díky těmto poznatkům a pečlivému plánování budete lépe vybaveni k chytrým rozhodnutím, snížení rizik a sebevědomějšímu zvládání náročného terénu.
Na co bych se měl dívat na topografické mapě při hodnocení rizika lavin při backcountry lyžování?
Při použití topografické mapy k odhadu rizika lavin věnujte pozornost několika klíčovým prvkům. Úhel svahu je zásadní - většina lavin se spouští na svazích mezi 25° a 45°. Dále je tu orientace, protože severní a východní svahy v mnoha oblastech mají tendenci držet nestabilnější sníh. Nezapomeňte na terénní pasti jako jsou rokle, útesy nebo přehyby; ty mohou zvýšit nebezpečí tím, že soustředí nebo zesilují lavinové suť. Naopak terénní kotvy jako husté stromy nebo velké kameny mohou někdy pomoci stabilizovat sněhovou pokrývku na určitých místech.
Kombinace znalostí z této mapy s aktuálními pozorováními a nástroji jako GPS může výrazně zlepšit vaši bezpečnost a rozhodování při objevování backcountry. A nesmíme zapomenout na vybavení - něco jako Snowfeet* Walkski Backcountry Touring Skis (100 cm) může být průlomové. Tyto kompaktní lyže nabízejí přenosnost a kontrolu, kterou je těžké překonat u objemnějších lyží nebo snowboardů, což usnadňuje zvládání náročného terénu.
Související blogové příspěvky
- Jak vybrat lyže pro začátečníky v backcountry (bezpečnost především!) - 2025
- Měl bych si před backcountry lyžováním udělat kurz bezpečnosti proti lavinám?
- Terénní pasti při backcountry lyžování: Co to je a jak se jim vyhnout
- Jak vybrat bezpečnou trasu pro backcountry lyžování: Tipy pro hodnocení rizika


Zanechte komentář
Tento web je chráněn službou hCaptcha a vztahují se na něj Zásady ochrany osobních údajů a Podmínky služby společnosti hCaptcha.