


Yes - you can pack for a ski trip without a giant ski bag. I’d do it by starting with shorter gear, wearing the bulkiest stuff in transit, and building one ski clothing setup instead of packing a new outfit for each day.
Here’s the short version:
- Smaller gear changes everything. Full skis often need a ski bag. Short gear can fit in a normal suitcase, duffel, or even a carry-on-size backpack.
- Clothes take more space than most people think. For a 3–5 day trip, I’d pack 2 base-layer tops, 2 bottoms, 2–3 ski socks, 1 midlayer, 1 ski jacket, and 1 pair of ski pants.
- Boots and helmets shouldn’t travel empty. I stuff boots with socks, gloves, and toiletries, then put goggles and a beanie inside the helmet.
- Airline size limits matter. Many U.S. airlines use 62 linear inches as the cutoff for oversize checked bags. Stay under that, and you can often skip extra bag fees.
- One checked bag + one carry-on is enough for many trips. That setup is a lot easier than hauling a ski bag, suitcase, and boot bag through the airport. Been there. Not fun :)
If I wanted the simplest setup, I’d aim for this:
| Setup | Best for | What I’d pack |
|---|---|---|
| Checked duffel or suitcase + backpack | 3–7 day trip | Boots, helmet, outerwear, short ski gear, layers |
| Carry-on-size backpack only | Light weekend trip | Short gear, base layers, small extras |
So, the big idea is pretty simple: shrink the gear first, then pack smart. Once the long ski bag is out of the picture, the rest gets much easier.
If you want a quick visual on compact ski packing, these videos can help:
I’d treat this whole thing like a space game: hard gear at the bottom, soft stuff in the gaps, heavy items on my body during travel. That’s how I keep the bag smaller, lighter, and way less annoying to drag through an airport.
Skiskates - Skis that Fit Into your Backpack | by Snowfeet*

Build a minimal ski clothing system
Clothing eats up the most space after your skis. So if your bag keeps puffing up like it had one too many lodge burgers, this is the spot to fix.
The move is simple: build one layering system and use it for the whole trip. Don’t pack a big, separate outfit for each day on the mountain.
Pack one layering system instead of multiple heavy outfits
Use one three-layer setup: base, mid, shell.
Start with a moisture-wicking base layer in merino or synthetic. Skip cotton. It holds sweat, gets cold, and turns into a bad time fast.
Then add one light midlayer. A 100–200 weight fleece works well. So does a thin synthetic or down sweater. That piece gives you warmth between the base and shell without taking over your suitcase.
Finish with one waterproof ski jacket and one pair of ski pants.
For a 3–5 day trip, you usually only need:
- 2 base-layer tops
- 2 base-layer bottoms
Merino can often be worn again for 2–3 days if you hang it up and let it dry overnight.
Wear your heaviest gear on travel day
Wear your ski jacket, insulated pants, and winter boots on travel day. That keeps the bulkiest stuff out of your bag, which helps more than people think.
Put a light base layer under it so you can peel off the jacket on the plane if you get warm. Once you board, stash the jacket in your carry-on.
Clothing checklist: what to bring and what to leave home
For a 3–5 day trip, this is enough for most skiers and riders without wasting space:
| Category | Bring | Leave Home |
|---|---|---|
| Base layers | 2 tops, 2 bottoms (merino or synthetic) | Cotton thermals |
| Midlayer | 1 fleece or thin synthetic or down sweater | Second heavy sweater or hoodie |
| Outerwear | 1 ski jacket, 1 pair insulated ski pants | Separate heavy parka |
| Socks | 2–3 pairs ski socks (merino rewears well if dried overnight) | Thick cotton socks |
| Gloves | 1 waterproof pair + optional thin liner glove | Extra bulky glove sets |
| Head/neck | 1 beanie, 1 neck gaiter or balaclava | Separate scarf, multiple hats |
| Underwear | 3–5 pairs | More than one per day |
| Après / town | 1 pair dark jeans or casual pants, 1–2 casual tops or sweaters | Extra shoes, second bulky coat |
| Sleepwear | 1 lightweight set | Heavy robes or extra pajamas |
A nice little space-saving trick: let your ski midlayer and jacket do double duty in town, and bring one pair of dark jeans for après-ski.
Next, fit boots, helmet, and accessories into the same bag without pushing past standard luggage size.
Fit boots, helmet, and accessories into standard bags
Boots and helmets are the last big pieces, and they take up a lot of room. The good news? They also have room inside them. Use that space before you grab another bag.
Use boots and helmet as extra storage space
Ski boots have empty space in the shell and up the shaft. Don’t waste it. Roll up socks, a base layer, or thin gloves and tuck them inside each boot. You can slide toiletries into the shaft too. Then buckle the boots loosely so everything stays put in transit.
Your helmet can do the same job. Put your goggles inside with the lens facing inward so it doesn’t get scratched. Then fill the rest with a beanie or neck gaiter. If you want extra padding, wrap the helmet in a fleece or midlayer.
After that, put the hard gear low and near the middle of the bag so the load stays balanced.
Place heavy gear low and centered in your bag
In a rolling suitcase, place the boots flat at the bottom near the wheel side. Set them side by side or heel to toe. That puts the heaviest part of the load close to the wheels, which makes the bag easier to roll through the airport without that annoying tip-over dance.
In a duffel, line the boots along the base and place the helmet between them. That setup helps the bag sit better and carry better.
Then pack soft layers around the hard stuff:
- Ski pants
- A puffy jacket
- A fleece
This helps protect your gear and stops things from sliding around during travel. Don’t leave boots loose with empty space around them. They’ll shift, bang into everything, and make the bag feel awkward fast.
With the weight sorted out, the next step is picking the bag that fits the trip.
Boot bag vs. duffel vs. carry-on-size backpack: which to use
The best bag depends on how long you’re going and how small your ski setup is. If you’re traveling with compact gear like Snowfeet* Skiskates or Snowfeet PRO, you may not need a ski bag at all. And that changes the game.
| Bag Type | Best For | Why It Works With Snowfeet* |
|---|---|---|
| Boot bag | Short trips, boot-only packing | Keeps boots apart from the rest of your stuff, but you’ll likely need a second bag for clothes |
| Duffel (70–90 L) | Full trips, one-bag packing | Fits boots, helmet, outerwear, and layers without pushing into oversized bag territory |
| Carry-on-size backpack | Short or light trips | Works well with compact Snowfeet* gear, so you can skip a checked bag |
For most ski trips, a duffel with backpack straps is the best all-around pick. It gives you enough room without turning your walk through the terminal into a wrestling match. If your setup is small enough to skip the ski bag, a carry-on-size backpack becomes a solid option. That’s one of the big perks of Snowfeet* gear.
One last tip: if you can, keep your boots in your carry-on. If your checked bag gets delayed, you can still ride. And honestly, that can save the whole trip.
sbb-itb-17ade95
Use compression tools and a step-by-step packing order
Once your boots and helmet are in, the last space fight is your soft gear. And yeah, this is where a lot of bags go from “pretty organized” to “why won’t this thing close?” The good news: the right tools and the right packing order make a big difference.
Cut bulk with packing cubes, compression bags, and rolling
After boots and helmet, soft layers become the main space hog. Vacuum compression bags work best for bulky ski clothing. They shrink jackets, pants, and midlayers, so save them for insulated pieces only.
For base layers, thermals, and socks, roll them instead of vacuum-sealing them. Rolled items slide into awkward corners around boots and other hard gear. Packing cubes help keep the small stuff neat, so you’re not digging through a pile of socks at the airport.
A simple rule:
- Use vacuum bags for bulky insulated pieces
- Roll base layers, thermals, and socks
- Use packing cubes for small loose items
Don’t vacuum-seal helmets, goggles, or rigid back protectors. Those items need their shape. Once the bulky gear is compressed, the rest comes down to plain old space management.
Fill dead space around hard gear with soft items
After you compress the big stuff, use every gap around boots and gear. Don’t let empty space just sit there doing nothing. Most ski bags have dead space between bindings and near the tips. If you’re packing short skis, you’ll usually have more room for clothing and accessories than you would with full-length skis.
Roll base layers into tight cylinders and tuck them around your gear and boots. It’s a bit like stuffing gloves into the corners of a drawer. Not glamorous, but it works.
Compressed jackets can also double as padding around hard items. That helps protect your gear during transit and makes better use of the space you already have.
Packing order: what goes in first, next, and last
Order matters more than most people think. If you pack at random, your gear shifts in transit and you lose space fast.
Follow this sequence:
- Bottom layer - heavy and hard gear first: Boots, compressed outerwear, and snow pants make a stable base.
- Middle layer - your Snowfeet* gear: Place your short skis in the middle, then pack softer items around them.
- Around the hard gear - rolled soft layers: Base layers, thermals, and mid-layers fill gaps and help stop everything from shifting.
- Top layer - quick-access items last: Keep socks, hand warmers, and toiletries on top.
Vacuum compression makes gear denser, so check your bag’s weight before you leave. Pack by weight: hard items first, soft layers around them, and your grab-fast items last.
Pick a carry-friendly bag setup and avoid oversized baggage fees
Long Skis vs. Snowfeet: Ski Trip Packing Comparison
Once your gear is compressed and packed by weight, the last move is simple: pick a bag setup that fits standard airline limits.
That’s the part that helps you dodge oversized baggage fees and skip the whole “How am I dragging this ski bag through the airport?” problem.
2 bag setups that work for most ski trips
For a weekend trip (2–3 days), a small checked suitcase or duffel plus a personal-item backpack is usually enough. Snowfeet* gear fits in the checked bag with boots, a helmet, and layers. Your backpack can hold valuables, a midlayer, and travel documents.
For a longer trip (4–7 days), go with a medium checked bag and a standard carry-on or 35–40 L backpack. The checked bag holds boots, helmet, Snowfeet* gear, and most of your clothing. The carry-on covers a backup ski outfit, electronics, and anything you’d be mad to lose if your checked bag gets delayed.
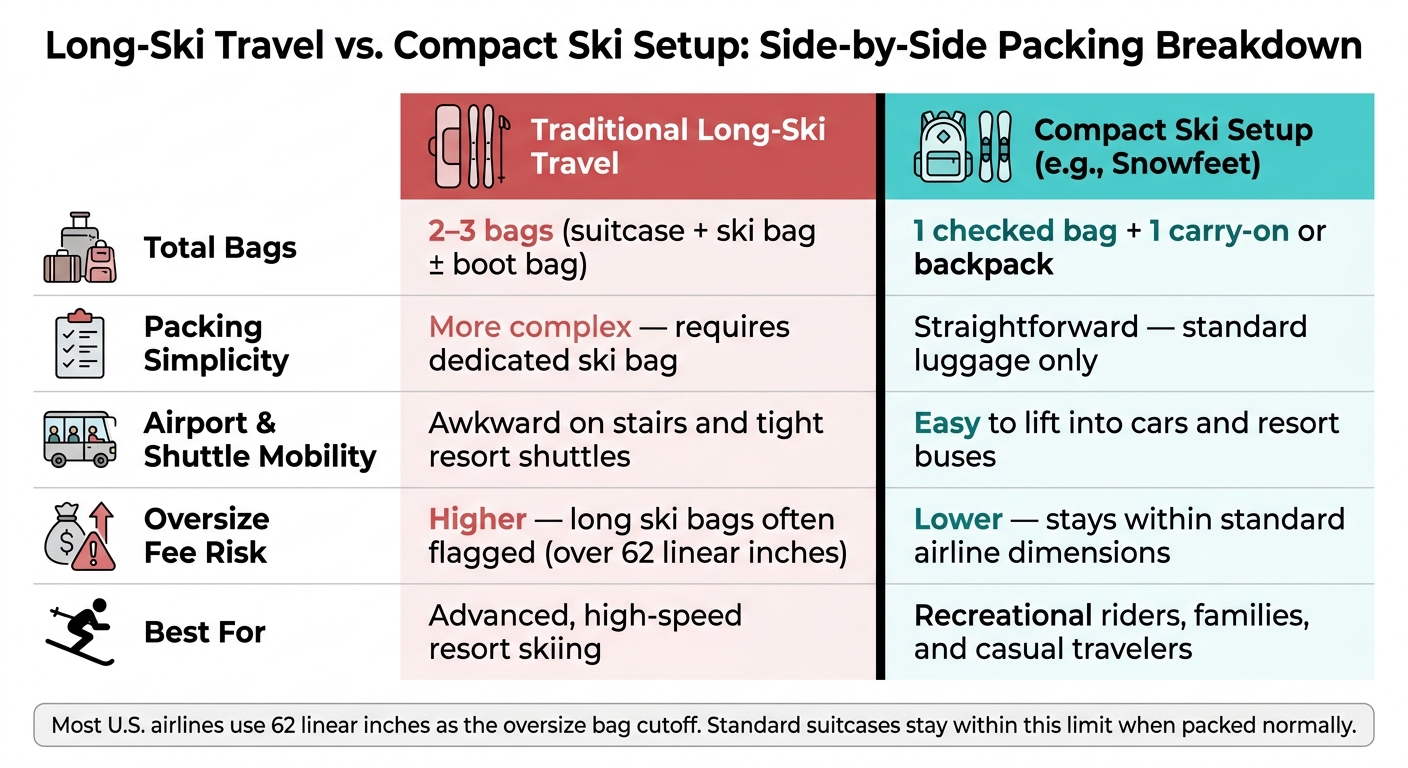
Both setups fit within standard luggage sizes, so there’s no need for a ski bag. Many U.S. airlines use 62 linear inches as the oversize cutoff, and standard suitcases in these size ranges stay within normal limits when packed within normal weight caps.
Here’s the side-by-side view next to a standard ski setup.
Long-ski travel vs. a Snowfeet* packing setup: side by side
Standard skis often need a ski bag, and that can lead to oversize fees. Snowfeet* gear fits inside a normal bag, which means no extra piece to haul around.
| Category | Long-ski travel | Snowfeet* setup |
|---|---|---|
| Total bags | 2–3 (suitcase + ski bag ± boot bag) | 1 checked bag + 1 carry-on/backpack |
| Packing simplicity | More complex, requires ski bag | Straightforward, standard luggage |
| Airport and shuttle mobility | Awkward on stairs, tight shuttles | Easy to lift into cars and resort buses |
| Oversize fee risk | Higher - long ski bags often flagged | Lower - stays within standard dimensions |
| Best for | Advanced, high-speed resort skiing | Recreational riders, families, and casual trips |
That’s the whole shift. Compact gear doesn’t just save space. It makes the trip less of a circus.
Conclusion: pack less, carry less, still ride ready
Everything in this guide comes back to one choice: start with compact gear.
Snowfeet* short skis make the rest of the packing plan possible. Then the other pieces fall into place. A lean layering system keeps clothing bulk down. Boots and helmets can hold smaller items. Compression bags shrink puffy gear. And a simple packing order helps keep the bag stable in transit.
Full-length skis still make sense for advanced skiers who care most about speed. But for most recreational travelers, Snowfeet* gives you more room, less hassle, and a much easier airport day. One normal bag. One carry-on. No ski-case headache.
FAQs
Can I really fit all my ski gear in one regular suitcase?
Yes - if you pick compact gear like Snowfeet, your ski setup can fit in a standard suitcase or even a carry-on.
That’s the big win here. Snowfeet products range from 15 to 47 inches, so they’re much easier to pack than full-length skis. Some models can fit within standard airline carry-on limits of 22 x 14 x 9 inches.
You can save even more space because Snowfeet work with regular winter boots or snowboard boots. That means you can leave bulky ski boots at home, which is a huge help when you’re trying to avoid stuffed bags and extra airline fees.
A simple packing trick:
- Wrap your Snowfeet in clothing
- Place them diagonally in the bag
- Fill your boots with small items like socks
It’s a smart way to save space and dodge oversized baggage fees.
What size Snowfeet* gear is easiest to pack for air travel?
For air travel, the 38 cm (15-inch) Snowfeet Mini Ski Skates* are the easiest to pack. They’re the smallest option, so they fit in a standard backpack or carry-on. Nice and simple.
The 44 cm (17.3-inch) Skiskates and 65 cm (25.6-inch) Skiblades are also easy to bring along. You can usually pack them in standard suitcases or carry-ons without much hassle.
Even the 120 cm (47-inch) Short Skis are much easier to handle than traditional skis. They take up less space and feel way less awkward at the airport :)
How do I pack ski boots and a helmet without wasting space?
Pack smart. Use regular waterproof winter boots or snowboard boots instead of bulky ski boots. They work with all Snowfeet models and take up far less space.
That’s one of the nice things here: Snowfeet gear is much smaller than old-school 6-foot skis, so you’ve got more room for the rest of your stuff.
Pack your helmet inside your carry-on or suitcase. Then tuck in your goggles and small accessories around it. A simple trick? Stuff your boots with socks or underwear. It saves space and gives your gear a bit of padding too.


Leave a comment
This site is protected by hCaptcha and the hCaptcha Privacy Policy and Terms of Service apply.