


Want to carve like a pro on the slopes? Short skis, like Snowfeet Skiblades, make it easier to master tight turns and smooth arcs. These lightweight, compact skis are perfect for carving, offering better control and less strain on your legs. Whether you're a beginner or a seasoned skier, this guide breaks down everything you need to know - from choosing the right model to step-by-step carving techniques.
Key Takeaways:
- Why Short Skis? Easier turns, less effort, and great control on varied terrain.
- Top Models: 65 cm for agility, 99 cm for versatility, and 120 cm for high-performance carving.
- Carving Steps: Start with J-turns, practice edge control with railroad drills, and build up to dynamic carving.
- Gear You’ll Need: Helmet, gloves, goggles, and winter boots (no stiff ski boots required).
- Snowfeet vs. Long Skis: Short skis are lighter, portable, and less expensive while delivering sharper turns and a faster learning curve.
Ready to hit the slopes? Let’s dive into the details and get you carving like a pro!
Snowfeet Skiblades vs Traditional Long Skis Comparison Chart
Gear Setup and Preparation
Choosing Your Snowfeet* Model

Picking the right Snowfeet* model depends on your riding style and the type of terrain you prefer. The 65 cm model ($550) is all about agility. It feels like skating on snow, making it ideal for quick turns and even uphill skating. If you're looking for something versatile, the 99 cm model ($590) is a great middle ground. It offers solid edge control and stability on groomed runs while staying light and easy to maneuver. For those chasing a high-performance carving experience without the weight of long skis, the 120 cm model ($790) is the top-tier option, delivering pro-level carving in a lightweight design.
Each model includes bindings compatible with ski or snowboard boots. Unlike traditional skis that can be bulky and a hassle to carry, Snowfeet* are compact and lightweight. You can toss them into your car trunk or even a large backpack - perfect for backcountry adventures or avoiding the chaos of crowded parking lots.
Once you’ve picked your model, it’s time to get your gear ready for a smooth day on the mountain.
Equipment Checklist and Setup
To pair with your Snowfeet*, you’ll need the basics: a helmet, warm layers, gloves, and goggles. One of the best things about Snowfeet* is their compatibility with regular winter boots. Whether you’re using ski bindings (US sizes 4.5–14.5) or snowboard bindings (US sizes 6–14.5), there’s no need to invest in expensive, stiff ski boots. Traditional ski setups often require extra gear and professional help, but Snowfeet* keeps it simple and beginner-friendly.
Make sure your bindings are properly adjusted, and your boots fit snugly. The lightweight design of Snowfeet* makes a noticeable difference, especially if you’re out on the slopes all day.
Getting Ready for the Slopes
Once your gear is set, it’s time to hit the snow. Start on groomed, intermediate runs to get a feel for the short skis. Keep your weight centered or slightly back on your heels, bend your knees a bit, and lean forward just enough to stay balanced. If you feel wobbly at higher speeds, try positioning one foot slightly ahead of the other to create a wider base.
Before diving into carved turns, practice the basics: gliding, shifting your weight, and stopping with a wedge (snowplow) technique. Snowfeet* are super responsive, so most riders get the hang of it quickly and often feel comfortable by the end of their first day. A solid setup and a little practice will help you make the most of Snowfeet*’s agility and unique riding experience on every run.
How to Carve on Snowfeet* Skiblades: Step-by-Step
Step 1: Get Comfortable with Traversing and J-Turns
Start by positioning yourself horizontally across the slope. This lets you feel how your Snowfeet* naturally grip the snow. Thanks to their sidecut design, the skiblades will naturally track slightly uphill, giving you a sense of how carving feels. Once you’ve got the hang of this, pick up some speed and try J-turns. Roll your ankles and knees inward while shifting your hips toward the inside ski. This movement creates a J-shaped track in the snow and helps you understand how edge pressure affects the Snowfeet*. Keep your weight centered over the skiblades - leaning too far forward can cause the tails to lift, leading to skidding instead of smooth carving. Mastering these basics will prepare you for more advanced drills like the railroad track exercise.
Step 2: Work on Edge Angles with Railroad Tracks
The railroad drill is a great way to refine your carving technique. Roll your feet from your big toe to your little toe in unison, letting your knees follow your feet. This will carve two clean, parallel tracks in the snow. The 99 cm and 120 cm Snowfeet* models are perfect for this drill. Their deep parabolic sidecut and narrow 7.8 cm waist (on the 120 cm model) make edge engagement feel effortless. The high-quality metal edges provide excellent grip and control. Since these skiblades demand precise front-to-back balance, focus on maintaining proper weight distribution. While other skiblades might forgive small mistakes, Snowfeet* reward precision. Once you’ve nailed your edge angles, practice combining turns for a smooth, flowing carving rhythm.
Step 3: Link Turns with Smooth Transitions
To connect your carved turns, release pressure on the edges and shift your weight smoothly to engage the new edge. Building on your edge control and balance, this technique helps you flow seamlessly from one turn to the next. Soften your outside leg (which becomes your new inside leg) and let your body naturally move over the skiblades to initiate the next turn. Using your outside ski pole as a stabilizer can help keep your upper body steady and make transitions smoother. Snowfeet*’s lightweight design makes these transitions feel quick and responsive, allowing you to execute tight, precise turns with ease.
Step 4: Master Dynamic Carving and Short Turns
Dynamic carving is all about quick weight shifts and sharp movements. Lean deeply to one side until you’re almost off balance, then quickly shift your weight to the other leg to begin the next turn. For high-speed carving, extend your forward leg to create a stable, triangular base, and bend your back knee more than your front to stay in control. If you want sharper turns, increase your edge angle. As Daniel Siouffi, a satisfied customer, shared:
Going fast, I was in complete control of every move, turn, and stop - by better distributing my weight on my toes, I was flying like never before.
For powder or varied terrain, the 99 cm and 120 cm models are your best bet. If you’re sticking to groomed slopes or focusing on tricks, the 65 cm model will suit you perfectly.
Snowfeet* vs. Traditional Skis for Carving
How Snowfeet* Outshines Traditional Skis
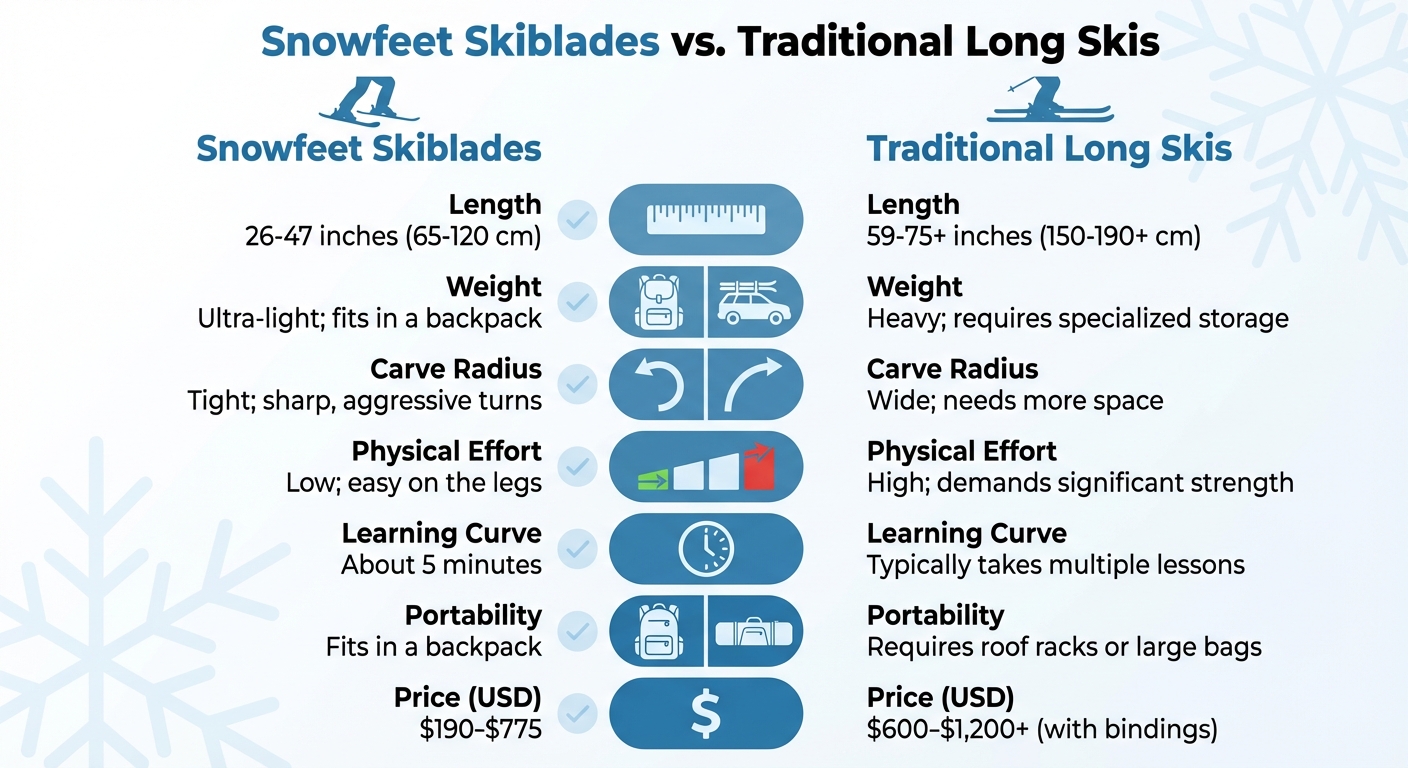
When it comes to carving, Snowfeet* offers a clear edge over traditional skis in several important ways. Let’s start with the physical effort. Traditional skis, typically 5 to 6 feet long, demand a lot of leg strength to handle continuous turns. On the other hand, Snowfeet* Skiblades, which range from just 26 to 47 inches (65 cm to 120 cm), require much less effort to initiate and maintain carved turns. That means less strain on your legs, so you can stay out on the slopes longer without feeling wiped out.
Then there’s the agility factor. Traditional skis are built for wide, sweeping turns, which can feel limiting in tight spaces. Snowfeet* Skiblades, however, are designed for sharp, precise movements. Whether you’re weaving through trees, maneuvering around bumps, or making quick direction changes, these skiblades make it easier to stay in control and on edge.
Portability is another area where Snowfeet* takes the lead. These skiblades are compact enough to fit in a standard backpack, making them perfect for public transportation, locker storage, or those last-minute trips. Compare that to traditional skis, which often require roof racks or oversized bags just to get them from point A to B. And let’s not forget the price: Snowfeet* Skiblades range from $190 to $775, while a traditional setup, including bindings, can start at $600 and easily climb past $1,200.
The table below breaks down how Snowfeet* Skiblades stack up against traditional skis.
Comparison Table: Snowfeet* Skiblades vs. Traditional Long Skis
Here’s a quick side-by-side look:
| Feature | Snowfeet* Skiblades | Traditional Long Skis |
|---|---|---|
| Length | 26 in to 47 in (65 cm to 120 cm) | 59 in to 75+ in (150 cm to 190+ cm) |
| Weight | Ultra-light; fits in a backpack | Heavy; requires specialized storage |
| Carve Radius | Tight; sharp, aggressive turns | Wide; needs more space |
| Physical Effort | Low; easy on the legs | High; demands significant strength |
| Learning Curve | About 5 minutes | Typically takes multiple lessons |
| Portability | Fits in a backpack | Requires roof racks or large bags |
| Price (USD) | $190 - $775 | $600 - $1,200+ (with bindings) |
The numbers speak for themselves. With over 50,000 riders across the globe and an impressive average rating of 4.9/5 from more than 5,500 verified reviews, Snowfeet* has shown that shorter truly is better for carving. As Andrew B. puts it:
These skiblades are so much fun and easy to control. Never going back to regular skis.
From lower physical demands to unmatched agility and portability, Snowfeet* Skiblades are a smart pick for anyone who loves carving and wants to make the most of their time on the slopes.
sbb-itb-17ade95
Conclusion
Steps to Master Carving and Why Snowfeet* Stands Out
To master carving on Snowfeet* Skiblades, follow these four steps: start with traversing and J-turns, move on to creating edge angles using the railroad drill, practice smooth transitions between turns, and finally, work on dynamic short turns. Each step builds on the one before, with proper weight distribution toward your toes being the secret to controlling your turns and stops.
Snowfeet* Skiblades are designed with a deep parabolic sidecut and a narrow 7.8 cm waist, making them incredibly responsive and perfect for carving. Unlike traditional skis that require significant momentum to carve effectively, these skiblades let you maintain control and freedom of movement even at slower speeds. You can practice comfortably on green or blue runs without worrying about picking up too much speed. This design makes Snowfeet* a standout choice for carving enthusiasts.
Their compact, lightweight build (ranging from 26 to 47 inches compared to the 59 to 75+ inches of traditional skis) reduces leg strain, so you can stay on the slopes longer and enjoy every run.
Ready to Start Carving?
If you're ready to take your carving skills to the next level, head over to the Snowfeet* shop to pick your model. Prices start at $550 for the 65 cm Skiblades, $590 for the 99 cm version, and $790 for the premium 120 cm model. Each size caters to different riding styles, but all deliver the tight carving radius and sharp turns that Snowfeet* is known for.
Want a little extra guidance? Visit the Snowfeet YouTube channel for video tutorials covering everything from your first runs to advanced carving drills. With over 50,000 riders worldwide and a 4.9/5 rating from more than 5,500 verified reviews, you’re joining a passionate community that knows the benefits of shorter, more responsive equipment. Grab your Snowfeet* Skiblades, hit the slopes, and see the difference for yourself!
How to Carve on Skis | 5 Tips & Drills for Beginners / Intermediates
FAQs
Why choose Snowfeet Skiblades instead of traditional skis?
Snowfeet Skiblades bring a whole new level of fun and precision to the slopes. With their compact sizes - 65 cm, 99 cm, or 120 cm - and lightweight build, these skiblades are designed for quick, sharp turns and excellent control, even on narrow trails or groomed runs. If you’re into carving or want to improve your technique without breaking a sweat, these are a game-changer.
Traditional skis can feel heavy and unwieldy, especially for beginners. Snowfeet Skiblades, on the other hand, are much easier to handle. Their shorter length makes them less intimidating, requiring less effort to maneuver while still offering impressive carving performance. Plus, they’re a breeze to carry around, making them perfect for those who want convenience without sacrificing quality. Whether you’re tackling steep slopes or weaving through tight tree lines, Snowfeet Skiblades combine the precision of skis with the ease and flexibility you didn’t know you needed.
Which Snowfeet model is best for my skiing style?
Choosing the right Snowfeet model comes down to what you want out of your ride, the terrain you’ll tackle, and your personal style. If tight turns and freestyle tricks are your thing, go for the 65 cm model. Its compact size makes it super agile and responsive. For a more all-around option, the 99 cm model is a great pick. It’s smooth, versatile, and handles groomed runs or mixed terrain with ease. If you’re all about speed and stability, the 120 cm model is your best bet. Its longer edge gives you deeper, more stable turns, perfect for high-speed carving.
Unlike traditional skis, Snowfeet’s shorter lengths are lighter and easier to handle. They’re less tiring, too, which is great if you want to focus on agility and quick edge transitions. Whether you’re carving up groomers, venturing off-piste, or just getting started, there’s a Snowfeet model out there to match your vibe and keep things fun.
How can I master carving on Snowfeet Skiblades like a pro?
Mastering carving on Snowfeet Skiblades comes down to finding the right balance, controlling your edges, and moving smoothly. Start with a low, athletic stance - keep your knees bent and your weight evenly spread across both feet. This position lets you fully tap into the agility that short skis like Snowfeet offer.
To initiate a turn, gently roll your inside ankle to engage the ski edge. Gradually tilt your knees and ankles together to increase the edge angle, which helps you create those clean, precise arcs that Snowfeet are known for. As you carve, shift more weight onto your inside ski to grip the snow better, but don’t forget to keep some light pressure on the outside ski to stay balanced.
Keep your upper body facing downhill and aim for smooth, continuous movements. Snowfeet Skiblades respond best to fluidity - jerky motions can throw you off. Start practicing on gentle slopes, focusing on each part of the technique. With time, these steps will feel natural, and you’ll be carving with ease and confidence.


Leave a comment
This site is protected by hCaptcha and the hCaptcha Privacy Policy and Terms of Service apply.