


If you want off-ice hockey skating reps, short snow skates are your best bet. I’d keep it simple: use packed snow, train for 30 to 45 minutes, stick to 2 to 3 sessions per week in the off-season, and focus on slalom runs, stops, one-leg glides, pivots, and short burst drills.
Here’s the short version:
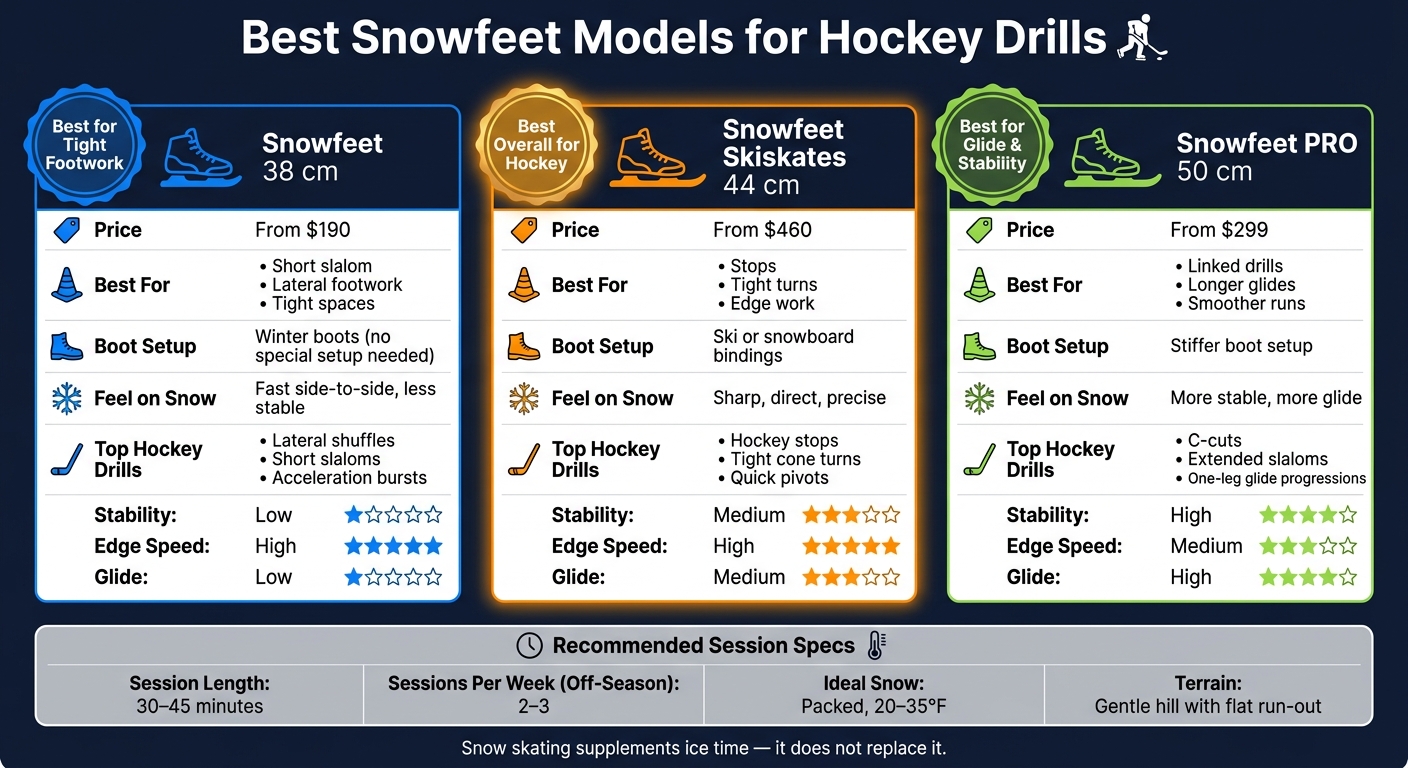
- Best overall for hockey-style drills: Snowfeet* Skiskates 44 cm
- Best for tight footwork in small spaces: Snowfeet* 38 cm
- Best for a bit more glide and stability: Snowfeet* PRO 50 cm
- Best terrain: gentle hill, packed snow, flat run-out
- Best session length: 30–45 minutes
- Best drill focus: edge control first, then stops, turns, pivots, and reaction work
Snow won’t feel like ice. It has more drag and less glide. But that’s not a bad thing. It gives you more time to feel your edges, fix your stance, and clean up your movement before speed enters the chat :)
Snowfeet* & Skiskates Tutorial - How to Become a PRO Skiskater
Quick Comparison
Best Snowfeet Models for Hockey Drills: Side-by-Side Comparison
| Model | Best for | Boot setup | Feel on snow | Starting price |
|---|---|---|---|---|
| Snowfeet* 38 cm | Short slalom, lateral footwork, tight spaces | Winter boots | Fast side-to-side, less stable | $190 |
| Snowfeet* Skiskates 44 cm | Stops, tight turns, edge work | Ski or snowboard bindings | Sharp, direct, precise | $460 |
| Snowfeet* PRO 50 cm | Linked drills, longer glides, smoother runs | Stiffer boot setup | More stable, more glide | $299 |
What matters most? I’d build the session around a few clean reps, not random laps. Think 6–8 cone turns, 10–15 short glides, 3–5 second burst efforts, and weak-side stop practice every time you train. That’s where snow skating can help hockey players the most when rink time is thin.
If you want a few solid video examples before heading out, these can help:
- Hockey skating edge work drills on YouTube
- Hockey stop tutorial on YouTube
- Backward skating and pivots on YouTube
A good rule of thumb: if your stance stays low, your chest stays up, and your upper body stays quiet, you’re probably training the right stuff.
Choose the Right Snowfeet* Setup for Hockey-Style Drills
Best Snowfeet* models for edge control, stops, and agility
The three Snowfeet* options that fit hockey training best each do a different job.
Snowfeet* 38 cm (from $190) attach to sturdy winter boots, so you don't need a separate boot setup. Their short length makes edge-to-edge moves fast, which is great for quick-change drills like lateral shuffles, short slaloms, and short acceleration bursts in tight spaces. The downside? You get less glide and less front-to-back stability. So they shine when you're changing direction a lot, not when you're trying to coast.
Snowfeet* PRO 50 cm (from $299) give you a longer platform, which means more glide and better stability. That extra length helps when you want to connect moves without things feeling twitchy underfoot, like going from a longer slalom into a controlled stop or working on extended C-cuts. They're still short enough to let you mix glide and agility on one small run.
Snowfeet* Skiskates 44 cm (from $460) clip into ski or snowboard bindings, which gives you a firm boot connection. That setup gives you the edge precision needed for hockey stops and tight turns. Once you've picked the right setup, the next step is stance and balance. That's where these drills start to click.
How Snowfeet* compares with snowblades and longer skis
Longer gear like 99 cm skiblades or 120–140 cm skis can feel more stable at speed on wide resort runs. But for tight hockey-style drills, that extra length can get in your way.
Quick pivots, small-radius turns, and fast stops all need more room on longer skis. And on a neighborhood hill or small practice area, you often just don't have that space.
Here’s the simple breakdown:
- Snowfeet* models are short enough for tight turns and fast stops.
- Boot setup ranges from winter boots to ski boots, based on how much edge control you want.
- Their compact size keeps agility high where longer skiblades and standard skis start to feel clunky in small spaces.
Boot choice and snow conditions
Use stiff boots and firm, packed snow.
With the 50 cm PRO and Skiskates 44 cm, a stiffer boot sends more energy straight into the edge. That's what you want for hockey-style stops and turns. Match your gear to the snow first, then start with stance and balance before you add speed.
sbb-itb-17ade95
Build the Basics Before Adding Speed
Edge control on snow
With the right Snowfeet* setup on your feet, start with control first and speed later. Think hockey stance the whole time: feet shoulder-width apart, knees bent, hips back, chest up, hands forward.
Packed snow bites more than ice, so go easy at the start. Use light edge pressure and let the glide stay smooth. Begin with small ankle rolls while you’re almost still. Roll to the inside edge, come back to flat, then roll to the outside edge. Do 6–8 reps each way.
Next, move to two-foot glides on a gentle slope. Give yourself a light push, hold your hockey stance, and keep your torso quiet. No extra twisting, no wild arm swings. Aim for 10–15 short glides.
After that, add short C-cut pushes on flat ground. Push one foot in a C-shape while the other foot stays centered, then come back to parallel. Switch legs and repeat for 2–3 sets of 8–10 reps per side.
Once those moves feel smooth, it’s time to work on single-leg control.
Balance and weight transfer for single-leg control
When two-foot balance feels steady, shift to single-leg work. Start with static holds on flat snow. Put your weight all the way onto one leg, lift the other foot just off the surface, and hold for 3–5 seconds. Then switch sides. Aim for 3–4 sets per leg. Keep your nose, knees, and toes stacked, with hips back and chest up.
Then move into mini one-leg glides. Take a small push, glide on one foot for about 5–10 feet, set the other foot down, and stop. Keep your ankle relaxed and your hips level. If you wobble, no big deal - just place the free foot down softly and reset.
These glides carry over well to crossovers and pivots on the ice.
When one-leg glides feel quiet and controlled, move into slaloms, stops, and pivots.
Snow Skating Drills for Hockey Players
Use that control to train the hockey patterns that matter most: turns, stops, pivots, and bursts. Start with slalom for edge rhythm, then move into stops, pivots, and reaction work.
Slalom runs and one-leg glide progressions
Slalom runs help you build edge-to-edge rhythm on snow. Set up 6–8 cones in a straight line on a gentle packed slope. Start with 10–12 feet between cones so you have enough room to roll from edge to edge without forcing it. As you get smoother, bring the spacing down to 6–8 feet. That makes your weight shifts faster and sharper.
Stay in a low hockey stance for the whole run. Keep your knees loaded, chest up, and hands forward. Try to keep your upper body quiet. Let your feet do the work, and focus on clean edge rhythm with control. Use Skiskates 44 cm if you want the fastest edge changes, or PRO 50 cm if you want more stability.
For one-leg glide progressions, head to a flat area or a very gentle slope. Push off, glide on both feet, then lift one foot and hold for 1–2 seconds. From there, work up to full 10–15 foot glides on one foot. Keep your hips level and your weight centered over the gliding foot. That’s the same kind of balance you need for smooth transitions and shot setup.
Once edge changes feel smooth, move into braking and tight-turn work.
Hockey stops, tight turns, and crossover-style carving
Work through stops in order:
- Start with a snowplow brake
- Move to a skidded parallel stop
- Finish with full hockey stops to both sides
On the full stop, come in at a comfortable speed, drop into a deep hockey stance, and snap your hips and Snowfeet* across the fall line. Load the outside edge hard and keep pressure on it until you come to a full stop. Always practice your weak side.
For tight cone turns, set cones 6–8 feet apart and carve tight arcs around each one. Load your outside leg, drive your inside knee toward the cone, and focus on an inside-foot step-through as you come out of the turn. That’s the same movement you use to hold speed through a corner on the ice. The short length of the Skiskates 44 cm makes those small-radius arcs feel natural.
After forward control feels dialed in, shift to the transitions hockey players use all the time.
Backward movement, pivots, acceleration, and reaction drills
Backward glides start on flat snow in a wide V stance. Push one foot out at a time with a C-cut motion, bring it back under your body, then do the same with the other foot. Keep your knees bent and your head up. Once you can link 3–4 C-cuts in a smooth rhythm, add a forward-to-backward pivot. Mark a spot on the snow, approach it going forward, then open your hips and turn 180° while staying low. This forward-to-backward pivot matches the same transition you use in a game when you switch from offense to defense.
For acceleration and stop–start repeats, begin from a dead stop and push hard for 3–5 seconds, then brake all the way and reset. These short, explosive reps train the same first-stride power you need off a faceoff.
Finish the session with reaction drills. Have a partner call out game-like reads, like:
- Left
- Right
- Stop
- Pivot
Then react in real time. That adds a decision-making layer under pressure, and that’s something pre-planned patterns just can’t give you.
Build a Weekly Plan and Track Progress Back on the Ice
Sample 30- to 45-minute session for US winter conditions
Don’t try to cram every drill into one day. That’s like dumping your whole gear bag on the bench and hoping it turns into a game plan. A short weekly rotation works much better.
A good snow-skating session only needs a small hill and 30 to 45 minutes. On packed snow in 20–35°F weather with light wind, you can train on:
- a small park slope
- a yard hill
- any packed local run
Start with a 5–10 minute warm-up. Then rotate 2–3 drills from the sections above for 20–30 minutes. Wrap up with 5 minutes of easy glide and cooldown.
Keep the workload matched to age and skill level:
- Younger players: 30 minutes, 3–4 reps, longer rest
- Teens: 30–40 minutes, 4–6 reps
- Older players: 6–8 hard reps with shorter rest
If your form starts to fall apart, pull back. Cut reps or take more rest. Clean reps beat sloppy ones every time.
Seasonal progression and what to watch for on ice
Your plan should shift with the season. The goal in July isn’t the same as the goal in November.
Use 2–3 sessions per week in the off-season. In preseason, shift toward stop-start work and reaction drills. Once the season starts, back off to 1 light session each week or every other week.
When the work starts to carry back to the rink, you’ll notice it in a few clear ways. Tight turns feel more controlled. Forward-to-backward pivots happen faster. Weak-side stops look cleaner. And if your first two strides off a faceoff feel quicker, that acceleration work is doing its job.
Snow skating doesn’t replace ice time. But it does give you more reps, and those reps can show up when the season gets rolling.
Conclusion: Key drills and the best Snowfeet* choices for hockey players
The best setup comes down to what you want to train, but for most hockey players, Skiskates 44 cm give the best on-snow reps.
The drills in this guide - slalom runs, hockey stops, one-leg glides, pivots, and reaction work - line up well with on-ice skills. The big thing is to keep sessions structured and repeatable, not just cruise around the hill and call it practice.
For most hockey players, Skiskates 44 cm are the top pick for sharp stops, tight turns, and quick edge changes.
FAQs
Can beginners use Snowfeet* for hockey drills?
Yes - Snowfeet* 44 cm Skiskates are a good pick for beginners.
Their short, light build feels a lot like hockey skates, so the move from ice to snow feels more natural. That’s a big plus if you already know how to skate and don’t want to wrestle with long skis on day one.
They’re also shorter and more responsive than standard skis. That makes it easier to work on lateral moves, C-cuts, and hockey stops without feeling like you’re steering a pair of giant planks :)
Start on flat, groomed snow first. Once that feels smooth, move on to simple drills like figure-eights or crossovers.
What kind of snow works best for these drills?
For the best results, use well-packed, groomed snow. Smooth, predictable snow gives your edges the grip they need to feel a bit like ice skates and lets you work on clean, precise moves.
Open fields, maintained trails, or packed backyard snow all work well. If the snow is too loose, pack it down by hand or press it flat with skis to make a firmer base. Snowfeet* can handle light powder, but they work best on groomed runs.
How do I know which Snowfeet* model fits my training?
Choose based on your goals and skill level.
For hockey players who want agility, quick-reaction drills, and the closest feel to ice skating, the 44 cm Snowfeet Skiskates* are the best pick.
If you’ve got more experience and want extra stability at higher speeds - without giving up that hockey-style agility - go with the 50 cm Snowfeet PRO*.


Lascia un commento
Questo sito è protetto da hCaptcha e applica le Norme sulla privacy e i Termini di servizio di hCaptcha.