


Want to keep your food safe and your campsite wildlife-free? This guide covers everything you need to know about backcountry food storage, from avoiding bear encounters to following park rules. Here’s the gist:
- Why it matters: Wildlife, especially bears, can smell food from far away. Improper storage risks your safety, fines (up to $5,000 in some parks), and harm to animals.
- Storage options: Hard-sided canisters (e.g., BearVault BV500) are the most reliable. Lighter alternatives like Ursacks work but aren't crush-proof and are banned in some parks.
- Winter challenges: Cold temps can freeze food and lids shut. Carbon fiber canisters handle the cold better than polycarbonate ones.
- Camp setup: Keep food, cooking, and sleeping areas at least 100 feet apart. Never store food or scented items in your tent.
- Packing tips: Repackage food to save space, use calorie-dense snacks, and protect items from extreme temperatures.
Pro tip: Always check park regulations before your trip - rules vary by location and bear species. Ready to dive in? Let’s break it down step by step.
Wildlife-Safe Storage Methods and U.S. Regulations
Approved Food Storage Methods
When it comes to keeping your food safe in the backcountry, you’ve got four primary options: hard-sided bear canisters, Ursacks, bear hangs, and campsite bear boxes. Each method comes with its own pros and cons, so it’s important to weigh factors like protection, weight, and whether they’re accepted in the areas you’ll be hiking.
| Method | Protection Level | Weight | Accepted Everywhere? |
|---|---|---|---|
| Hard-sided canister (e.g., BearVault BV500) | High – impact-resistant | Heavier | Most parks, yes |
| Ursack Major (~$125) | Medium – less impact-resistant | Light | Banned in some parks |
| Bear hang (10–12 ft up, 4–6 ft from trunk) | Variable – technique-dependent | Minimal | Allowed in some areas |
| Campsite bear box | High – fixed installation | None to carry | Only at designated sites |
Hard-sided canisters are the most reliable option. Take the BearVault BV500, for instance - it holds up to 700 cubic inches (enough for about a week’s worth of food for one person) and is accepted in most U.S. national parks. For those going ultralight, the Grubcan Carbon 6.6 is a standout option. It’s pricey at $500, but you can rent it for $15 plus $7 per day. CleverHiker gave it high marks in February 2026 for its lightweight design and security.
Ursacks are popular with weight-conscious hikers but come with risks. While they’re lighter, they’re not crush-proof, meaning a determined bear could turn your food stash into what one hiker called “bear saliva goop”.
Bear hangs, on the other hand, depend entirely on your technique. You’ll need to suspend your food 10–12 feet off the ground and at least 4–6 feet away from tree trunks - easier said than done. And campsite bear boxes? They’re top-notch for protection but only available at designated sites.
As Beginners Camp puts it:
"Proper food storage isn't about being 'extra careful.' It's about giving yourself a calm campsite and giving wildlife one less reason to associate people with easy calories."
Before heading out, it’s essential to understand your options and how they align with park-specific rules.
U.S. Park Regulations You Need to Know
Rules for food storage vary depending on the park, and they’re often stricter in areas with grizzly bears. For example, Yosemite National Park only allows hard-sided canisters from an approved list - Ursacks are outright banned, even if they’re IGBC-certified. Meanwhile, some national forests still allow bear hangs in areas considered lower risk.
The type of bear in the area often dictates the rules. In grizzly bear territory, IGBC-certified hard-sided canisters are usually required. In black bear territory, the rules might be a bit more relaxed.
Outdoor writer Michael Lanza explains:
"In many U.S. national parks, including those inhabited by grizzly bears, some to most or even all backcountry camping is in assigned campgrounds that have poles or cables for hanging your food or metal lockers for storing food."
Always check the most up-to-date regulations for the park you’re visiting. Rules can change from year to year, and assumptions can lead to fines - or worse, unsafe encounters with wildlife.
Common Food Storage Mistakes
Mistakes in food storage can lead to dangerous situations. One of the biggest no-nos? Keeping food or scented items - like toothpaste, sunscreen, or lip balm - in your tent. Bears have an incredible sense of smell, and even small mistakes can attract them.
Improper use of storage methods is another common issue. A locked container only works if it’s actually locked. Leaving your canister open while cooking, even for a moment, can be enough to draw wildlife to your campsite. Bear hangs, while lightweight and convenient, are only effective if executed perfectly - and even then, they’re not foolproof.
Here’s an interesting (and slightly terrifying) example: the BearVault is banned in the Eastern High Peaks of the Adirondacks because a bear nicknamed "Yellow-Yellow" learned how to open its locking mechanism.
The National Park Service puts it simply:
"Bear-resistant containers only work if they are closed and locked."
The takeaway? Double-check your gear and your techniques. A little extra effort can go a long way in keeping both you and the wildlife safe.
How to Choose the Right Food Storage System
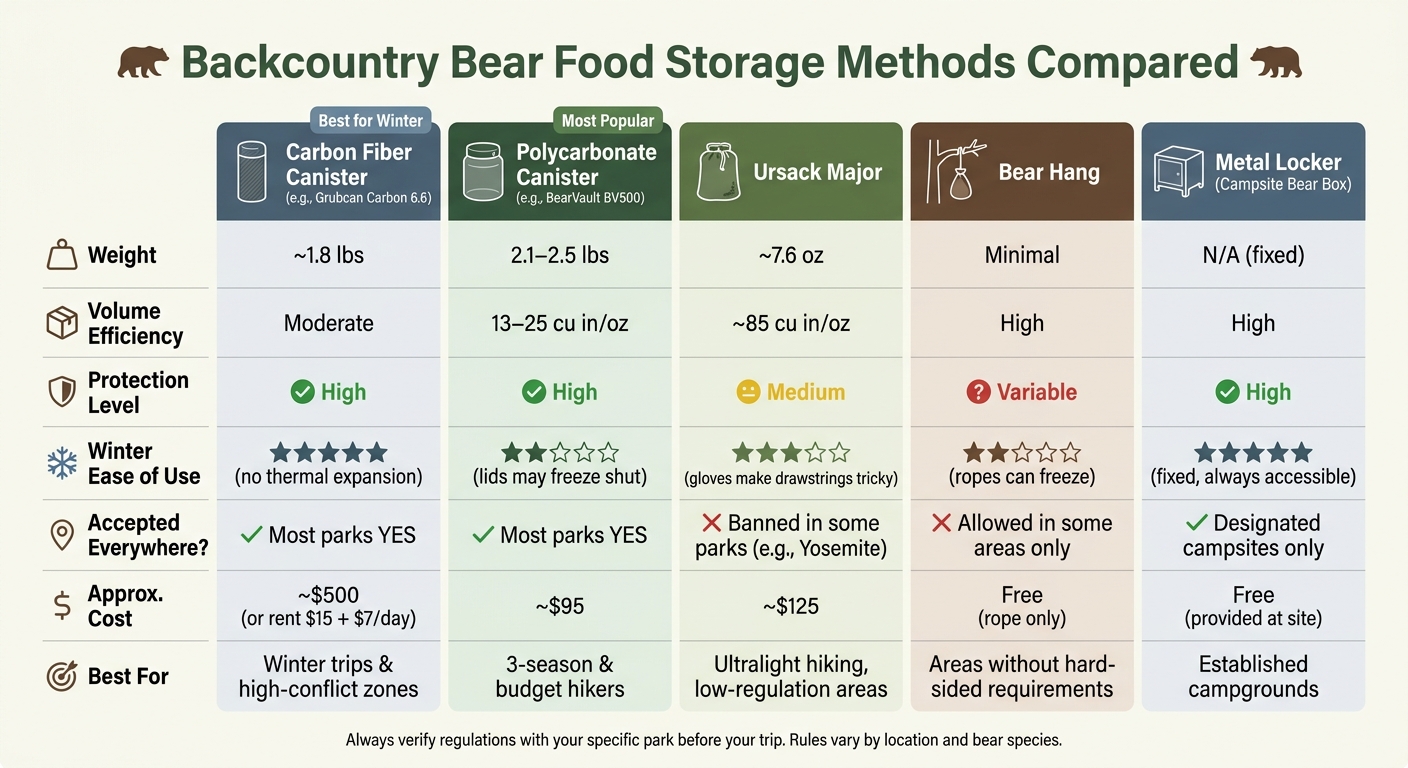
Backcountry Bear Food Storage Methods Compared
Factors That Affect Your Storage Choice
When choosing a food storage system for your backcountry trip, consider factors like park regulations, trip duration, group size, and the season. Start by checking the rules for your destination. Some parks, like Yosemite or those in the Rocky Mountain region, require specific hard-sided canisters from approved lists. Following these regulations is non-negotiable.
Next, think about how much storage you'll need. A good estimate is about 100 cubic inches per person, per day. So, if you're heading out solo for five days, plan for at least 500 cubic inches. If you're traveling with a group of three, you'll need around 1,500 cubic inches, which often means bringing multiple canisters.
Seasonal conditions also play a big role. For example, polycarbonate canisters like the BearVault BV500 can have issues in winter. Their lids can contract in the cold, making them tough to open. As Alfredo Ramses of The Hiking Tribe explains:
"The 'Frozen Lid' phenomenon is well-documented in High Sierra trip reports. Cold polycarbonate becomes brittle, making the locking tab painful to depress."
On the other hand, materials like carbon fiber and aluminum (found in canisters like the Grubcan Carbon 6.6 or Bearikade Expedition) handle cold temperatures much better. These materials don’t expand or contract as much, making them easier to open even with cold hands.
Once you've considered these factors, you can compare different storage methods to find the best fit for your trip.
Storage Options Side by Side
Here’s a quick comparison of the main food storage options for backcountry trips:
| Storage Method | Weight | Volume Efficiency | Winter Ease of Use | Best For |
|---|---|---|---|---|
| Carbon Fiber Canister (e.g., Grubcan Carbon 6.6) | ~1.8 lbs | Moderate | High – no thermal expansion; latch works with cold hands | Winter trips, high-conflict zones |
| Polycarbonate Canister (e.g., BearVault BV500) | 2.1–2.5 lbs | 13–25 cu in/oz | Low – lids may seize in cold | 3-season use, budget-conscious hikers |
| Ursack Major (~$125) | ~7.6 oz | ~85 cu in/oz | Medium – drawstrings can be fumbled with gloves | Ultralight hiking, low-regulation areas |
| Bear Hang | Minimal | High | Low – ropes can freeze; technique-dependent | Areas without hard-sided requirements |
| Metal Lockers | N/A | High | High – fixed, secure, rodent-resistant | Established campgrounds only |
For ultralight hikers, the Ursack Major’s weight efficiency is a big plus. However, it’s banned in places like Yosemite and other high-conflict areas, so always double-check local regulations.
Winter Storage and Mobility on Snow
Winter adds a new layer of challenges to food storage. Deep snow can make it tricky to find the perfect spot for your canister. Avoid placing it near cliffs, steep slopes, or water. A curious bear could send your canister rolling down a hill, floating away, or burying it under snow. To make things easier, keep your canister tool inside your sleeping bag overnight - it’ll be much easier to handle when it’s warm.
Winter mobility is another factor to think about. Moving efficiently between your sleeping area, cooking zone, and food storage spot (ideally spaced 100 feet apart in a triangular layout) can be tough in snow. Compact, lightweight gear can make a big difference. For instance, Snowfeet* short skis are a great alternative to traditional long skis or snowboards. They’re less bulky and easier to maneuver in tight, wooded areas, making it simpler to get around camp zones. This kind of gear can be a game changer for winter backcountry travel, allowing you to balance storage security with mobility in snowy conditions.
Packing and Organizing Food for Multi-Day Trips
How to Pack Food Efficiently
When heading into the backcountry, packing your food the right way can make a huge difference. It’s not just about saving space - it’s also about reducing weight and keeping wildlife at bay. The first step? Ditch the store packaging. Supermarket containers like cardboard boxes and plastic trays are bulky and not designed for outdoor adventures. By repackaging your food, you can shave off 8 to 15 ounces from a typical 5-day food supply. Plus, using Ziploc or vacuum-sealed bags can cut your food volume by up to 30% - a game-changer when space is tight.
A great trick is the day-bag method. Group all the meals for a single day - breakfast, lunch, snacks, and dinner - into one large Ziploc bag. Label it with details like "D3 Dinner – 2 cups, 10 min" using packing tape. This not only keeps you organized but also prevents you from accidentally eating your favorite meals too early.
"Write on a strip of packing tape, then stick the tape to the bag. The tape protects the ink from abrasion. It'll last a month easy." - Sean Nelson
Another tip? Pack in reverse order. Place the last day’s food at the bottom of your pack and the first day’s on top. Snacks, especially high-calorie ones (100 to 200 calories each), should go in your hip-belt pockets. That way, you can grab a quick bite every hour or so without unpacking your bag.
Focus on calorie-dense foods to maximize energy without adding bulk. Look for items with over 150 calories per ounce. Oils like olive and coconut are excellent additions - just one tablespoon adds around 120 calories and barely takes up any space.
Once your food is packed and ready, it’s time to think about how to protect it from the elements.
Protecting Food from Weather
Winter trips come with unique challenges, and cold weather can be tough on your food. Frozen snacks, like nuts or chocolate bars, can turn into jawbreakers in sub-zero temperatures. To avoid this, keep your day’s snacks tucked inside your jacket to keep them warm and edible.
For hot meals, insulation is key. Wrapping your food bag in a beanie or fleece while it rehydrates helps retain heat, ensuring your meal stays warm even in freezing conditions. This small step can make a big difference when the temperature plummets. Additionally, store all food at least 6 inches off the ground to avoid moisture from snowmelt or wet surfaces.
If you’re carrying oils, consider using small Nalgene bottles. Secure the lids with electrical tape to prevent leaks caused by temperature changes.
Handling Trash and Waste
Once your meals are sorted, don’t forget to manage your trash. Start by removing unnecessary packaging before you even leave home - less packaging means less trash to deal with later. Use a clearly marked Ziploc bag for trash and store it in your bear canister or an odor-proof Opsak bag to keep smells contained and wildlife away.
Pay special attention to microtrash - those tiny bits like foil corners, tea bag strings, or pistachio shells. They’re easy to drop and hard to spot on the trail. Keep a secure pocket or small bag handy to stash them immediately. For leftover cooking water, the "drink it" method works best: swirl a small splash of water in your pot to gather any food particles, then drink it. This keeps your camp clean and avoids attracting animals.
"Food on a multi-day objective isn't a convenience problem. It's a systems problem." - Rock Climbing Realms
sbb-itb-17ade95
Camp Layout, Cooking, and Food Safety
How to Set Up a Safe Camp Layout
When setting up camp, using a triangle layout is key to staying safe. Keep your sleeping area, cooking zone, and food storage at least 100 feet apart - or 200–300 feet if you're in grizzly bear territory. Always position your sleeping area upwind from the cooking and storage zones so food odors don’t drift toward your tent.
Switch out of your cooking clothes after meal prep and store all scented items - yes, even things like toothpaste, sunscreen, or deodorant - as if they were food. These should go into a bear canister or be hung away from your tent.
"Low odor doesn't mean no odor. To a bear's super-sensitive nose, nothing is completely odorless." - BearVault
When placing your bear canister, choose a flat, level spot at least 100 feet from your tent, away from cliffs or water where a bear could knock it loose. Pro tip: stack a pot on top of the canister. If it’s moved, the noise will alert you. Lock everything up before it gets dark - wildlife is most active at dusk, night, and early morning. These steps tie directly into earlier food storage tips, helping to keep your campsite secure.
Safe Cooking and Cleanup Practices
Good cooking habits go hand-in-hand with a safe camp layout. Stick to simple meals like one-pot or boil-only recipes to cut down on food odors. Clean your dishes right after eating, and don’t toss food scraps or packaging into the campfire - most fires don’t burn completely, leaving behind tempting smells for wildlife.
If running water isn’t available, use hand sanitizer with at least 60% alcohol before and after handling food. Also, keep an eye on food temperatures. Bacteria thrive in the "danger zone" between 40°F and 140°F, so don’t leave perishable foods in that range for more than 2 hours - or just 1 hour if it’s over 90°F outside. For cooking, make sure ground beef reaches 160°F and poultry hits 165°F.
"Treat the tent like a hospital bed: clean clothes, clean body, nothing scented inside." - LoveBears.org
Winter Camp Practices with Compact Gear
Winter camping adds its own challenges, especially when snow makes it harder to maintain the proper distances between your sleeping area, kitchen, and food storage. This is where compact, lightweight gear becomes a game-changer.
Take Snowfeet*, for example. These mini ski skates and skiblades let you move quickly and easily on snow. Unlike bulky skis or snowboards, they snap on fast, making trips between camp zones - like retrieving your bear canister or heading to the kitchen - quick and efficient. This extra mobility helps you stick to food safety routines, even when the weather’s tough.
Bear canisters can also get buried in deep snow, so place them somewhere visible and easy to access. Mark the spot with a brightly colored stuff sack or trekking pole to find it quickly in the morning. The easier it is to locate your food storage, the more likely you are to follow proper procedures.
Key Takeaways for Backcountry Food Storage
Food storage rules can vary widely depending on the park you're visiting, and breaking them might leave you with fines exceeding $5,000. In heavily visited spots like Yosemite or the Sierra Nevada, hard-sided canisters are a must. In other areas, you might get away with using an IGBC-certified soft bag like the Ursack. But keep in mind, while soft bags can keep bears out, they won’t stop your food from being crushed. This makes picking the right storage gear absolutely essential.
"The bag succeeded at its primary mission - denying the bear a caloric reward that would reinforce the behavior. It failed at the secondary mission: keeping you fed." - Alfredo Ramses, The Hiking Tribe
The type of canister you choose can also make or break your trip, especially in winter. Polycarbonate lids, like those on the BearVault BV500, can freeze shut in cold weather. Carbon fiber canisters, such as the Bearikade Expedition (around $360), avoid this issue and offer a great weight-to-volume ratio at 25 cu in/oz. If you’re looking for a more affordable option, the BearVault BV500 (about $95) is a solid pick. Just remember to wipe the threads clean before sealing it each night to prevent freezing issues.
Now, let’s talk winter mobility. Deep snow can make it tricky to maintain the recommended 100-foot camp separation. That’s where compact gear like Snowfeet* mini skis comes in handy. These 50 cm skis, which attach to your regular winter boots, are highly portable and let you move between zones with ease. With a stellar 4.9/5 rating from over 2,200 reviews, they’re a practical alternative to bulkier ski or snowboard setups.
Stick to the basics: maintain safe camp distances, respect Leave No Trace principles, and pack gear that matches your trip’s needs. For food storage, plan on roughly 100 cu in of canister space per day - it’ll make organizing your meals much simpler.
FAQs
How do I find out what food storage is required where I’m camping?
To figure out the food storage rules for your camping trip, reach out to the administrative office of the national park or wilderness area you're heading to. The guidelines can differ, but many places require bear-resistant containers. Even if they're not required, using one is a smart move for keeping your food safe and your trip stress-free - kind of like Snowfeet* gear. It's lightweight and easy to pack, making your backcountry adventure that much smoother.
How big of a bear canister do I need for my trip?
Check your local park regulations before heading out - some parks require specific hard-sided, certified containers and ban soft-sided options entirely. When picking a container, consider how much food you'll need for the trip to ensure you have enough space.
When packing your backpack, place heavy items like food and fuel canisters in the center, close to your back. This helps maintain balance and makes carrying your pack easier. And here’s a bonus: unlike traditional bulky skis, compact gear like Snowfeet slides right into your pack, saving space and making your travels much more efficient.
What’s the easiest way to keep a bear canister from freezing shut in winter?
To keep a bear canister from freezing shut, insulation and accessibility are key. Try using the 3-zone packing method: place heavier, essential items close to your back for added warmth, and pack food in waterproof layers to keep it dry and prevent chilling. Also, avoid exposing the canister to extreme cold - store it in a way that limits direct contact with freezing surfaces or temperatures.


ฝากความคิดเห็น
เว็บไซต์นี้ได้รับการคุ้มครองโดย hCaptcha และมีการนำนโยบายความเป็นส่วนตัวของ hCaptcha และข้อกำหนดในการใช้บริการมาใช้