


Skiing can feel overwhelming for beginners, especially if you’re worried about falling, losing control, or just looking awkward. But here’s the good news: starting small with the right gear can make all the difference. This guide breaks down how to ease into skiing without the stress, focusing on compact options like Snowfeet Skiskates (44 cm) and Skiblades (65 cm). These shorter, lightweight skis are less intimidating, easier to control, and perfect for building confidence on gentle slopes.
Key Takeaways:
- Start on beginner-friendly terrain like bunny slopes or green-circle runs.
- Use short skis like Skiskates or Skiblades for better control and easier turns.
- Set small, achievable goals (e.g., sliding 10–20 feet and stopping safely).
- Practice basic techniques like the wedge (snowplow) for stopping and turning.
- Dress in layers, warm up your muscles, and pick the right time (like quiet weekday mornings) to practice.
Whether you’re trying skiing for the first time or still nervous about hitting the slopes, this guide will help you take your first steps with confidence. Let’s get started!
Snowboarder tries Snowfeet* | Which Snowfeet* Short Ski is the Best? | Snowblades 44, 65, 99 Review

Choosing the Right Snow Gear
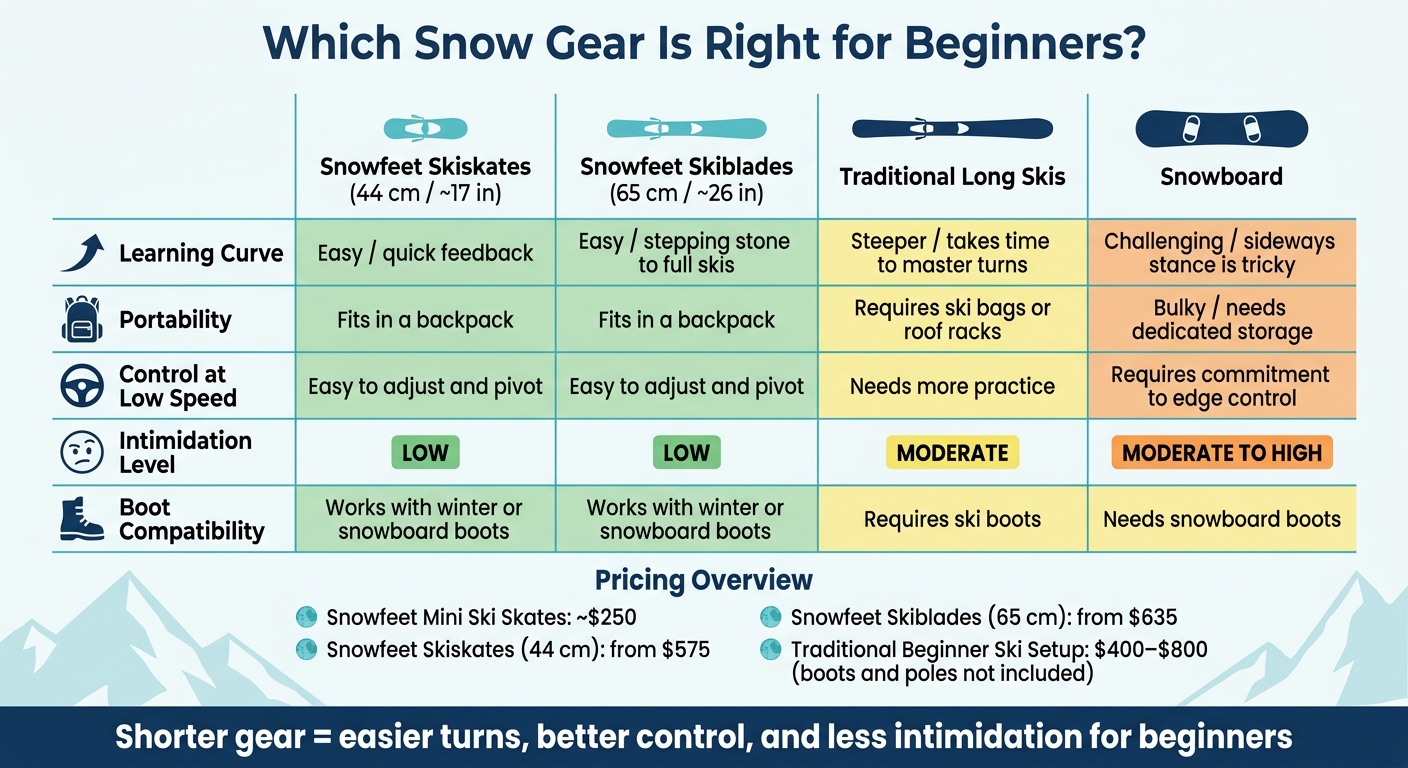
Snowfeet Skiskates vs Skiblades vs Traditional Skis vs Snowboard: Beginner Comparison
What Are Short Skis and Skiskates?
Short skis and skiskates are compact, lightweight snow tools that are much easier to handle than traditional ski gear. Snowfeet* offers two main options for beginners: Snowfeet* Skiskates (44 cm / ~17 in) and Snowfeet* Skiblades (65 cm / ~26 in). Both attach to your boots and are small enough to carry in a backpack, making them super convenient for your trip to the slopes.
The main difference between the two lies in their feel and functionality. Skiskates are smaller and provide a skate-like experience, feeling almost like an extension of your feet. Skiblades, on the other hand, are slightly longer and behave more like traditional skis, making them a great stepping stone for anyone looking to transition to full-length skis over time. Both options are designed to reduce the hassle of bulky equipment, which is a huge plus for beginners.
Snowfeet* vs. Long Skis and Snowboards
Now that we’ve covered what makes short skis special, let’s compare Snowfeet* gear to traditional long skis and snowboards.
For beginners, the hardest part of skiing or snowboarding isn’t always the technique - it’s often the logistics and intimidation factor. Long skis can be awkward to carry, tricky to walk in, and require more effort to maneuver. Snowboards, while smaller, introduce a whole new stance and balance system that can feel overwhelming for first-timers.
Snowfeet* gear eliminates many of these early challenges. Their compact size and quick responsiveness make it easier to learn the basics without feeling overwhelmed. Plus, their ability to react to subtle weight shifts helps beginners build confidence faster.
| Feature | Snowfeet* Skiskates / Skiblades | Traditional Long Skis | Snowboard |
|---|---|---|---|
| Learning curve | Easier to pick up; quick feedback | Steeper; takes time to master turns | Challenging for many; sideways stance is tricky |
| Portability | Fits in a backpack | Requires ski bags or roof racks | Bulky; needs dedicated storage |
| Control at low speed | Easy to adjust and pivot | Needs more practice | Requires commitment to edge control |
| Intimidation level | Low - small and approachable | Moderate - bulky and long | Moderate to high - larger and unfamiliar stance |
| Boot compatibility | Works with winter or snowboard boots | Requires ski boots | Needs snowboard boots |
Which Snowfeet* Product Is Right for You?
So, how do you decide which Snowfeet* product to start with? It all comes down to your comfort level and what you’re looking to get out of your first few trips to the slopes.
Here’s a quick guide to help you choose:
- Snowfeet* Mini Ski Skates (~$250): Perfect for absolute beginners. These attach to standard winter boots and offer an affordable, low-pressure way to try sliding on snow.
- Snowfeet* Skiskates (44 cm, from $575): A step up in performance and quality. These are great if you want a more responsive, skate-like experience and plan to spend more time on the slopes.
- Snowfeet* Skiblades (65 cm, from $635): The closest option to traditional skiing. Ideal if you’re thinking about transitioning to full-length skis later, as the skills you develop with these will carry over.
Each of these options provides a beginner-friendly way to ease into skiing without committing to bulky, expensive gear right away. For comparison, a beginner ski setup with bindings from major brands typically costs between $400–$800 - and that’s not including boots or poles. Snowfeet* gear is either similarly priced or more affordable, with the added bonus of being easier to transport and learn on.
Here’s the bottom line: don’t choose gear based on what looks the most advanced. Focus on what feels manageable and fun for your first few outings. Once you get a feel for what you enjoy, you can always upgrade later.
Getting Your Mind and Body Ready
Dealing With Fear and Setting Realistic Goals
Starting out on the slopes can feel intimidating. Many beginners worry about losing control, falling, or standing out as the one struggling on the bunny hill. These fears are completely normal. Whether it’s the fear of speed, falling, or just looking awkward, these emotional hurdles are common for adults trying skiing for the first time. But here’s the silver lining: the right gear can help ease those worries.
Snowfeet* gear, for example, is compact and designed for tighter turning and better speed control. If stopping is your biggest concern, shorter gear can make it easier to manage. With Snowfeet*, even small shifts in your weight help guide your direction, so you can avoid the longer, more intimidating turns traditional skis require.
Start small with your goals on day one. Something like "slide 10–20 feet on a gentle slope and stop safely" is a perfect target. Try the 3-run rule: after each short run, stop and reflect on one thing that felt easier than the last time. And if nerves creep in, practice box breathing (inhale for 4 seconds, hold for 4, exhale for 4, hold for 4). This simple technique can calm your body in under a minute and help you feel more in control.
Once you’ve got your fears in check with the right gear and small, achievable goals, it’s time to prepare your body for the adventure ahead.
Basic Fitness and Warmup Tips
A calm mind is great, but pairing it with a little physical prep can make your first experience on the slopes even smoother.
You don’t need to be an athlete to start skiing. If you can comfortably walk for 15–20 minutes on flat ground and climb a flight of stairs, you’re good to go. That said, skiing will work your quads, calves, and core a bit harder than usual. To get ready, try doing 2–3 short workouts a week for 4–6 weeks. Simple exercises like squats, wall sits, and balance drills can help build strength and reduce soreness after your first day.
On the day of, spend 5–10 minutes warming up. Movements like leg swings, ankle circles, shallow lunges, and marching in place are great for loosening up. Cold muscles on a chilly slope can stiffen up quickly, so a quick warmup can make your first few glides feel much smoother.
How to Dress for a Cold Day on the Slopes
What you wear can make or break your day. If you’re cold, wet, or uncomfortable, you won’t enjoy yourself - and you might hesitate to try again. The solution? Stick to the three-layer system:
- Base layer: Choose moisture-wicking synthetic or merino wool tops and bottoms. Avoid cotton - it traps moisture and gets cold fast.
- Mid-layer: A fleece or light insulated jacket will keep you warm by trapping heat.
- Outer layer: Go for a waterproof, windproof ski jacket and pants to shield you from the elements.
For your feet, wear one pair of thin to medium-thick ski or snowboard socks made of synthetic material or wool. Avoid layering socks or using cotton, as they can bunch up and reduce circulation. Keep your hands warm with insulated, waterproof gloves or mittens, and don’t forget a properly fitted helmet and goggles. Helmets significantly reduce the risk of head injuries, while goggles protect your eyes from glare, wind, and tricky light conditions that can make the terrain hard to read.
Before hitting the slopes, test your gear at home. Do a quick squat to make sure everything fits well and allows you to move freely. This small step can save you from discomfort and distractions on the mountain.
sbb-itb-17ade95
Your First Day on Snow with Snowfeet*
How to Pick the Right Slope to Start On
Choosing the right slope is all about starting somewhere manageable. At most U.S. resorts, this means heading to the learning area or bunny hill near the base. These zones are specifically designed for beginners, featuring gentle slopes, magic carpets for easy uphill transport, and often, instructors nearby to lend a hand. They’re flatter than standard green circle runs, giving you a chance to stay in control without worrying about steep terrain.
Look for a slope that’s short enough to walk back up if needed and wide enough to avoid bumping into others. Skip anything marked blue or black - those steeper runs can feel overwhelming before you’ve built up some confidence. If you can, aim for a weekday morning when the slopes are quieter. Fewer people mean less pressure and more space to practice at your own pace.
Once you’ve picked a safe spot, it’s time to focus on balance and getting your stance right.
Getting Your Stance and First Glide Right
Before heading downhill, take a few minutes on flat ground to get a feel for Snowfeet*. Strap in, stand still for about 30 seconds, and find your balance. Rock gently forward and backward to figure out where your center of gravity is.
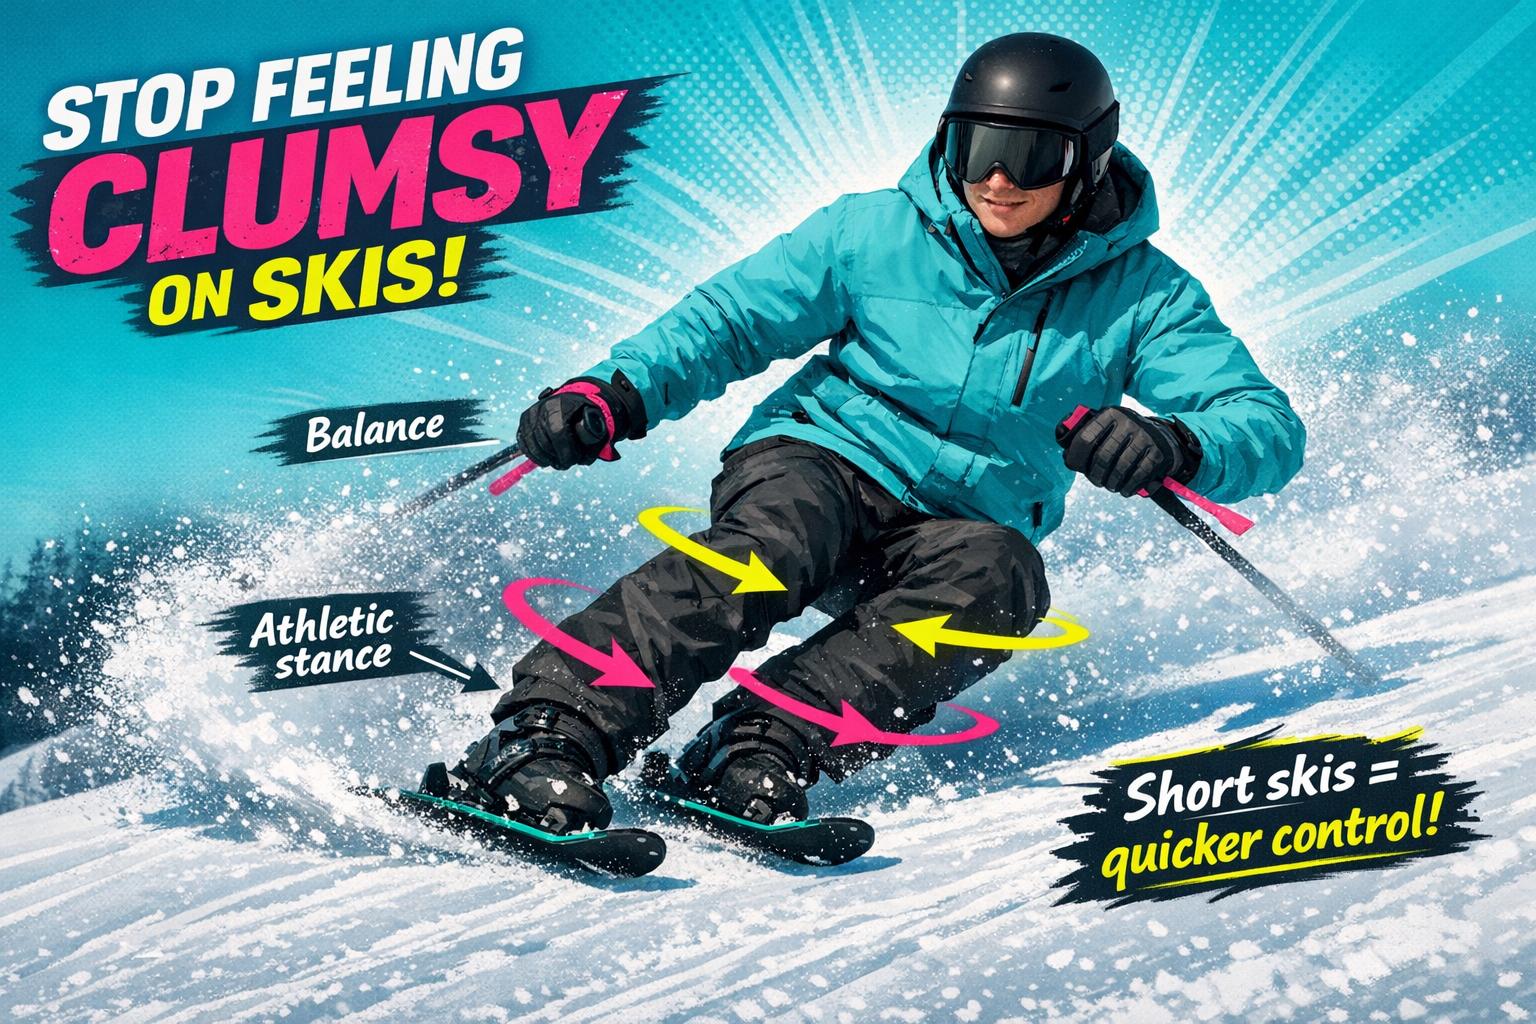
Adopt what’s called the basic athletic stance: feet hip-width apart, knees slightly bent, hips centered over your feet, and hands in front of you, as if you’re getting ready to catch something. Traditional skis can sometimes make beginners lean back due to their long tips, but Snowfeet* Skiskates (around 17 inches) or Skiblades (about 26 inches) are shorter, which helps you stay naturally balanced without that visual distraction. Their compact design makes it easier to maintain a centered stance, setting you up for smoother glides.
When you’re ready to glide, find a gentle incline to ease into motion. Keep your knees soft and let yourself slide about 10–20 feet before stepping or sliding to a stop. Practice this a few times until you’re comfortable, then move on to longer slopes.
Once you’ve got your glide and stance down, it’s time to learn how to stop and control your speed.
How to Stop, Turn, and Control Your Speed
On your first day, mastering the wedge - or snowplow - is key to controlling your speed. To form the wedge, push the tails of your Snowfeet* apart while keeping the tips close together, creating a V-shape. Press your knees inward and shift your weight slightly forward. The wider your wedge, the more friction you create, which slows you down. With Snowfeet*, the shorter design makes forming the wedge easier compared to full-length skis, where beginners often struggle with crossing tips.
Once you’re confident stopping, you can use the wedge to start turning. To turn left, press more weight onto your right foot. To turn right, shift more weight onto your left foot. Snowfeet* are highly responsive, so even small weight shifts result in smooth, controlled turns. This responsiveness makes them a great alternative to traditional skis, especially for beginners.
If you find yourself on a steeper slope, try side slipping. Stand sideways across the slope, tilt your edges downhill to slide, and then shift your weight uphill to stop. It’s a handy way to manage speed and stay in control on trickier terrain.
Building Confidence Over Time
A Step-by-Step Plan for Skill Building
Progress takes time, and that’s perfectly okay. Building confidence is all about stacking small wins instead of rushing into tougher challenges. Gradual steps - from flat terrain to gentle green runs - help you grow at a steady pace.
Start each session with a few minutes on flat ground. Work on your stance, practice shifting your weight side to side, and slide short distances before coming to a stop. Once that feels comfortable, head to the bunny hill and focus on mastering one skill at a time. For example, one session could be about straight glides, the next about controlled stops, and then moving on to shallow turns. Snowfeet* Skiskates make this process easier with their compact design, which offers better edge control and quicker recovery.
When you’re able to link turns and stop confidently on a gentle green run, you’re making real progress. Keep your sessions short - one to two hours is ideal - and focus on a single goal each time. Overdoing it can lead to fatigue, which often causes sloppy movements and dents your confidence.
Once you’ve built a solid foundation through independent practice, consider adding personalized instruction to speed up your progress.
Taking Lessons and Skiing With Supportive People
A beginner lesson, even just a half-day, can make a world of difference. Let your instructor know you’re using Snowfeet* gear so they can tailor exercises to suit its compact and responsive nature. Drills like side-stepping, garland turns, and traverses work particularly well with short gear, often making the learning curve feel a bit smoother.
Equally important is who you ski with. A patient friend who sticks to easy runs, takes breaks, and cheers on your small victories can make your experience much more enjoyable. On the flip side, avoid skiing with people who pressure you into tackling blue or black runs before you’re ready. Pushing too fast is one of the main reasons beginners lose confidence and quit.
Signs You Are Ready to Move Up
Moving up isn’t about being fearless - it’s about consistently performing skills without stress or frequent falls. You’ll know you’re ready for Snowfeet* Skiblades when you can reliably link turns on a gentle green run, stop on command, and notice that your current gear feels a little unstable at higher speeds. That craving for more stability is a great sign that you’re progressing.
The same principle applies to trying steeper terrain. Test yourself with a single run on a slightly harder slope. Once you can handle gentle slopes with control, you might think about upgrading to a slightly longer Snowfeet* model or exploring more challenging runs. Just remember to change one variable at a time - either new gear or a steeper slope, but not both at once. This method helps you avoid setbacks that could shake your confidence and undo all the progress you’ve made.
Conclusion
By now, you know how Snowfeet* gear makes learning to navigate snowy slopes much easier for beginners. You don’t need to wrestle with long, heavy skis or deal with complicated snowboard setups. With sizes starting at just 44 cm for Skiskates and 65 cm for Skiblades, Snowfeet* gear takes away the biggest hurdle most beginners face: the fear of losing control.
Shorter gear means mistakes are easier to handle, and turns feel more natural. This creates a stress-free way to develop real skills. As the Snowfeet* team explains:
"For a beginner, the thought of wrestling with long, heavy skis on a slippery slope can be intimidating. But what if there were a more forgiving, fun alternative that made learning feel like a breeze?"
Start small. Begin on flat terrain, ease into gentle green runs, and focus on mastering one skill at a time. Only change one thing - whether it’s your gear or the terrain - when you’re ready to take the next step. Each smooth stop and controlled turn boosts your confidence. Every glide gets you closer to tackling new challenges.
Whether you stick with Skiskates or move on to Skiblades, the key is simple: you’re out there, learning and building confidence - one run at a time.
FAQs
Can I use Snowfeet* with my current boots?
Yes, Snowfeet work perfectly with your regular winter boots or snowboard boots. Unlike traditional skis that demand expensive and stiff ski boots, Snowfeet come with adjustable bindings that fit most US sizes 6 to 14.5. This means no extra spending on special boots and no need to deal with the hassle of renting gear. Plus, you’ll enjoy more comfort and freedom, making your skiing experience way more fun - without all the bulky, restrictive equipment.
Are Snowfeet* easier than regular skis to learn on?
Snowfeet are a breeze to learn compared to traditional skis. Their compact and lightweight design (ranging from 17 to 47 inches, unlike the 59+ inches of regular skis) gives you better balance and faster control. They also feel more like skating, which makes the transition smoother for beginners. Most people can pick up basic turns in just 1–2 hours, whereas traditional skiing often takes 4–6 sessions to get the hang of. Plus, their smaller size means fewer falls - up to 50% less - making them a great choice for boosting confidence on the slopes.
What’s the safest way to stop as a total beginner?
The best way to stop as a beginner is by learning the snowplow, also known as the pizza stance. To do this, stand with your feet shoulder-width apart, point the tips of your gear together, bend your knees, and push your heels outward while leaning slightly forward. Thanks to their shorter length, Snowfeet make it easier to control your edges, which helps with mastering this technique.
You’ve got other options too. Use the built-in heel brake for a straightforward stop, or if you’re feeling confident, try a hockey-style stop by pivoting your feet across the slope.


Legg igjen en kommentar
This site is protected by hCaptcha and the hCaptcha Privacy Policy and Terms of Service apply.