


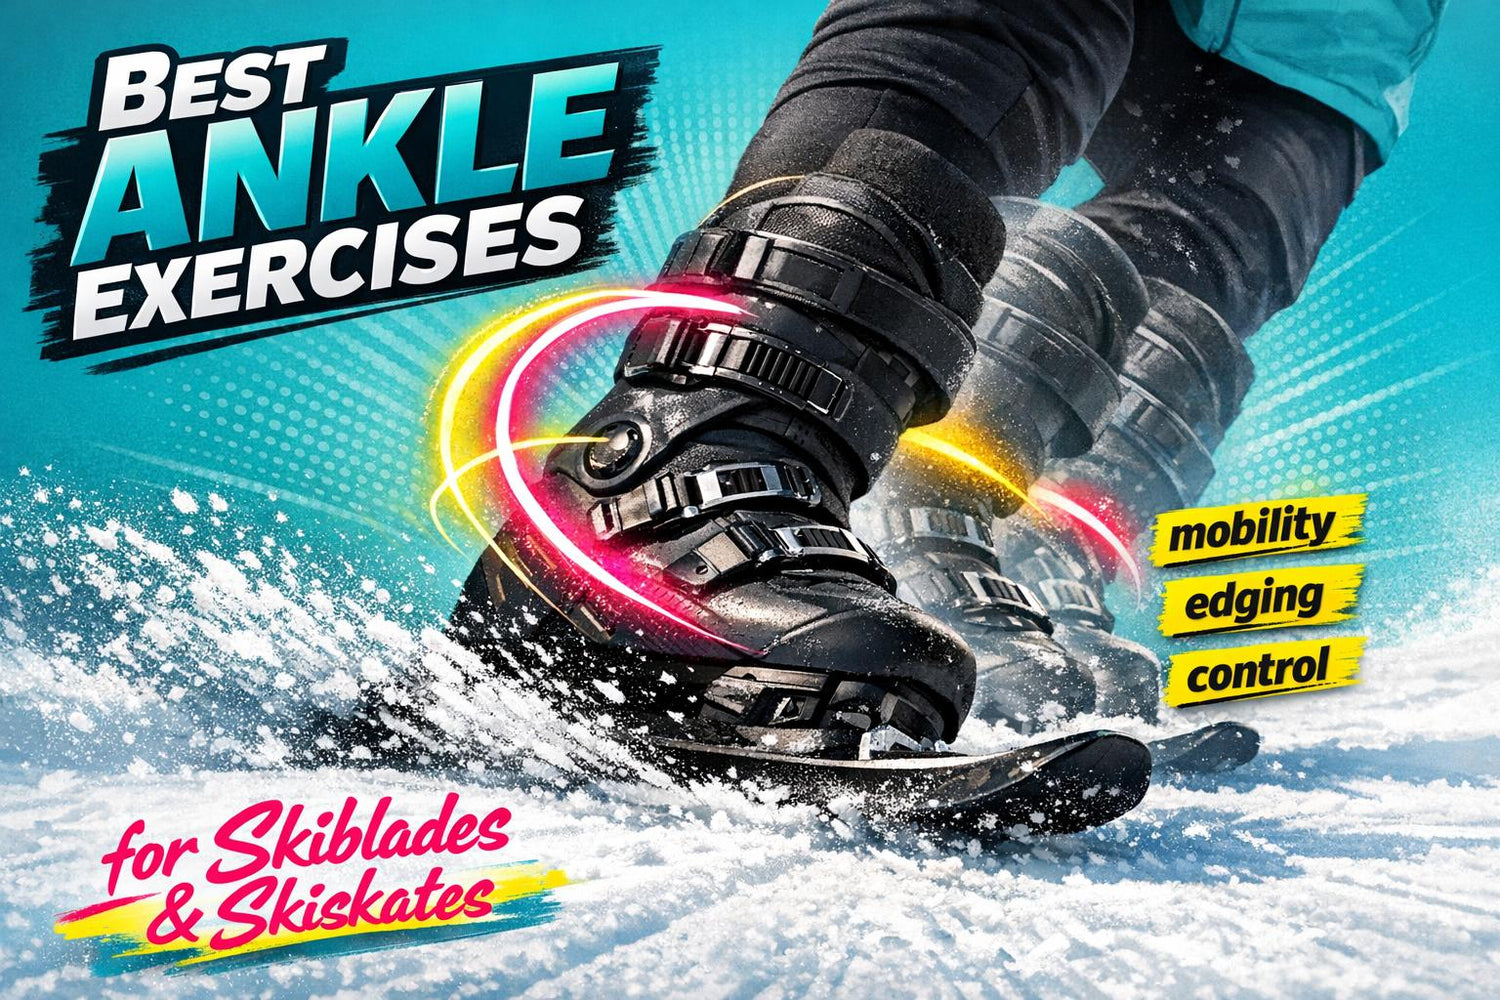
When you’re riding skiblades or skiskates, your ankles do most of the work. Unlike long skis, short skis demand constant ankle movement for balance, edging, and quick turns. Weak or stiff ankles can lead to poor control, fatigue, or even injury. The good news? Strengthening your ankles doesn’t take long - just a few weeks of consistent, targeted exercises can make a big difference.
Here’s a quick rundown of the top exercises to get your ankles slope-ready:
- Ankle Circles & Alphabet Tracing: Boost flexibility and joint mobility for smoother movements.
- Standing Calf Stretch: Loosen tight calves to improve your forward stance.
- Kneeling Dorsiflexion Rock: Increase forward ankle flexibility to avoid backseat stances.
- Anterior Tibialis Stretch: Prevent shin splints and maintain precise control.
- Dynamic Heel-Toe Walks: Train balance and weight shifts for edge control.
- Single-Leg Balance: Build stability and muscle activation for better turns.
- Single-Leg Calf Raises: Strengthen calf muscles for edging and push-offs.
- Lateral Band Walks: Improve side-to-side control for quick transitions.
- Resistance Band Drills: Target ankle strength in all directions.
- Skater Hops: Mimic on-snow movements for agility and power.
These exercises are simple, take just 10–15 minutes a few times a week, and can improve your control, balance, and confidence on short skis like Snowfeet Skiblades or Skiskates. Let’s dive into how each one helps you dominate the slopes.
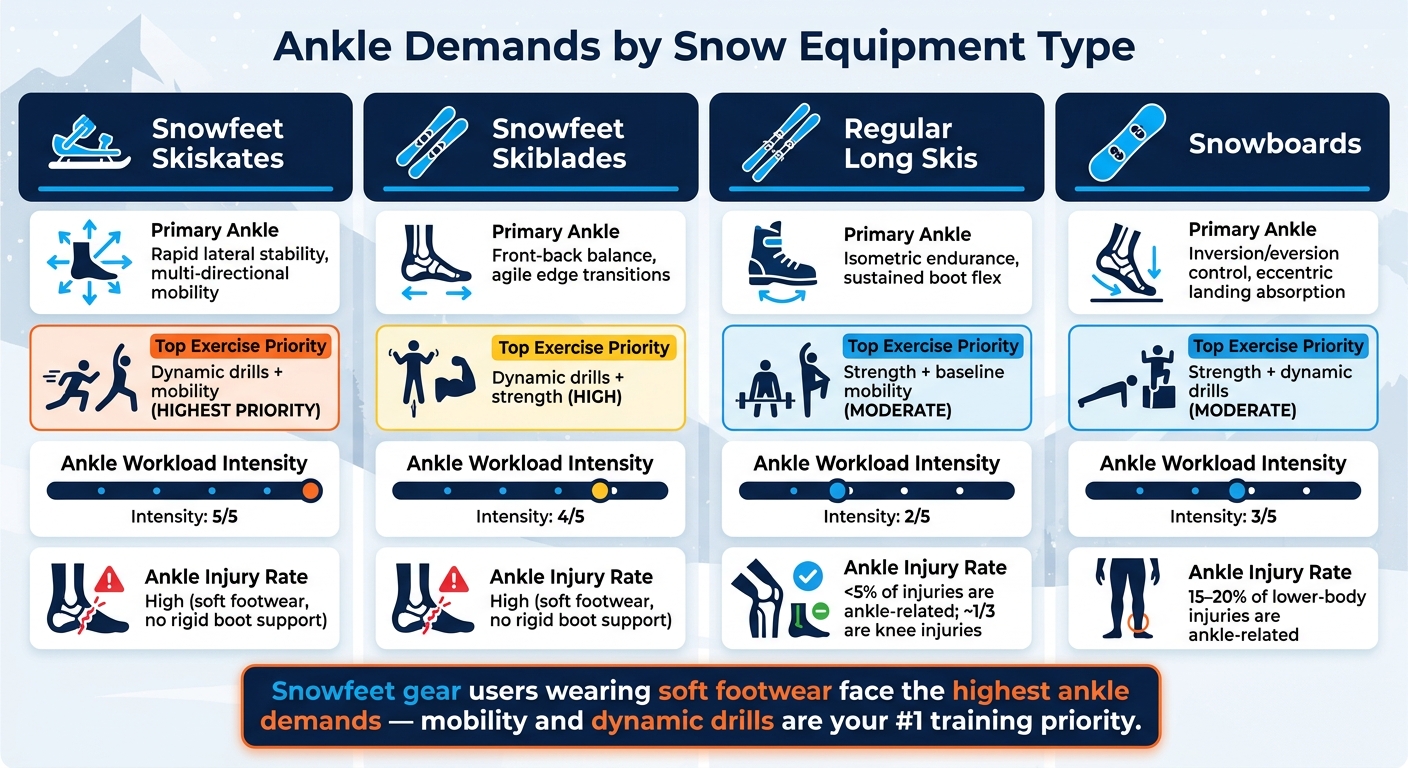
Ankle Demands by Snow Equipment: Skiblades vs Skiskates vs Skis vs Snowboards
1. Ankle Circles and Alphabet Tracing
This simple ankle exercise doesn’t require any fancy gear, but it packs a punch when it comes to prepping your joints for the demands of skiblades and skiskates. Ankle circles involve rotating your foot in a slow, controlled motion through its full range, while alphabet tracing has you "write" the alphabet in the air with your big toe. Both exercises help your ankles move freely and stay flexible, which is key for handling the quick adjustments needed on short skis.
Here’s how to do it: Sit down and lift one foot off the ground, keeping your knee steady. Slowly rotate your foot in a full circle, using only your ankle. Do 10–15 rotations in each direction for both ankles. Then, in the same position, use your big toe to trace every letter of the alphabet in the air - once per ankle.
Why does this matter? Well, as Snowfeet explains:
"Skiskates are a bit tricky because they're short, making it harder to stay balanced."
That balancing act? It all starts in your ankles. If your ankles are stiff, edging - an essential skill for short skis - becomes much harder. Ankle circles help by circulating synovial fluid, the natural lubricant for your joints, which reduces stiffness and preps your ankles for those quick, precise movements Snowfeet* gear demands.
Alphabet tracing takes it a step further. Each letter forces your ankle to move in a different direction, mimicking the unpredictable motions you’ll face on the slopes. Whether it’s catching an edge, adjusting mid-turn, or handling a bump in moguls, this exercise trains your ankles for better control and sharper reactions. The result? Stronger edge control and more confidence when riding on short skis.
2. Standing Calf Stretch Against a Wall
Tight calves can seriously mess with your balance on skiblades and skiskates. When your calf muscles are stiff, your ankles can’t flex forward properly. This makes it tough to hold that slightly forward-leaning stance that Snowfeet* emphasizes as key for controlling short skis. Luckily, this simple stretch can improve ankle mobility and help you nail that stance, setting you up for better edge control.
Snowfeet* riders, in particular, see big benefits from better ankle flexibility. It allows for a lower, more controlled stance, which is crucial on short skis.
Here’s how to do it: Face a wall and place both hands at chest height. Step one foot back, keeping the back heel flat on the floor and the back knee straight. Make sure both sets of toes point forward. Lean your hips toward the wall until you feel a stretch in the upper calf of your back leg. Hold for 20–30 seconds, breathe deeply, and repeat 2–3 times for each leg. Want to target the deeper soleus muscle? Slightly bend the back knee while keeping your heel down. This tweak focuses on the muscle that’s critical for maintaining a low, stable skiing stance.
Why is this important? Limited ankle flexibility (dorsiflexion) can increase your risk of injury. On short, nimble gear like skiskates, where you’re constantly shifting weight and reacting to uneven terrain, tight calves can force your ankle into awkward compensations. This leads to fatigue, awkward movements, and even strain. By committing to 30-second stretches, repeated 2–4 times, a few days a week, you can boost your flexibility. Even small gains of 2–5 degrees in range of motion can make a noticeable difference in how you handle terrain and shift weight edge-to-edge on Snowfeet* skiblades or skiskates.
Here’s a helpful tip: as you lean into the wall, think about how your shin moves forward when you flex into a turn. This mental connection makes the stretch feel purposeful, not just another part of your routine. Try doing this stretch before you clip in to loosen up and again after your session to relieve tightness.
3. Kneeling Dorsiflexion Rock (Knee-to-Wall Drill)
While the calf stretch works on the back of your ankle, this drill zeroes in on the front. Why is that important? Because it trains your shins to move forward over your foot - exactly what your ankle does when you flex into your boots, absorb bumps, or engage edges. This movement is key for better control with Snowfeet* skiblades and skiskates.
Here’s how to do it: Start in a half-kneeling position with one knee on a mat and your other foot flat on the floor, toes pointing straight ahead. Position your big toe about 2–4 inches from a wall. Slowly move your front knee toward the wall, keeping it aligned over your foot’s midline. Rock in and out of this motion without bouncing, and make sure your heel stays down. Do 2–3 sets of 10–15 reps per side, about 3–5 days a week.
Why does this matter for on-snow performance? Snowfeet* recommends a stance with a slight knee bend and forward lean. If your dorsiflexion is limited, your body compensates by hinging at the hips, which can throw you into the dreaded "back seat" position. That makes edge control harder and quick direction changes on agile gear like skiblades or skiskates more challenging. A 2015 study in the Journal of Strength and Conditioning Research backs this up, showing that reduced ankle dorsiflexion increases dynamic knee valgus and worsens landing mechanics in athletes.
Want to test yourself? Place your big toe 4 inches from a wall and see if your knee can touch it without your heel lifting. If not, move your foot closer and work in 0.5-inch increments over time.
This exercise builds the controlled ankle movement you’ll need for the more dynamic drills ahead.
4. Anterior Tibialis Stretch
After focusing on mobility and calf flexibility, it’s time to zero in on the anterior tibialis stretch. This muscle, located along the outer shin, plays a big role in lifting your foot - something that’s crucial when you’re dealing with the repetitive movements required by short skis like Snowfeet* skiblades and skiskates. Keeping this muscle in good shape is key for avoiding stiffness and maintaining precise foot control, which is a must for the quick adjustments these activities demand.
When the anterior tibialis tightens up, it can limit ankle flexibility and cause discomfort that radiates from the top of your foot to your big toe. It’s also a common culprit behind shin splints, or more specifically, anterior tibial stress syndrome, which tends to show up during high-repetition downhill activities.
Here’s how to stretch it: Kneel on a soft surface with your feet flat and toes pointed backward. This position moves your ankle into plantarflexion (toes pointing away from your shin), which stretches the anterior tibialis. Hold this stretch for 20–30 seconds on each side, repeating it 2–3 times. Want to take it further? While kneeling, turn the sole of your foot outward (eversion) for a deeper stretch.
Not a fan of kneeling? Try the seated version: Sit comfortably, point your toes away from your shin, and use your hand to gently press the top of your foot downward until you feel the stretch along the front of your lower leg.
"Stretching helps prevent muscle fatigue and subsequent strain on the tibia where muscles attach; strengthening muscles, like the tibialis anterior, helps control movement to reduce stress on the tibia." - StatPearls
One last tip: Avoid foam rolling directly on your shin bone. Stick to the muscle just to the outside of the tibia. And make sure your skiblade or skiskate bindings aren’t overly tight across the top of your foot - this can irritate the tibialis anterior.
5. Dynamic Heel-Toe Walks
Once you've worked on your mobility through stretches, it's time to bring your ankles to life with dynamic heel-to-toe walks. Here's how it works: step forward by landing on your heel, roll through your arch, and finish by pushing off with your toes. This movement isn't just about walking - it's about training the precise pressure shifts you'll need for Snowfeet*. With shorter skis, you're constantly adjusting your weight, and this drill helps you nail that.
The Snowfeet* team explains it like this:
"Stand straight and put your weight in the middle of your feet or on your heels. Keep your legs slightly bent and lean forward a bit. If you need to be more stable, put one foot in front of the other."
This exercise isn't just about balance; it builds ankle strength, coordination, and your awareness of foot position - what's called proprioception. Research backs this up: dynamic balance training can cut lower-limb injury risks by 20–50%, thanks to better ankle and knee control. For Snowfeet*, this means smoother pressure transfers and better performance on the slopes.
Here’s how to do it:
- Walk 20–40 feet in 2–4 sets, keeping each step slow and deliberate (about 2–3 seconds per step).
- Aim to do this 2–4 times a week. Stick with it, and in 4–6 weeks, you'll likely notice stronger, more stable ankles when you're on the snow.
Keep your knees slightly bent, your spine neutral, and your steps moderate - overstriding can mess with your balance and strain your calves. Once you're comfortable with the basics, level up by walking on a slight incline or adding diagonal steps to mimic turning. For an extra challenge, mix in single-leg calf raises to boost your dynamic control even further.
6. Single-Leg Balance with a Soft Knee
After warming up your ankles, it’s time to step up with some balance training. Single-leg balance with a soft knee is a great way to build the stability and body awareness you’ll need for handling short skis.
Here’s how to do it: Stand on one leg with your knee slightly bent - around 10–20° - and avoid locking it straight. Keep your hips level, your spine upright, and your weight centered over the middle of your foot. For extra stability, extend your arms out to the sides. Once you’re comfortable, place your hands on your hips for a tougher challenge. This "soft knee" stance mimics the athletic posture recommended by Snowfeet Store for riding:
"Keep your legs flexible, slightly bend your knees, and lean forward."
- Snowfeet Store
Why is this important? Skiblades and skiskates are short, typically between 15 inches (38 cm) and 39 inches (99 cm), so even minor ankle movements can drastically affect your balance and direction. Locking your knees shifts the strain to passive structures like ligaments, while a soft knee activates key muscles - your calves, tibialis, and hip stabilizers - helping you stay in control as you edge or absorb bumps. This exercise builds on the mobility and control you’ve already worked on in earlier drills.
To get the most out of this, aim for 20–30 seconds per leg, doing 2–3 sets. Focus on keeping your arch lifted and your knee aligned over your toes. A common mistake? Gripping the floor with your toes. Keep them relaxed to evenly distribute the load across your foot. Once you feel steady, close your eyes for 10–15 seconds or stand on a folded towel to mimic the unevenness of snow, adding an extra layer of challenge. Practice this 3–4 times a week, and many riders notice improved confidence on the slopes within 4–6 weeks.
sbb-itb-17ade95
7. Single-Leg Calf Raises
Let’s add some muscle to your balance work! Single-leg calf raises focus on strengthening your gastrocnemius and soleus - the two major calf muscles - while also engaging smaller stabilizing muscles like the tibialis posterior and peroneals. These muscles are key for plantarflexion (pushing your toes downward), which powers your push-off and maintains steady pressure on the edges of your skiblades or skiskates.
So, why go single-leg instead of double-leg? When using short skis - like Snowfeet* Skiskates, which are about 15 to 20 inches long (38–50 cm) - each leg often works independently to manage balance and edging. A double-leg calf raise divides the effort between both legs, which doesn’t match the demands of short skis. Single-leg raises, on the other hand, force your ankle stabilizers to work harder, controlling movement in all directions. This mimics real-life actions like carving, absorbing bumps, or pushing off during a skating stride.
Here’s how to do it: Stand near a sturdy support, lift one foot off the ground, and keep a slight bend in your knee. Slowly rise onto the ball of your foot over 2 seconds, pause at the top for 1 second, and then lower your heel back down over 3 seconds. Focus on the lowering phase - it’s where you’ll build the most strength. Keep your ankle aligned and your arch active to avoid rolling outward.
Start with 2–3 sets of 10–12 reps per leg, 2–3 times a week. Over 3–6 weeks, aim to progress to 3–4 sets of 12–15 reps, and add weight once you can easily hit 20 reps. For an extra challenge, try doing these on a step, letting your heel drop below the edge for a greater range of motion. These slow, controlled movements pair perfectly with your balance exercises to build stronger, more stable ankles.
Why does this matter? Strong calves make a big difference. They improve your ability to carve tighter arcs, boost edge grip when braking, and help prevent that dreaded back-seat stance caused by calf fatigue. For short, nimble gear like Snowfeet* Skiblades and Skiskates, this kind of targeted strength is essential because each leg has to work independently - unlike with traditional skis. And there’s science to back it up: a study found that adding single-leg heel raises to a training program significantly improved dynamic balance scores on the Star Excursion Balance Test in just six weeks. That’s a game-changer for anyone riding agile, short-platform equipment like Snowfeet* Skiblades or Skiskates.
8. Lateral Band Walks and Ankle Eversion
Single-leg calf raises are great for building calf strength, but if you want better side-to-side control for quick transitions on Snowfeet* Skiblades or Skiskates, lateral band walks and ankle eversion drills are the way to go. These exercises focus on lateral stability, which is key for precise edge transitions.
Lateral band walks are a powerhouse move for strengthening the gluteus medius, hip abductors, and peroneal muscles. These muscles play a big role in preventing your ankles from rolling inward. Interestingly, studies show that athletes with chronic ankle instability often have 10–20% less peroneal evertor strength compared to those without injuries. That’s a big deal when you're on short skis, where even a tiny ankle misalignment can throw you off balance.
Here’s how to do lateral band walks:
- Place a mini resistance band around your ankles (not above your knees, as that shifts the focus away from your ankles).
- Stand in a slight squat position with your knees bent and hips pushed back, mimicking a skiskating stance.
- Step sideways in small, controlled movements - about hip-width apart. Keep your toes pointed forward and your knees aligned over your middle toes.
- Don’t let your feet snap together; maintain tension in the band the entire time.
- Move slowly and deliberately to fully engage your outer ankle and hip muscles.
Aim for 2–3 sets of 10–15 steps in each direction.
Next, add banded ankle eversion to your routine. Here’s how:
- Anchor a resistance band to something sturdy on the inside of your foot and loop it around your forefoot.
- Slowly turn your foot outward against the band’s resistance while keeping your lower leg still.
- Control the return movement (the eccentric phase) to build strength and resilience against ankle rolling.
Go for 2–3 sets of 12–15 reps per foot, every other day.
Since Snowfeet* Skiblades and Skiskates are shorter and more responsive than traditional skis, they demand quick and precise lateral movements. Strengthening your outer-ankle and hip-abductor muscles helps you stay balanced over your edges, whether you're carving tight turns, recovering from unexpected terrain, or making rapid direction changes.
9. Resistance Band Dorsiflexion and Inversion/Eversion
If you're already doing lateral band walks, this exercise takes things up a notch by focusing on all three key ankle movements - dorsiflexion, inversion, and eversion. While lateral band walks strengthen side-to-side motion, this drill gives your ankles a complete workout.
Here’s a quick breakdown: dorsiflexion is when you pull your toes toward your shin, inversion involves rotating the sole of your foot inward, and eversion is when the sole rotates outward. Together, these motions cover the full range of what your ankles do while riding Snowfeet* Skiblades or Skiskates.
How to Perform the Exercise
- Dorsiflexion: Sit with one leg extended. Wrap a light resistance band around the ball of your foot, anchoring the other end in front of you so the band pulls your foot downward. Pull your toes toward your shin, hold for 1–2 seconds, then slowly release over 2–3 seconds. This controlled return phase is key for building shin endurance and balance.
- Inversion and Eversion: Anchor the band to the outside of your foot (for inversion) so it pulls outward. Rotate your sole inward against the band’s resistance. For eversion, switch the band to the inside of your foot and rotate the sole outward. Move slowly and keep your knee steady to isolate the ankle.
Aim for 2–3 sets of 10–12 reps per direction, per leg, and try to do this 3–4 times a week.
Why It Matters for Snowfeet* Skiblades and Skiskates

Snowfeet* Skiblades and Skiskates are super responsive - way more than traditional skis. Even small movements in your ankles can steer or adjust your balance. Strong dorsiflexors keep you centered and forward in your stance, while good inversion and eversion strength help you maintain clean edges and recover quickly if you hit an unexpected bump or rut.
Start with a light resistance band to ensure smooth, controlled movement through the full range. As you get stronger, you can make it harder by extending the lowering phase to 3–4 seconds or by stepping further from the anchor point.
10. Skater Hops Side to Side
Skater hops are a great way to mimic the side-to-side movements you'd make with Snowfeet* Skiblades or Skiskates - basically, it’s like practicing skiskating without the snow.
This exercise builds on earlier ankle stabilization drills but steps things up by challenging your balance while moving dynamically. Here’s how to do it: start in an athletic stance with your knees slightly bent. Jump laterally from your right foot to your left, landing softly on your left leg while your right leg sweeps slightly behind you, just like a speed skater. Then, push off explosively to return to the starting position. The trick? Absorb the landing with a bent knee and relaxed ankle rather than landing stiff-legged. Begin with shorter hops (2–3 feet) and only increase the distance once you can land steadily.
Why does this matter for short skis? Because this drill hits three key areas:
- Ankle power: Each push-off strengthens the muscles you need for quick edge transitions on Snowfeet* Skiskates.
- Lateral stability: Every single-leg landing forces your ankle to stay steady, helping you maintain control while carving.
- Quick foot response: The fast, repetitive movements train your nervous system to handle edge changes, bumps, or uneven snow with ease.
Fun fact: Studies show that lateral plyometric jumps can boost change-of-direction speed by 2–5% and lower the risk of leg injuries by 30–50%.
To get started, aim for 2–3 sets of 8–10 hops per side, with 45–60 seconds of rest between sets, and do this 2–3 times a week. Feeling stronger? Try "speed skater" intervals: hop continuously for 20 seconds, rest for 40 seconds, and repeat for 4–6 rounds. If single-leg landings feel too wobbly, start with lateral step-throughs or two-leg landings until your ankle control improves.
Ankle Demands: Snowfeet* Skiblades, Skiskates, and Regular Skis Compared
Now that we’ve covered key ankle exercises, let’s dive into how different snow gear impacts your ankles. Whether you’re using Snowfeet* Skiblades, Skiskates, or traditional skis, each piece of equipment places unique demands on your joints. And understanding these differences highlights why Snowfeet* training routines are so important.
Snowfeet* Skiblades and Skiskates: Precision and Quick Responses
Snowfeet* Skiblades and Skiskates are all about agility. Their shorter design means your ankles need to be on point - every edge change, bump, or sharp turn requires quick, precise adjustments. Unlike longer skis, there’s no extra length to help smooth out mistakes, so your ankles are doing most of the work.
What makes it even more challenging? Many Snowfeet* users wear regular winter shoes or snowboard boots, which don’t offer the stiff support of alpine ski boots. This softer footwear means your ankles have to work even harder to maintain balance and control. As the Snowfeet* FAQ explains:
"You have to keep the front-back balance, so it feels very natural to those who play ice hockey, ice skate, or even use inline skates."
This is why dynamic drills and ankle mobility exercises are a must for Snowfeet* users.
Traditional Skis: More Support, Less Ankle Stress
With traditional long skis, the story changes. Stiff alpine ski boots limit ankle movement, shifting the workload to your knees and hips instead. This is why knee injuries make up about one-third of alpine skiing injuries, while ankle injuries account for less than 5%. The boots do a great job protecting your ankles, but they also restrict motion, so your training focus shifts to maintaining enough dorsiflexion to stay forward in the boot and building calf endurance for those long downhill runs.
Snowboards: Linked Movement and Lateral Forces
Snowboards fall somewhere in between. Since both feet are strapped to one board, your ankles don’t move independently. Instead, they work together to control inversion and eversion (side-to-side tilting). Snowboarders also face high eccentric loads, especially during landings and traverses, which explains why ankle injuries account for 15–20% of all lower-body injuries in snowboarding - much higher than in alpine skiing.
Comparing Ankle Demands Across Equipment
Here’s a quick breakdown of the primary ankle demands for each type of gear and the exercises that will help you the most:
| Equipment | Primary Ankle Demand | Top Exercise Priority |
|---|---|---|
| Snowfeet* Skiskates | Rapid lateral stability, multi-directional mobility | Dynamic drills + mobility (highest priority) |
| Snowfeet* Skiblades | Front-back balance, agile edge transitions | Dynamic drills + strength |
| Regular long skis | Isometric endurance, sustained boot flex | Strength + baseline mobility |
| Snowboards | Inversion/eversion control, eccentric landing absorption | Strength + dynamic drills |
Key Takeaway
If you’re using Snowfeet* gear, especially with softer footwear, mobility and dynamic drills should be at the top of your training list. Strength exercises are important too, but focusing on movements that mimic skiskating - like skater hops, lateral band walks, and single-leg balance drills - will give you the best results on the snow.
Conclusion
Your ankles play a huge role in every sharp turn and smooth landing when using skiblades or skiskates. With Snowfeet* gear, ankle strength becomes even more important because every tiny movement you make translates directly to the snow.
By sticking to the exercises outlined earlier for just 10–15 minutes, 3–4 times a week, you can see real progress in as little as 4–6 weeks. Many riders notice less ankle fatigue and improved control within 2–3 weeks, with bigger gains showing up around the 6–8 week mark. The result? Every ride feels smoother and less tiring.
Before hitting the slopes, take a few minutes to warm up your ankles. This is especially important for the quick, skate-like motions that Snowfeet* gear requires - whether you're wearing snowboard boots or regular winter shoes instead of rigid alpine ski boots. These exercises not only help with safety but also make your rides more fun and give you a level of control that traditional skis and snowboards, with their stiff boot setups, just can't offer.
As Brad Tolin, a Snowfeet* fan, shared:
"These ski blades are a blast to use. Super easy to control, quick to turn, and way more forgiving than traditional skis."
Strengthening your ankles won’t just help prevent injuries like sprains or shin pain - it’ll make every run more enjoyable. Stick to the exercises, stay consistent, and you'll feel the difference as soon as you hit the snow.
FAQs
How can I tell if limited ankle mobility is affecting my skiblade or skiskate control?
If you're finding it hard to tilt your ankles just right to engage the edges of your Snowfeet* skiskates or skiblades, limited ankle mobility might be the culprit. Proper edge control comes from precise ankle tilts - not leaning your whole body. Unlike stiff traditional ski boots that can limit movement, Snowfeet* are made to respond smoothly to natural ankle rolls. Still struggling? Switching to snowboard boots could help. They offer extra support while keeping the flexibility you need.
Which 2–3 ankle exercises give the fastest results for Snowfeet* users?
To get your ankles ready for Snowfeet*, try these three simple exercises:
- One-foot balance drills: Practice gliding on one foot for 5–10 seconds. This helps improve your stability, which is key for moves like crossovers and pivots.
- Calf raises: Strengthen the muscles around your ankles to give them better support.
- Air squats: Boost your leg strength to improve edge control and balance.
These exercises can make a big difference in your precision and agility, especially compared to using longer skis.
Can I do these ankle drills if I’ve had ankle sprains or shin splints?
If you’ve dealt with ankle sprains or shin splints in the past, it’s a good idea to check in with a medical professional before jumping into snow sports. Once you’re cleared, focus on gear that provides solid support. Snowfeet* products, especially when paired with snowboard boots, offer greater ankle stabilization compared to stiff, traditional ski equipment. Paying attention to proper ankle positioning and keeping your weight centered can not only help strengthen your ankles but also improve your control and lower the chances of re-injury while you’re out enjoying the slopes.


Laat een reactie achter
Deze site wordt beschermd door hCaptcha en het privacybeleid en de servicevoorwaarden van hCaptcha zijn van toepassing.